About This Succulent Turtle Amigurumi Pattern
This Succulent Turtle pattern is a delightful fusion of two beloved themes - adorable turtles and trendy succulents! What makes this pattern special is the innovative technique of working in back loops only to create unworked front loops, which then become the foundation for your dimensional succulent top. The pattern uses super bulky chenille yarn that gives your turtle a soft, plush texture that's irresistible to touch. With careful color changes between Agave, Sand, and Terracotta, you'll create beautiful depth and realistic plant-inspired tones that make this piece truly stand out.
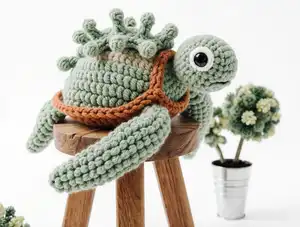
The construction method attaches all the limbs and tail directly into the body rounds, eliminating excessive sewing and creating a sturdy finished piece. The succulent leaves are formed using a combination of half double crochet, double crochet, and treble crochet stitches with chain peaks, resulting in 16 beautiful dimensional leaves that truly capture the essence of a real succulent plant.
Why You'll Love This Succulent Turtle Amigurumi Pattern
I absolutely love how this pattern combines two of my favorite things into one adorable creation! The succulent turtle is such a unique concept that stands out from typical amigurumi designs. I'm particularly fond of how the back loop only technique creates those perfect unworked loops for the succulent - it's such a clever construction method that makes the dimensional leaves possible. The use of super bulky yarn means this project works up relatively quickly compared to standard amigurumi, so you get that satisfying finished product without spending days on tiny stitches. Plus, there's something so charming about a turtle carrying a little garden on its back - it's whimsical, it's creative, and it makes people smile every time they see it. The chunky texture of the chenille yarn adds an extra cozy, huggable quality that makes this turtle perfect for display or cuddling!
Switch Things Up
I love experimenting with different color combinations for this succulent turtle! Instead of the earthy Agave and Sand tones, I've tried making a pastel version with soft pink for the shell and mint green for the succulent - it gives such a sweet, dreamy vibe that's perfect for nursery decor. You could also go bold with jewel tones like deep purple for the body and bright coral for the succulent leaves.
Another fun modification I enjoy is adjusting the succulent style itself. Instead of the standard leaf pattern, I sometimes make smaller, tighter leaves by reducing the chain spaces and stitch heights, which creates a more compact rosette succulent look. Or go wild and make longer, more dramatic leaves by adding extra chains and treble stitches!
Size variations are super fun too - I've made tiny keychain versions using sport weight yarn and a 2.5mm hook, and giant floor cushion versions with jumbo yarn and a 12mm hook. Each size has its own charm! The mini ones make adorable gifts or bag charms, while the large ones become beloved room decorations.
For a more realistic touch, I sometimes add a subtle color gradient to the succulent leaves by working the first few rounds in a darker green and gradually switching to lighter shades as I work outward. This mimics how real succulents often have darker centers and lighter tips. You can also add tiny French knots in contrasting colors at the base of leaves for flower bud details!
Common Mistakes & How to Fix Them
✗ Forgetting to place stitch markers in the front loops when working back loops only, which makes it difficult to find them later for the succulent
✗ Pulling the succulent leaf stitches too tight, which flattens the dimensional effect - keep tension loose for fuller, more realistic leaves
✗ Attaching limbs and tail without checking placement first, resulting in an unbalanced turtle - always pin pieces in place before securing them permanently
✗ Overstuffing the body which distorts the shell shape and makes the succulent sit awkwardly - stuff firmly but not so tight that it loses its natural form