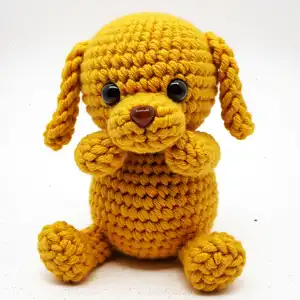
Create your own adorable golden puppy companion with this sweet amigurumi pattern! This charming dog friend features outstretched paws ready for a hug, floppy ears, and an endearing expression that will melt your heart. Perfect for dog lovers and amigurumi enthusiasts alike, this pattern guides you through crafting a cute puppy that sits at approximately 9cm tall. With detailed instructions for the head, body, ears, tail, and paws, you'll bring this lovable canine to life stitch by stitch.
Progress Tracker
0% Complete
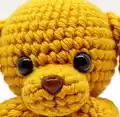
— Muzzle :
Info :
Make this first, you need it to help place the eyes when making the head
Row 1 :
7ch, 2dc into 2nd ch from hook, dc in next 4 dc, 5 dc in last ch, working in the back loops of the chain, dc in each of the next 4 loops, 3dc in last loop (which is the back of the first chain you used, where you put the 2dc). You now have 18 dc around an oval. Slip stitch into the first dc of the row to join the ring.
Row 2 :
2dc in the same place as the joining stitch, dc in each of next 6 dc, 2dc in next dc, dc in next dc, 2dc in next dc, dc in each of next 6 dc, 2dc in next dc, dc in next dc, join as before. (22 stitches)
Row 3 :
In the back loops of each stitch only, dc into each dc, join (22)
Row 4-5 :
dc into each dc (22)
Info :
Pull thread through, leaving a long end to sew the muzzle onto the head. Put the nose, if you are using one, in the middle of one long side just above the edge formed by working into the back loops only. Stuff - you may need to add stuffing once you have most of this sewn to the head.
— Head :
Row 1 :
6 dc into a magic ring
Row 2 :
2dc into each dc (12 stitches)
Row 3 :
(1dc, 2dc in next dc) x 6 (18)
Row 4 :
(2 dc, 2dc in next dc) x 6 (24)
Row 5 :
(3 dc, 2dc in next dc) x 6 (30)
Row 6 :
(4 dc, 2dc in next dc) x 6 (36)
Row 7 :
(5 dc, 2dc in next dc) x 6 (42)
Row 8 :
(6 dc, 2dc in next dc) x 6 (48)
Rows 9-15 :
1dc in each dc to end (48) - that's 6 rows without shaping
Row 16 :
(6 dc, dec) x 6 (42)
Row 17 :
(5 dc, dec) x 6 (36)
Row 18 :
(4 dc, dec) x 6 (30)
Row 19 :
(3 dc, dec) x 6 (24)
Row 20 :
(2 dc, dec) x 6 (18)
Info :
Place the muzzle so that it sits between row 12 and about row 18 and sew it in place. Put the safety eyes in just above and either side of it as shown, between rows 11 and 12 about 5 stitches apart. Stuff the head.
Row 21 :
(1 dc, dec) x 6 (12)
Info :
Cut yarn, leaving a long tail for sewing to the body. No need to pull the stitches tight, but you can if you like.
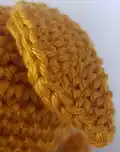
— Ears :
Row 1 :
6 dc into a magic ring
Row 2 :
2dc into each dc (12 stitches)
Row 3 :
(1dc, 2dc in next dc) x 6 (18)
Row 4 :
(2 dc, 2dc in next dc) x 6 (24)
Row 5 :
(3 dc, 2dc in next dc) x 6 (30)
Row 6 :
(4 dc, 2dc in next dc) x 3 - do not finish the row (33)
Info :
Leave a tail to sew on, make another one. Fold in half, so that the side you have done the half-row more on sits against the other side, and stitch through the places you would put your hook to sew together, so that the tops of the row still show and the ear is quite flat. Stitch to the head between about the 6th and 8th rows, just about half way back with the seam facing forwards.
— Body :
Row 1 :
6 dc into a magic ring
Row 2 :
2dc into each dc (12)
Row 3 :
(1dc, 2dc in next dc) x 6 (18)
Row 4 :
(2 dc, 2dc in next dc) x 6 (24)
Row 5 :
(3 dc, 2dc in next dc) x 6 (30)
Row 6 :
(4 dc, 2dc in next dc) x 6 (36)
Rows 7-12 :
dc into each dc (36) - that's 6 more rows straight
Row 13 :
(4 dc, dec) x 6 (30)
Row 14 :
dc into each dc (30)
Row 15 :
(3 dc, dec) x 6 (24)
Row 16 :
dc into each dc (24)
Info :
Leave a long end, stuff and sew to the head around the 19th row (which also has 24 stitches, so you can sew stitch to stitch if you like). Don't overstuff, or the base will be too round for your puppy to sit neatly without falling over all the time.
— Tail :
Row 1 :
3 dc into a magic ring
Row 2 :
2dc in each dc (6 stitches)
Rows 3-11 :
dc into each dc (6 stitches) - that's 9 rows without shaping
Info :
Leave an end for sewing. Flatten the very end where you finished, and stitch just that row to the back of the dog, around row 6 of the body.
— Front Paws :
Row 1 :
6 dc into a magic ring
Row 2 :
(1dc, 2dc in next dc) x 3 (9)
Rows 3-6 :
dc in each dc to end (9) - that's 4 rows
Info :
Leave an end for sewing, make a second one, stitch to body either side of where the nose droops between about rows 12 and 15, 5 stitches visible between them.
— Back Paws :
Row 1 :
6 dc into a magic ring
Row 2 :
(1dc, 2dc in next dc) x 3 (9)
Rows 3-5 :
dc in each dc to end (9) - that's 3 rows
Info :
Leave an end for sewing, make a second one, stitch them to the body between rows 4 and 7 right at the bottom of the front with only one stitch or so showing between them.
This charming Puppy Dog Friend pattern brings together simple amigurumi techniques and thoughtful design to create an absolutely huggable companion! With outstretched paws ready for cuddles and a sweet golden face, this little dog captures the pure joy and loyalty that makes puppies so beloved. The pattern encourages creativity with suggestions for customization, allowing you to adjust proportions and poses to make your puppy truly one-of-a-kind. Whether you're crafting for yourself or as a heartfelt gift, this adorable pup is sure to bring smiles and warmth wherever it goes. 🐶 Happy crocheting! 🧶✨