🧶 Beautiful ✨ Detailed 💝 Adorable

Sol&Luna Boho Lantern Crochet Pattern

Sol&Luna Boho Lantern Crochet Pattern
4.8★ Rating
8-12 Hours Time Needed
2.8K Made This
✂️

Beginner Friendly Level

Perfect for those just starting their sewing journey, with clear instructions and simple techniques

⏱️

All-Day Adventure

Requires 8-10 hours, ideal for a full day of immersive knitting.

🏡

Cozy Accent

A warm touch for your space that transforms ordinary corners into inviting nooks filled with handmade charm.

About This Sol&Luna Boho Lantern Crochet Pattern

The Sol&Luna Boho Lantern is a versatile home decor project that brings bohemian elegance to any space. This pattern features a unique wave-like construction using multiple rings that creates a stunning visual effect. The flexible design adapts to any ring size and yarn type, making it perfect for both indoor and outdoor decoration. When illuminated with fairy lights, the lantern casts beautiful shadows and creates an enchanting atmosphere.

Sol&Luna Boho Lantern Crochet Pattern crochet pattern - detailed view of completed project

This lantern pattern is beginner-friendly with detailed step-by-step instructions for each component. The modular design allows you to customize the length and add optional decorative patterns between rings for a truly unique creation.

Why You'll Love This Sol&Luna Boho Lantern Crochet Pattern

I absolutely love this pattern because it's so forgiving and customizable! You can make it as long or as short as you want, use any yarn you have in your stash, and the results always look professionally crafted. The way the rings create that beautiful flowing shape is mesmerizing, and when you add lights inside, it transforms into something truly magical. I also appreciate that there are optional pattern variations included, so you can make each lantern unique. It's the perfect project for those evenings when you want to create something beautiful without following strict stitch counts.

Sol&Luna Boho Lantern Crochet Pattern step 1 - construction progress Sol&Luna Boho Lantern Crochet Pattern step 2 - assembly progress Sol&Luna Boho Lantern Crochet Pattern step 3 - details and accessories Sol&Luna Boho Lantern Crochet Pattern step 4 - final assembly and finishing

Switch Things Up

I love experimenting with different yarn weights and colors to create unique variations of this lantern. Try using a gradient yarn that shifts colors as you work through the rounds - it creates a stunning ombre effect that looks amazing when lit. You could also mix different textures by alternating between smooth cotton and rustic jute for an eclectic bohemian vibe.

For a more modern look, consider using metallic gold or copper rings instead of natural wood, paired with sleek white or gray yarn. During the holidays, switch to festive colors like deep red and forest green with gold accents. I've even made mini versions using 10cm rings and fingering weight yarn for adorable tea light holders.

Don't be afraid to play with the optional patterns - combining both pattern styles in the same lantern creates beautiful textural interest. You can also vary the number of pattern rounds between rings to create asymmetrical designs. For outdoor lanterns, I recommend using weather-resistant acrylic yarn that won't fade in the sun or get damaged by moisture.

Common Mistakes & How to Fix Them

✗ Crocheting too tightly around the rings makes subsequent rounds difficult to work - keep your tension loose and comfortable ✗ Not counting stitches after increase and decrease rounds can result in a misshapen lantern - always verify your stitch count ✗ Using rings of different diameters creates an unbalanced appearance - ensure all rings are the same size before starting ✗ Skipping the penultimate half double crochet round before each ring leads to improper shaping and tight connections ✗ Forgetting to push stitches to the top of flat wooden rings causes twisted construction - always position stitches correctly ✗ Cutting fringe strands too short means you cannot trim them evenly - always cut double the desired finished length

Sol&Luna Boho Lantern Crochet Pattern

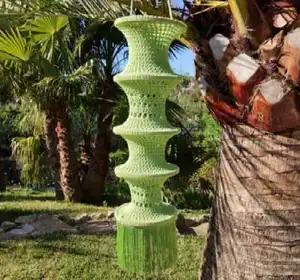
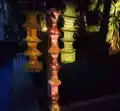
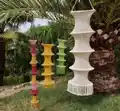
Create a stunning bohemian-style lantern that transforms any space with its unique circular design. This versatile pattern works with any ring size and yarn weight, allowing you to customize your lantern to perfectly match your garden or home decor. The characteristic wave-like shape is achieved using wooden or metal rings, and when paired with fairy lights, it creates a magical ambient glow perfect for cozy evenings.

Beginner Friendly 8-12 Hours

Materials Needed for Sol&Luna Boho Lantern Crochet Pattern

— Main Fabric

  • 01
    Jute yarn (e.g., Mondial Juta, 100g/65m) - approximately 500-600g for 5 rings of 26cm diameter
  • 02
    Cotton yarn (e.g., Lana Grossa Star, 50g/90m) - approximately 350-400g for 5 rings of 20cm diameter
  • 03
    Macramé yarn (3mm cotton) - approximately 3-4 balls of 300m each for 5 rings of 50cm diameter
  • 04
    Any type of yarn: jute, cotton, or macramé that suits your project needs

— Tools Required

  • 01
    Wooden or metal rings (minimum 3, preferably 5-6 or more, all same diameter)
  • 02
    Crochet hook (half size larger than yarn recommendation)
  • 03
    Scissors
  • 04
    Measuring tape
  • 05
    Stitch markers
  • 06
    Darning needle for sewing
  • 07
    Fairy lights (solar or battery-operated, optional)
  • 08
    Chain or cord materials for hanging

Progress Tracker

0% Complete

— First Ring :

Step 1 :

Crochet an even number of single crochet stitches around the ring until you can join the last stitch with the first without stretching

Step 2 :

Join with a slip stitch to the first single crochet

Info :

Do not crochet too tightly - maintain comfortable spacing. If using flat wooden rings, push all stitches to the top of the ring after joining

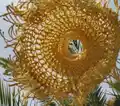
— Rounds Between Rings :

Round 1 :

Work one half double crochet in each stitch around the outside of the ring. Mark starting point with stitch marker

Round 2 (Decrease) :

Work in spiral rounds, crocheting two stitches together throughout (yarn over, insert hook in first stitch, yarn over, insert hook in second stitch, yarn over = 4 loops, yarn over and pull through all loops). Number of stitches is halved

Following Rounds :

Continue in spiral rounds using your chosen basic pattern: half double crochet or double crochet until reaching the penultimate round before next ring

Info :

Maintain same number of rounds between each ring. Recommended distance between rings: approximately 3/4 of the ring diameter (e.g., 15cm for 20cm rings, 19.5cm for 26cm rings)

Penultimate Round :

Work half double crochet in every stitch

Last Round (Increase) :

Work two half double crochets in every stitch to double the number of stitches

— Optional Pattern #1 :

Round 1 :

Alternate one double crochet with one chain stitch

Round 2 :

Half double crochet in each stitch including chains from previous round

Info :

Repeat rounds 1 and 2 as desired. Best suited for half double crochet basic pattern. Work same number of basic rounds after pattern before next ring

— Optional Pattern #2 :

Round 1 :

Work 2 double crochets into one stitch, skip next stitch - repeat to end of round

Round 2 :

Work 2 double crochets into each gap between 2 double crochets of previous round

Info :

Repeat rounds 1 and 2 as desired. Best suited for double crochet basic pattern. Work same number of basic rounds after pattern before next ring

— Second and Following Rings :

Step 1 :

Insert hook into a stitch before grabbing yarn on inside of ring, creating 2 loops on hook

Step 2 :

Yarn over on outside of ring and pull through both loops to create single crochet

Step 3 :

Continue working single crochets around ring, join last stitch to first with slip stitch

Info :

Do not crochet too tightly. Push stitches to top if using flat wooden rings, then continue crocheting around outside to the left

Step 4 :

Repeat rounds between rings as described previously until reaching next ring

— Optional Finishing Rounds :

Round 1 :

Half double crochet throughout, crocheting two stitches together to reduce number by half

Round 2 :

Half double crochet throughout, alternating one normal stitch with two stitches together

Info :

Repeat rounds 1 and 2 alternately until top opening is closed to desired size. Useful for attaching fairy lights or solar panel

— Hanging Cord :

Step 1 :

Start with 3 chain stitches, work 1 single crochet into first chain

Step 2 :

Turn cord toward you so two side loops are facing you

Step 3 :

Work 1 single crochet into the two loops on the side, continue until cord reaches desired length

Info :

Crochet as loosely as possible to make inserting hook easier. Sew finished cord to top ring or optional finishing rounds

— Fringes :

Preparation :

Cut yarn strands twice as long as desired fringe length. Recommended fringe length: approximately half the distance between rings

Quantity :

For dense fringe, cut approximately 3 times as many strands as stitches on bottom ring

Attachment :

Fold 3 strands in half, pull loop through stitch with hook, pull loose ends through loop and tighten

Info :

Allow fringes to hang for a while before trimming with very sharp scissors. Alternatively, attach ready-made fringe border

Assembly Instructions

  • Work around first ring with single crochets, joining last stitch to first with slip stitch
  • Complete decrease rounds and spiral rounds between each ring section following pattern instructions
  • Attach each subsequent ring by inserting hook into stitches before grabbing yarn inside ring
  • Ensure all rings are positioned with stitches pushed to top if using flat wooden rings
  • Add optional decorative pattern rounds if desired, maintaining consistent spacing between rings
  • Complete optional finishing rounds at top to decrease opening for light attachment
  • Crochet and sew hanging cord securely to top ring or finishing rounds
  • Attach fringes to bottom ring by folding bundles and pulling through stitches, allow to hang before final trimming

Important Notes

  • 💡Always use an even number of stitches when crocheting around the first ring to ensure proper joining
  • 💡Count stitches after each decrease and increase round to maintain proper lantern shape
  • 💡Maintain consistent tension throughout - avoid crocheting too tightly around rings
  • 💡Keep the same number of rounds or distance in centimeters between all rings for balanced appearance
  • 💡Use crochet hook half size larger than yarn recommendation for proper drape and texture
  • 💡Allow fringes to hang before trimming to ensure even length with gravity's effect
  • 💡Consider using heavier weight yarns like jute or macramé for larger ring diameters (25cm+) for better structure

This beautiful Sol&Luna Boho Lantern pattern brings handcrafted bohemian charm to any space, whether hung in your garden or displayed indoors. The versatile design adapts to your personal style with customizable ring sizes, yarn choices, and optional decorative patterns. When illuminated with fairy lights, it creates a warm, enchanting ambiance perfect for relaxing evenings. The beginner-friendly instructions make this an achievable project that yields professional-looking results. 🏮✨ Happy crocheting! 🧶

You ask,

we answer.

FAQs

Can I use different sized rings for the same lantern?

It's recommended to use rings of the same diameter throughout the lantern to maintain a balanced, harmonious shape. Different sized rings will create an uneven appearance.

How do I calculate the distance between rings?

A good rule of thumb is to make the distance approximately 3/4 of the ring diameter. For example, 20cm rings should have about 15cm between them (20÷4=5, then 5×3=15cm).

Should I use half double crochet or double crochet for the basic pattern?

Half double crochet creates a denser structure requiring more rounds, while double crochet creates a more open structure and works up faster. For heavy yarns like jute or macramé, double crochet is recommended so the lantern drapes nicely.

What type of lights work best inside the lantern?

Solar or battery-operated fairy lights with transparent or white cables work best. You can also use fine wire lights with mini-LEDs that can be completely hidden inside the lantern structure.

How many rings do I need for a complete lantern?

The pattern recommends a minimum of 3 rings, but preferably 5, 6, or more rings depending on your desired lantern length and visual impact.

Why is my lantern twisting or not hanging straight?

This usually happens when crocheting too tightly around the rings or not pushing stitches to the top of flat wooden rings. Ensure even tension and proper stitch positioning throughout.

Can I make this pattern without fringes?

Yes, fringes are optional. You can finish the bottom ring without them, or use a ready-made fringe border in any color as an alternative.