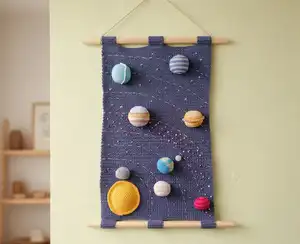
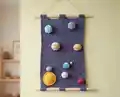
Create a stunning educational wall hanging featuring our solar system with this detailed crochet pattern. This beautiful décor piece includes all eight planets, the Sun, and Moon, complete with intricate details like Saturn's rings and Earth's continents. Perfect for nurseries, classrooms, or any space lover's room, this pattern combines functional art with astronomical accuracy. The finished piece measures approximately 28x42 cm and features removable planets attached with Velcro, making it both decorative and interactive for learning.
Progress Tracker
0% Complete
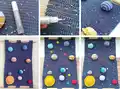
— The Base :
Info :
Work in back and forth rows with a 3.0mm crochet hook. Begin each row with a turning chain.
Starting Chain :
Chain 65, start working in the 3rd chain from hook
Rows 2-107 :
1 t-ch, 63 sc, turn (63)
Info :
The finished wall hanging using the materials stated is 28x42cm. Width and size may vary due to crochet density.
— Loops for Hanging :
Info :
Make three loops from above, below, in the center, and on the edges for wooden stick attachment
Rows 2-11 :
1 t-ch, 9 sc, turn (9)
Info :
Leave a long yarn tail for sewing. Adjust rows if using different diameter stick.
— Earth Circle :
Info :
Work in continuous spirals without turning chain using 1.5mm hook
Round 1 :
8 sc into MR (8)
Round 3 :
(1 sc, inc)*8 (24)
Round 4 :
(3 sc, inc)*6 (30)
Round 5 :
(2 sc, inc, 2 sc)*6 (36)
Round 6 :
(5 sc, inc)*6 (42)
Round 7 :
(3 sc, inc, 3 sc)*6 (48)
Info :
Leave a long tail for sewing
— Earth Hemisphere :
Info :
Work in back and forth rows. Begin with white color yarn. Carry all yarns on wrong side.
Row 1 :
4 sc into MR, pull the ring and turn (4)
Row 2 :
1 t-ch, inc*4, turn (8)
Row 3 :
White: 1 t-ch, (1 sc, inc)*2, Light blue: (1 sc, inc)*2, turn (12). Break white yarn.
Row 4 :
Light blue: 1 t-ch, (3 sc, inc)*3, turn (15)
Row 5 :
1 t-ch, (2 sc, inc, 2 sc)*3, turn (18)
Row 6 :
Light blue: 1 t-ch, 5 sc, hold yarn BEHIND work, Green: 1 inc, hold yarn BEHIND work, Light blue: (5 sc, inc)*2, turn (21)
Row 7 :
Light blue: 1 t-ch, (3 sc, inc, 3 sc)*2, 1 sc, hold yarn IN FRONT, Green: 1 sc, inc, hold yarn IN FRONT, Light blue: 4 sc, turn (24)
Row 8 :
Light blue: 1 t-ch, 4 sc, hold yarn BEHIND, Green: 4 sc, hold yarn BEHIND, Light blue: 16 sc, turn (24)
Row 9 :
Light blue: 1 t-ch, 16 sc, hold yarn IN FRONT, Green: 4 sc, hold yarn IN FRONT, Light blue: 4 sc, turn (24)
Row 10 :
Light blue: 1 t-ch, 3 sc, hold yarn BEHIND, Green: 5 sc, hold yarn BEHIND, Light blue: 16 sc, turn (24)
Row 11 :
Light blue: 1 t-ch, 15 sc, hold yarn IN FRONT, Green: 6 sc, hold yarn IN FRONT, Light blue: 3 sc, turn (24)
Row 12 :
Light blue: 1 t-ch, 3 sc, hold yarn BEHIND, Green: 8 sc, hold yarn BEHIND, Light blue: 13 sc, turn (24)
Row 13 :
Light blue: 1 t-ch, 13 sc, hold yarn IN FRONT, Green: 8 sc, hold yarn IN FRONT, Light blue: 3 sc, turn (24)
Row 14 :
Light blue: 1 t-ch, 4 sc, hold yarn BEHIND, Green: 5 sc, hold yarn BEHIND, Light blue: 15 sc, turn (24)
Row 15 :
Light blue: 1 t-ch, 13 sc, hold yarn IN FRONT, Green: 2 sc, hold yarn IN FRONT, Light blue: 2 sc, hold yarn IN FRONT, Green: 3 sc, hold yarn IN FRONT, Light blue: 4 sc, turn (24)
Row 16 :
Light blue: 1 t-ch, 6 sc, dec, 2 sc, hold yarn BEHIND, Green: 3 sc, hold yarn BEHIND, Light blue: 1 sc, dec, 6 sc, dec, turn (21)
Row 17 :
Light blue: 1 t-ch, 3 sc, dec, 3 sc, hold yarn IN FRONT, Green: 5 sc, hold yarn IN FRONT, Light blue: 1 sc, dec, 2 sc, dec, 1 sc, turn (18)
Row 18 :
Light blue: 1 t-ch, 4 sc, hold yarn BEHIND, Green: 1 sc, dec, 4 sc, dec, 1 sc, hold yarn BEHIND, Light blue: 2 sc, dec, turn (15)
Row 19 :
Green: 1 t-ch, 1 sc, hold yarn IN FRONT, Light blue: 1 sc, hold yarn IN FRONT, Green: dec, 2 sc, dec, 3 sc, hold yarn IN FRONT, Light blue: dec, 2 sc, turn (12)
Row 20 :
Light blue: 1 t-ch, 2 sc, hold yarn BEHIND, Green: dec, (1 sc, dec)*2, dec, turn (8). Break green yarn.
Row 21 :
1 t-ch, dec*4 (4)
Row 22 :
sc 4 cluster (pull loops). Break yarn and secure.
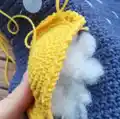
Info :
Put stuffing in hemisphere. Sew parts together. Attach Velcro.
— Mercury Circle :
Info :
Use gray yarn and 1.5mm hook. Work in continuous spirals.
Round 1 :
8 sc into MR (8)
Round 3 :
(1 sc, inc)*8 (24)
Round 4 :
(3 sc, inc)*6 (30)
Round 5 :
(2 sc, inc, 2 sc)*6 (36)
Info :
Cut yarn. Leave long tail for sewing.
— Mercury Hemisphere :
Info :
Work in back and forth rows
Row 1 :
4 sc into MR, turn (4)
Row 2 :
1 t-ch, inc*4, turn (8)
Row 3 :
1 t-ch, (1 sc, inc)*4, turn (12)
Row 4 :
1 t-ch, (3 sc, inc)*3, turn (15)
Row 5 :
1 t-ch, (2 sc, inc, 2 sc)*3, turn (18)
Rows 6-11 :
6 rows: 1 t-ch, 18 sc, turn (18)
Row 12 :
1 t-ch, (4 sc, dec)*3, turn (15)
Row 13 :
1 t-ch, (1 sc, dec, 2 sc)*3, turn (12)
Row 14 :
1 t-ch, (dec, 1 sc)*4, turn (8)
Row 15 :
1 t-ch, dec*4, turn (4)
Row 16 :
sc 4 cluster (pull loops). Cut and secure.
Info :
Sew Velcro to circle. Stuff with fiberfill. Sew parts together. Embroider stars with white thread.
— Venus Circle :
Round 1 :
8 sc into MR (8)
Round 3 :
(1 sc, inc)*8 (24)
Round 4 :
(3 sc, inc)*6 (30)
Round 5 :
(2 sc, inc, 2 sc)*6 (36)
Round 6 :
(5 sc, inc)*6 (42)
Round 7 :
(3 sc, inc, 3 sc)*6 (48)
Info :
Cut yarn. Leave long tail for sewing.
— Venus Hemisphere :
Row 1 :
4 sc into MR, turn (4)
Row 2 :
1 t-ch, inc*4, turn (8)
Row 3 :
1 t-ch, (1 sc, inc)*4, turn (12)
Row 4 :
1 t-ch, (3 sc, inc)*3, turn (15)
Row 5 :
1 t-ch, (2 sc, inc, 2 sc)*3, turn (18)
Row 6 :
1 t-ch, (5 sc, inc)*3, turn (21)
Row 7 :
1 t-ch, (3 sc, inc, 3 sc)*3, turn (24)
Rows 8-15 :
8 rows: 1 t-ch, 24 sc, turn (24)
Row 16 :
1 t-ch, (6 sc, dec)*3, turn (21)
Row 17 :
1 t-ch, (2 sc, dec, 3 sc)*3, turn (18)
Row 18 :
1 t-ch, (4 sc, dec)*3, turn (15)
Row 19 :
1 t-ch, (1 sc, dec, 2 sc)*3, turn (12)
Row 20 :
1 t-ch, (dec, 1 sc)*4, turn (8)
Row 21 :
1 t-ch, dec*4, turn (4)
Row 22 :
sc 4 cluster (pull loops). Cut and secure.
Info :
Sew Velcro to circle. Stuff with fiberfill. Sew parts together.
— Mars Circle :
Round 1 :
8 sc into MR (8)
Round 3 :
(1 sc, inc)*8 (24)
Round 4 :
(3 sc, inc)*6 (30)
Round 5 :
(2 sc, inc, 2 sc)*6 (36)
Round 6 :
(5 sc, inc)*6 (42)
Info :
Cut yarn. Leave long tail for sewing.
— Mars Hemisphere :
Info :
Work in back and forth rows. Alternate yarn in two shades of red if desired.
Row 1 :
4 sc into MR, turn (4)
Row 2 :
1 t-ch, inc*4, turn (8)
Row 3 :
1 t-ch, (1 sc, inc)*4, turn (12)
Row 4 :
1 t-ch, (3 sc, inc)*3, turn (15)
Row 5 :
1 t-ch, (2 sc, inc, 2 sc)*3, turn (18)
Row 6 :
1 t-ch, (5 sc, inc)*3, turn (21)
Rows 7-13 :
7 rows: 1 t-ch, 21 sc, turn (21)
Row 14 :
1 t-ch, (2 sc, dec, 3 sc)*3, turn (18)
Row 15 :
1 t-ch, (4 sc, dec)*3, turn (15)
Row 16 :
1 t-ch, (1 sc, dec, 2 sc)*3, turn (12)
Row 17 :
1 t-ch, (dec, 1 sc)*4, turn (8)
Row 18 :
1 t-ch, dec*4, turn (4)
Row 19 :
sc 4 cluster (pull loops). Cut and secure.
Info :
Sew Velcro to circle. Stuff with fiberfill. Sew parts together.
— Jupiter Circle :
Round 1 :
8 sc into MR (8)
Round 3 :
(1 sc, inc)*8 (24)
Round 4 :
(3 sc, inc)*6 (30)
Round 5 :
(2 sc, inc, 2 sc)*6 (36)
Round 6 :
(5 sc, inc)*6 (42)
Round 7 :
(3 sc, inc, 3 sc)*6 (48)
Round 8 :
(7 sc, inc)*6 (54)
Round 9 :
(4 sc, inc, 4 sc)*6 (60)
Info :
Cut yarn. Leave long tail for sewing. Use gray, brown, white and yellow yarn for hemisphere.
— Jupiter Hemisphere :
Info :
Work in back and forth rows. Start with gray color.
Row 1 :
4 sc into MR, turn (4)
Row 2 :
1 t-ch, inc*4, turn (8)
Row 3 :
1 t-ch, (1 sc, inc)*4, turn (12)
Row 4 :
1 t-ch, (3 sc, inc)*3, turn (15)
Row 5 :
1 t-ch, (2 sc, inc, 2 sc)*3, turn (18)
Row 6 :
1 t-ch, (5 sc, inc)*3, turn (21)
Row 7 :
1 t-ch, (3 sc, inc, 3 sc)*3, turn (24)
Row 8 :
1 t-ch, (7 sc, inc)*3, turn (27)
Row 9 :
White: 1 t-ch, (4 sc, inc, 4 sc)*3, turn (30)
Rows 10-11 :
Brown: 1 t-ch, 30 sc, turn (30)
Rows 12-14 :
Yellow: 1 t-ch, 30 sc, turn (30)
Row 15 :
Gray: 1 t-ch, 30 sc, turn (30)
Row 16 :
White: 1 t-ch, 30 sc, turn (30)
Row 17 :
Yellow: 1 t-ch, 30 sc, turn (30)
Rows 18-19 :
Brown: 1 t-ch, 30 sc, turn (30)
Row 20 :
Brown: 1 t-ch, (4 sc, dec, 4 sc)*3, turn (27)
Row 21 :
Gray: 1 t-ch, (7 sc, dec)*3, turn (24)
Row 22 :
1 t-ch, (6 sc, dec)*3, turn (21)
Row 23 :
1 t-ch, (2 sc, dec, 3 sc)*3, turn (18)
Row 24 :
1 t-ch, (4 sc, dec)*3, turn (15)
Row 25 :
1 t-ch, (1 sc, dec, 2 sc)*3, turn (12)
Row 26 :
1 t-ch, (dec, 1 sc)*4, turn (8)
Row 27 :
1 t-ch, dec*4, turn (4)
Row 28 :
sc 4 cluster (pull loops). Cut and secure.
Info :
Sew Velcro to circle. Stuff with fiberfill. Sew parts together.
— Neptune, Uranus, Saturn Circle :
Info :
Work in continuous spirals. Same pattern for all three planets. Use two shades blue for Neptune, melange yellow for Saturn.
Round 1 :
8 sc into MR (8)
Round 3 :
(1 sc, inc)*8 (24)
Round 4 :
(3 sc, inc)*6 (30)
Round 5 :
(2 sc, inc, 2 sc)*6 (36)
Round 6 :
(5 sc, inc)*6 (42)
Round 7 :
(3 sc, inc, 3 sc)*6 (48)
Round 8 :
(7 sc, inc)*6 (54)
Info :
Cut yarn. Leave long tail for sewing.
— Neptune, Uranus, Saturn Hemisphere :
Info :
Work in back and forth rows
Row 1 :
4 sc into MR, turn (4)
Row 2 :
1 t-ch, inc*4, turn (8)
Row 3 :
1 t-ch, (1 sc, inc)*4, turn (12)
Row 4 :
1 t-ch, (3 sc, inc)*3, turn (15)
Row 5 :
1 t-ch, (2 sc, inc, 2 sc)*3, turn (18)
Row 6 :
1 t-ch, (5 sc, inc)*3, turn (21)
Row 7 :
1 t-ch, (3 sc, inc, 3 sc)*3, turn (24)
Row 8 :
1 t-ch, (7 sc, inc)*3, turn (27)
Rows 9-17 :
1 t-ch, 27 sc, turn (27)
Row 18 :
1 t-ch, (7 sc, dec)*3, turn (24)
Row 19 :
1 t-ch, (6 sc, dec)*3, turn (21)
Row 20 :
1 t-ch, (2 sc, dec, 3 sc)*3, turn (18)
Row 21 :
1 t-ch, (4 sc, dec)*3, turn (15)
Row 22 :
1 t-ch, (1 sc, dec, 2 sc)*3, turn (12)
Row 23 :
1 t-ch, (dec, 1 sc)*4, turn (8)
Row 24 :
1 t-ch, dec*4, turn (4)
Row 25 :
sc 4 cluster (pull loops). Cut and secure.
Info :
Sew Velcro to circle. Stuff with fiberfill. Sew parts together. For Saturn and Uranus, add beaded rings using monofilament and beading needle.
— Moon :
Info :
Use gray yarn and 1.5mm crochet hook
Round 1 :
8 sc into MR (8)
Info :
Cut yarn. Leave long tail for sewing.
— Sun :
Info :
Use yellow yarn and 3.0mm crochet hook. Work in continuous spirals.
Round 1 :
8 sc into MR (8)
Round 3 :
(1 sc, inc)*8 (24)
Round 4 :
(3 sc, inc)*6 (30)
Round 5 :
(2 sc, inc, 2 sc)*6 (36)
Round 6 :
(5 sc, inc)*6 (42)
Round 7 :
(3 sc, inc, 3 sc)*6 (48)
Round 8 :
(7 sc, inc)*6 (54)
Round 10 :
Back loop only: (1 sl st, 1 ch)*54, 1 sl st
Info :
Cut yarn. Leave long tail for sewing.
This stunning Solar System Wall Hanging pattern transforms your crochet skills into an educational masterpiece that celebrates the wonders of our cosmic neighborhood. Perfect for space enthusiasts of all ages, this interactive décor piece features removable planets that can be repositioned, making it ideal for teaching children about astronomy while adding a handmade touch to any room. The combination of detailed colorwork, dimensional construction, and creative embellishments creates a truly unique wall art that's both beautiful and functional. Whether you're making it for a nursery, classroom, or your own space-themed sanctuary, this pattern offers an engaging project that results in a treasured keepsake. 🌟🪐✨