🧢 Beautiful ✨ Detailed πŸ’ Adorable

T-Rex Dinosaur Ornament Amigurumi Pattern

T-Rex Dinosaur Ornament Amigurumi Pattern
4.6β˜… Rating
6-8 Hours Time Needed
2.3K Made This
βœ‚οΈ

Intermediate Level

Ideal for those with basic knitting experience, featuring slightly more advanced stitches and techniques to expand your skills.

⏱️

All-Day Adventure

Requires 8-10 hours, ideal for a full day of immersive knitting.

🐾

Pocket Pal

A mini friend to carry anywhere, providing comfort and companionship in a perfectly portable size.

About This T-Rex Dinosaur Ornament Amigurumi Pattern

T-Rex Dinosaur Ornament Amigurumi Pattern crochet pattern - detailed view of completed project

Working with YarnArt Jeans yarn in beautiful color combinations of mustard, green, and blue accents, this pattern creates a dinosaur ornament approximately 6-7 inches tall. The detailed instructions include step-by-step photo guidance for complex techniques like needle sculpting and invisible finishing methods.

Why You'll Love This T-Rex Dinosaur Ornament Amigurumi Pattern

I absolutely love this T-Rex pattern because it strikes the perfect balance between detailed craftsmanship and achievable techniques. The needle sculpting for the eye placement adds such professional dimension to the face, and watching those little features come to life is incredibly satisfying. The color combination possibilities are endless, and I particularly enjoy how the blue accent stripes add visual interest to the body. The tiny arms and sturdy legs with individual claws give this dinosaur so much personality and charm. It's a project that challenges you just enough to keep it interesting while remaining thoroughly enjoyable throughout the entire process.

T-Rex Dinosaur Ornament Amigurumi Pattern step 1 - construction progress T-Rex Dinosaur Ornament Amigurumi Pattern step 2 - assembly progress T-Rex Dinosaur Ornament Amigurumi Pattern step 3 - details and accessories T-Rex Dinosaur Ornament Amigurumi Pattern step 4 - final assembly and finishing

Switch Things Up

I absolutely love experimenting with this T-Rex pattern to create unique variations that match different styles and preferences! One of my favorite modifications is changing the color palette entirely – imagine a pastel rainbow T-Rex in soft pinks, purples, and blues for a nursery, or a fierce realistic version in deep forest greens and browns. You could even create a galaxy-themed T-Rex using variegated yarn in cosmic colors!

For an extra touch of personality, I sometimes add embroidered details like scales along the back using French knots or backstitch, or create different facial expressions by adjusting the eye placement slightly. You can make your T-Rex look fierce, friendly, sleepy, or surprised just by changing where you position those eyes!

I've also experimented with the body stripes – instead of the three blue stripes, try making spots all over, zigzag patterns, or even adding tiny hearts for a Valentine's Day version. Some makers add felt spikes down the spine, though this isn't anatomically accurate for T-Rex, it adds a fun prehistoric touch!

For a more advanced modification, you can adjust the arm size by adding a few more rounds to make them slightly less tiny, or even create a poseable version by inserting thin wire into the arms, legs, and tail before stuffing. This lets you position your T-Rex in different poses, making it perfect for photography or dynamic displays!

Common Mistakes & How to Fix Them

βœ— Forgetting to stuff the head firmly before completing rows 32-37, which can result in a floppy or misshapen head that's difficult to sculpt properly βœ— Placing the eye pieces incorrectly before needle sculpting, causing asymmetrical facial features that are hard to fix once the pieces are sewn on βœ— Not using back loops only (BLO) when indicated for the body color change at row 6, creating an uneven transition between mustard and green colors βœ— Miscounting stitches during the complex mouth construction rows 10-12 on the green piece, leading to an improperly shaped snout that won't attach correctly βœ— Skipping stitch markers during leg construction, especially when joining the two sole pieces together, resulting in misaligned legs that don't sit properly βœ— Overstuffing the body and legs, making it difficult to sew pieces together securely and creating an unbalanced ornament that won't display well

T-Rex Dinosaur Ornament Amigurumi Pattern

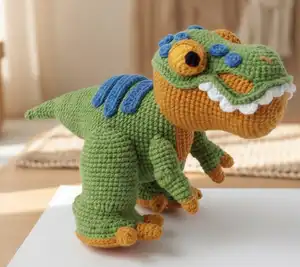
Create an adorable T-Rex dinosaur ornament with this comprehensive crochet pattern! This charming prehistoric friend features a detailed head with sculptured eye placement, poseable body with decorative stripes, sturdy legs with claws, tiny arms, and embroidered nostril details. Perfect for dinosaur enthusiasts and ornament collectors alike, this pattern uses basic amigurumi techniques to bring your very own mini T-Rex to life. The finished ornament showcases beautiful color combinations in mustard and green with blue accent spots, making it a delightful addition to any space or a thoughtful handmade gift for dinosaur lovers of all ages.

Intermediate 6-8 Hours

Materials Needed for T-Rex Dinosaur Ornament Amigurumi Pattern

β€” Main Fabric

  • 01
    YarnArt Jeans yarn (55% cotton, 45% polyacrylamide) size 2, 50g/150m in Mustard color 84
  • 02
    YarnArt Jeans yarn in Green color 69
  • 03
    YarnArt Jeans yarn in Blue color 16
  • 04
    YarnArt Jeans yarn in Yellow color 35
  • 05
    YarnArt Jeans yarn in Black color 53
  • 06
    YarnArt Jeans yarn in White color 03
  • 07
    Alternative colors: Light Brown 71, Brown 70, Orange 77

β€” Tools Required

  • 01
    Crochet hook 1.75mm (Soft Touch)
  • 02
    Scissors
  • 03
    Stitch markers
  • 04
    Polyester fiberfill stuffing (syntepuh)
  • 05
    Tapestry needle for sewing
  • 06
    Pins for positioning pieces
  • 07
    Yarn needle for weaving ends

Progress Tracker

0% Complete

β€” Head :

Mustard yarn color 84

Round 1 :

8 sc into MR (8)

Round 2 :

8 inc (16)

Round 3 :

(1 sc, inc) x 8 (24)

Round 4 :

1 sc, inc, (2 sc, inc) x 7, 1 sc (32)

Round 5 :

(3 sc, inc) x 8 (40)

Round 6 :

2 sc, inc, (4 sc, inc) x 7, 2 sc (48)

Round 7-9 :

48 sc (48) - 3 rounds

Round 10 :

10 sc, 4 inc-hdc, 12 sc, dec, (4 sc, dec) x 3, 2 sc (48)

Round 11-15 :

48 sc (48) - 5 rounds

Round 16 :

10 sc, 4 dec-hdc, 12 sc, inc, (4 sc, inc) x 3, 2 sc (48)

Round 17-18 :

48 sc (48) - 2 rounds

Round 19 :

(5 sc, inc) x 8 (56)

Round 20-21 :

56 sc (56) - 2 rounds

Round 22 :

3 sc, inc, (6 sc, inc) x 7, 3 sc (64)

Round 23-26 :

64 sc (64) - 4 rounds

Round 27 :

3 sc, dec, (6 sc, dec) x 7, 3 sc (56)

Round 28 :

28 sc, (5 sc, dec) x 4 (52)

Round 29 :

30 sc, dec, (4 sc, dec) x 3, 2 sc (48)

Round 30-31 :

48 sc (48) - 2 rounds

Round 32 :

2 sc, dec, (4 sc, dec) x 7, 2 sc (40)

Round 33 :

40 sc (40)

Round 34 :

(3 sc, dec) x 8 (32)

Round 35 :

1 sc, dec, (2 sc, dec) x 7, 1 sc (24)

Info :

Stuff with syntepuh

Round 36 :

(1 sc, dec) x 8 (16)

Round 37 :

8 dec (8)

Info :

Fasten off leaving 15 cm tail, weave yarn through front loops and pull tight to close

β€” Mouth (Green piece) :

Green yarn color 69

Round 1 :

14 ch (14)

Round 2 :

From 2nd stitch from hook: 2 inc, 9 sc, inc, 3 sc in 1 stitch, inc on other side of chain, 9 sc, inc, sc (32)

Round 3 :

3 inc, 11 sc, 5 inc, 11 sc, 2 inc (42)

Round 4 :

(sc, inc) x 3, 9 sc, 2 hdc, (dc, inc-dc) x 5, 2 hdc, 9 sc, (sc, inc) x 2 (52)

Round 5 :

18 sc, 2 hdc, (2 dc, inc-dc) x 5, 2 hdc, 15 sc (57)

Round 6 :

(2 sc, inc) x 3, 42 sc, (2 sc, inc) x 2 (62)

Round 7 :

2 sc, dec, 19 sc, (3 sc, inc) x 5, 19 sc (66)

Round 8 :

5 sc, 5 hdc, 51 sc, 5 hdc (66)

Round 9 :

5 sc, 4 hdc, 5 sc, 4 hdc, 3 sc, 3 hdc in 1 stitch, 2 sc, inc, (4 sc, inc) x 4, 2 sc, 3 hdc in 1 stitch, 3 sc, 4 hdc, 5 sc, 4 hdc, 2 sc (75)

Round 10 :

8 sc, 13 ch, from 9th stitch from hook sc, 4 sc, 3 inc-hdc, 30 sc, 3 inc-hdc, 5 sc, 13 ch, from 9th stitch from hook sc, 4 sc (91)

Round 11 :

14 sc, 3 sc in 1 stitch, 11 sc, 6 hdc, 30 sc, 6 hdc, 11 sc, 3 sc in 1 stitch, 11 sc (95)

Round 12 :

FLO: 95 sc (95)

Info :

Fasten off

β€” Teeth (White yarn) :

White yarn color 03

Info :

Go back to round 11, to beginning of row, work in back loops only

Row :

BLO: 2 sl st, ch, 3 dc in 1 stitch, ch, 3 sl st, (ch, 3 dc in 1 stitch, ch, 3 sl st) x 5, 47 sl st, (ch, 3 dc in 1 stitch, ch, 3 sl st) x 5, ch, 3 dc in 1 stitch, ch, sl st

Info :

Fasten off

β€” Head Assembly :

Infos :

Fasten 2 pieces with pins (green mouth to mustard head, bottom to up). Sew green piece to head. Make needle sculpting: insert needle at point 1, exit through point 2, insert at point 3, exit through point 4. Similarly make tightening for second eye (points 1-5-6-4). Fix thread and hide inside

β€” Eyes (make 2) :

Black yarn color 53

Round 1 :

6 sc into MR (6)

Info :

Fasten off

Yellow yarn color 35

Round 1 :

6 sc into MR (6)

Round 2 :

6 inc (12)

Round 3 :

3 sc, 3 inc, 3 sc, 3 inc (18)

Round 4-5 :

18 sc (18) - 2 rounds

Round 6 :

3 sc, 3 dec, 3 sc, 3 dec (12)

Round 7 :

6 dec (6)

Info :

Fasten off leaving 15 cm tail, weave through front loops and pull tight to close

Mustard yarn color 84

Round 1 :

8 sc into MR (8)

Round 2 :

8 inc (16)

Round 3 :

(3 sc, inc) x 4 (20)

Round 4 :

BLO: 20 hdc (20)

Round 5 :

10 hdc

Info :

Fasten off

Infos :

Sew black piece to yellow piece. Sew yellow piece to mustard piece. Sew eyes to head

β€” Spots (Blue yarn) :

Blue yarn color 16 - Make 3

Round 1 :

6 sc into MR (6)

Info :

Fasten off

Blue yarn color 16 - Make 3

Round 1 :

8 sc into MR (8)

Info :

Fasten off. Sew patches to head

β€” Embroidery Nostrils :

Info :

Mark the place of embroidery with pins. Make embroidery for nostrils

β€” Body :

Mustard yarn color 84

Round 1 :

9 ch (9)

Round 2 :

From 2nd stitch from hook: inc, 6 sc, 3 sc in 1 stitch, 7 sc on other side of chain (18)

Round 3 :

2 inc, 6 sc, 3 inc, 6 sc, inc (24)

Round 4 :

(1 sc, inc) x 2, 6 sc, (1 sc, inc) x 3, 7 sc, inc (30)

Round 5 :

(2 sc, inc) x 2, 6 sc, (2 sc, inc) x 3, 8 sc, inc (36)

Green yarn color 69

Round 6 :

BLO: 36 sc (36)

Round 7 :

(5 sc, inc) x 6 (42)

Round 8 :

3 sc, inc, (6 sc, inc) x 5, 3 sc (48)

Round 9 :

(7 sc, inc) x 6 (54)

Round 10 :

54 sc (54)

Round 11 :

28 sc, 2 inc, 24 sc (56)

Round 12 :

29 sc, 2 inc, 25 sc (58)

Round 13 :

2 dec, 26 sc, 2 inc, 26 sc (58)

Round 14-16 :

58 sc (58) - 3 rounds

Round 17 :

inc, 56 sc, inc (60)

Round 18 :

(9 sc, inc) x 6 (66)

Round 19 :

66 sc (66)

Round 20 :

5 sc, inc, (10 sc, inc) x 5, 5 sc (72)

Round 21-22 :

72 sc (72) - 2 rounds

Round 23 :

5 sc, dec, (10 sc, dec) x 5, 5 sc (66)

Round 24 :

66 sc (66)

Round 25 :

(9 sc, dec) x 6 (60)

Round 26 :

60 sc (60)

Round 27 :

4 sc, dec, (8 sc, dec) x 5, 4 sc (54)

Round 28 :

17 sc, dec, 7 sc, dec, 7 sc, dec, 17 sc (51)

Round 29 :

16 sc, dec, 6 sc, dec, 6 sc, dec, 17 sc (48)

Round 30 :

48 sc (48)

Round 31 :

3 sc, dec, (6 sc, dec) x 5, 3 sc (42)

Round 32 :

14 sc, dec, 4 sc, dec, 4 sc, dec, 14 sc (39)

Round 33 :

13 sc, dec, 3 sc, dec, 3 sc, dec, 14 sc (36)

Info :

Stuff with syntepuh

Round 34-36 :

36 sc (36) - 3 rounds

Round 37 :

2 sc, dec, (4 sc, dec) x 5, 2 sc (30)

Round 38-39 :

30 sc (30) - 2 rounds

Round 40 :

10 sc, dec, 2 sc, dec, 2 sc, dec, 10 sc (27)

Round 41 :

9 sc, dec, sc, dec, sc, dec, 10 sc (24)

Round 42 :

24 sc (24)

Round 43 :

sc, dec, (2 sc, dec) x 5, sc (18)

Info :

Stuff with syntepuh

Round 44 :

4 sc, dec, 2 sc, dec, 2 sc, dec, 4 sc (15)

Round 45 :

3 sc, dec, sc, dec, sc, dec, 4 sc (12)

Round 46-48 :

12 sc (12) - 3 rounds

Round 49 :

sc, dec, (2 sc, dec) x 2, sc (9)

Round 50-51 :

9 sc (9) - 2 rounds

Info :

Stuff with syntepuh

Round 52 :

(1 sc, dec) x 3 (6)

Round 53-54 :

6 sc (6) - 2 rounds

Info :

Fasten off leaving 15 cm tail, weave through front loops and pull tight to close

β€” Body Spots (Blue stripes) :

Blue yarn color 16 - Strip 1

Round 1 :

21 ch (21)

Round 2 :

From 2nd stitch from hook: inc, 18 sc, 3 sc in 1 stitch, 19 sc on other side of chain

Info :

Sew strip to body between row 15 and row 18

Blue yarn color 16 - Strip 2

Round 1 :

25 ch (25)

Round 2 :

From 2nd stitch from hook: inc, 22 sc, 3 sc in 1 stitch, 23 sc on other side of chain

Info :

Sew strip to body between row 20 and row 23

Blue yarn color 16 - Strip 3

Round 1 :

20 ch (20)

Round 2 :

From 2nd stitch from hook: inc, 17 sc, 3 sc in 1 stitch, 18 sc on other side of chain

Info :

Sew strip to body between row 25 and row 28

Info :

Sew head to body

β€” Legs (make 2) :

Make 4 sole parts - Mustard yarn color 84

Round 1 :

7 sc into MR (7)

Round 2 :

7 inc (14)

Round 3 :

(1 sc, inc) x 7 (21)

Round 4 :

1 sc, inc, (2 sc, inc) x 6, 1 sc (28)

Round 5 :

(3 sc, inc) x 7 (35)

Round 6 :

2 sc, inc, (4 sc, inc) x 6, 2 sc (42)

Round 7 :

(5 sc, inc) x 7 (49)

Info :

Fasten off invisibly. Mark closing stitch

Green yarn color 69 - Joining soles

Info :

Put two soles on top of each other wrong side against wrong side with heel facing you and closing stitches facing each other. Insert hook into stitches and connect with sl st round (49 sl st total)

Round 8 :

Insert hook into back loop of first sc. Using green yarn, pull up loop, ch 1, 1 sc in same back loop

Round 9 :

49 sc (49)

Round 10 :

(2 sc, dec) x 7, 21 sc (42)

Round 11 :

(1 sc, dec) x 7, 8 sc, 5 inc-hdc, 8sc (40)

Round 12 :

40 sc (40)

Round 13 :

22 sc, 5 dec-hdc, 8 sc (35)

Round 14 :

(1 hdc, inc-hdc) x 7, (1 sc, dec) x 7 (35)

Round 15-18 :

35 sc (35) - 4 rounds

Round 19 :

10 sc, dec, 16 sc, inc, 6 sc (35)

Round 20-22 :

35 sc (35) - 3 rounds

Round 23 :

10 sc, dec, 16 sc, dec, 5 sc (33)

Round 24 :

27 sc, dec, 4 sc (32)

Round 25 :

10 sc, dec, 14 sc, dec, 4 sc (30)

Info :

Stuff with syntepuh

Round 26 :

30 sc (30)

Round 27 :

(3 sc, dec) x 6 (24)

Round 28 :

1 sc, dec, (2 sc, dec) x 5, 1 sc (18)

Round 29 :

(1 sc, dec) x 6 (12)

Round 30 :

6 dec (6)

Info :

Fasten off leaving 15 cm tail, weave through front loops and pull tight to close

β€” Claws for legs (make 3 per leg) :

Mustard yarn color 84

Round 1 :

6 sc into MR (6)

Round 2 :

(1 sc, inc) x 3 (9)

Round 3 :

9 sc (9)

Round 4 :

1 sc, inc, (2 sc, inc) x 2, 1 sc (12)

Info :

Fasten off. Sew claws to leg. Sew legs to body

β€” Arms (make 2) :

Claws (make 3 per arm) - Mustard yarn color 84

Round 1 :

6 sc into MR (6)

Round 2 :

(1 sc, inc) x 3 (9)

Round 3 :

9 sc (9)

Green yarn color 69 - Joining claws

Round 4 :

BLO: From first claw crochet 9 sc, 9 sc on second claw (18)

Round 5-6 :

18 sc (18) - 2 rounds

Round 7 :

(4 sc, dec) x 3 (15)

Info :

Stuff with syntepuh

Round 8 :

15 sc (15)

Round 9 :

2 dec, sc, 5 inc-hdc, sc, 2 dec (14)

Round 10 :

2 inc, sc, 5 dec-hdc, sc, 2 inc (15)

Round 11-15 :

15 sc (15) - 5 rounds

Info :

Stuff with syntepuh

Round 16 :

(1 sc, dec) x 5 (10)

Round 17 :

5 dec (5)

Info :

Fasten off leaving 15 cm tail, weave through front loops and pull tight to close. Sew arms to body

Assembly Instructions

  • Sew the green mouth piece to the mustard head, aligning the bottom of the mouth with the lower portion of the head using pins first for proper positioning
  • Create needle sculpting for eye sockets by inserting needle at marked points and pulling thread to create indentations before attaching eyes
  • Sew completed eye pieces (black center, yellow middle, mustard outer) to the sculpted eye sockets on the head
  • Attach six blue decorative spots to the head in a balanced pattern as shown in the pattern photos
  • Embroider nostrils on the snout using black yarn and following the marked pin placement
  • Sew three blue decorative stripes around the body between the specified rows (15-18, 20-23, and 25-28)
  • Attach the completed head to the body opening, ensuring the neck portion fits securely and is centered
  • Sew six claws (three per leg) to each completed leg at the base, spacing them evenly around the foot
  • Attach both completed legs to the bottom of the body, positioning them symmetrically so the T-Rex can stand
  • Sew the tiny completed arms to the upper sides of the body between rounds 8-10, angling them slightly forward

Important Notes

  • πŸ’‘Use stitch markers consistently throughout the pattern, especially during complex shaping sections and when joining multiple pieces together
  • πŸ’‘Stuff all pieces firmly but not overly tight to maintain proper shaping and allow for easier assembly of components
  • πŸ’‘Pay special attention to the BLO (back loops only) instructions as they create important texture changes and color transitions
  • πŸ’‘When joining the two sole pieces for each leg, ensure the closing stitches face each other properly before connecting with slip stitches
  • πŸ’‘Pin all components in place before final sewing to ensure proper positioning and symmetry, especially for the legs and arms
  • πŸ’‘The needle sculpting technique for the eyes is crucial for creating facial character, so take time to practice this step
  • πŸ’‘When working the green mouth piece, follow the photo guides carefully as the construction creates the distinctive T-Rex snout shape

This delightful T-Rex ornament pattern brings prehistoric charm to your crochet collection with its adorable proportions and detailed construction. Perfect for dinosaur enthusiasts of all ages, this pattern combines fundamental amigurumi techniques with creative finishing touches like needle sculpting and decorative stripes. The result is a charming mini T-Rex that can serve as a year-round decoration, a thoughtful handmade gift, or a fun addition to a dinosaur-themed collection. With comprehensive photo guidance and clear instructions, you'll enjoy every step of bringing this prehistoric friend to life! πŸ¦–πŸ§Άβœ¨

You ask,

we answer.

FAQs

What size will my finished T-Rex ornament be?

When using YarnArt Jeans yarn with a 1.75mm hook as specified, your finished T-Rex will measure approximately 6-7 inches (15-18 cm) tall from head to toe. The size may vary slightly depending on your tension and how firmly you stuff the piece.

Can I use different yarn weights for this pattern?

Yes, you can use different yarn weights, but this will change the final size of your T-Rex. If using thicker yarn, use a correspondingly larger hook. For thinner yarn, use a smaller hook. Just ensure your stitches are tight enough that stuffing won't show through.

What is needle sculpting and is it difficult?

Needle sculpting is a technique where you use a yarn needle and thread to create indentations and shape features, like the eye sockets in this pattern. While it may seem intimidating, the pattern includes detailed photo guidance showing exactly where to insert and exit the needle. Take your time and follow the images closely for best results.

How do I join the two sole pieces for the legs?

Place the two mustard sole pieces wrong sides together with the closing stitches (marked stitches) facing each other. Using green yarn, insert your hook through both corresponding stitches on each piece and work slip stitches around the entire edge to join them. The pattern includes detailed step-by-step photos for this process.

Can I make this pattern in different colors?

Absolutely! The pattern shows two color variations (mustard/green/blue and light brown/brown/orange), but you can customize your T-Rex with any color combination you prefer. Consider realistic dinosaur colors, fantasy rainbow colors, or even team colors for a personalized touch.

Do I need to make the white teeth, or can I skip them?

The white teeth add character and detail to your T-Rex, but they're not structurally necessary. If you prefer a simplified look or find the tooth construction challenging, you can skip this step. Your T-Rex will still be adorable without them!