🧢 Beautiful ✨ Detailed πŸ’ Adorable

Blue Tang Fish (Dory) Amigurumi Pattern

Blue Tang Fish (Dory) Amigurumi Pattern
4.9β˜… Rating
3-4 Hours Time Needed
2.0K Made This
βœ‚οΈ

Intermediate Level

Ideal for those with basic knitting experience, featuring slightly more advanced stitches and techniques to expand your skills.

⏱️

Bite-Sized Project

Complete in under 2 hoursβ€”quick, fun, and perfect for a little creative escape.

🐟

Charming Critter

Delightful animal designs with sweet details that capture the essence of your favorite woodland and farmyard friends.

About This Blue Tang Fish (Dory) Amigurumi Pattern

Blue Tang Fish (Dory) Amigurumi Pattern crochet pattern - detailed view of completed project

The pattern features clear row-by-row instructions with helpful color change indicators and stuffing guidance. Special attention is given to creating the characteristic fins and tail that give this fish its unique swimming appearance.

Why You'll Love This Blue Tang Fish (Dory) Amigurumi Pattern

I absolutely love this pattern because it combines simplicity with striking visual impact! The seamless construction means less finishing work, which is always a win in my book. I'm particularly fond of how the bold color changes create such a recognizable character with minimal effort. The compact size makes it a quick project that's perfect for gift-giving or adding to a collection of ocean friends. Plus, there's something incredibly satisfying about watching this cheerful fish come to life as you work through each colorful section!

Blue Tang Fish (Dory) Amigurumi Pattern step 1 - construction progress Blue Tang Fish (Dory) Amigurumi Pattern step 2 - assembly progress Blue Tang Fish (Dory) Amigurumi Pattern step 3 - details and accessories Blue Tang Fish (Dory) Amigurumi Pattern step 4 - final assembly and finishing

Switch Things Up

I love experimenting with this pattern to create unique variations! Try using different shades of blue like turquoise or royal blue for a custom color palette, or add sparkly yarn for a magical underwater effect. You could make a whole school of fish in various sizes by using different yarn weights – imagine a family of Blue Tangs in mini, medium, and jumbo sizes!

For a fun twist, consider adding embroidered details like scales using a contrasting thread color, or create expression variations by positioning the eyes differently. Some crafters love adding small bubbles around the fish using clear beads or French knots. You could even make it interactive for kids by adding a small bell inside during stuffing for a gentle rattling sound.

If you're feeling adventurous, try creating other tropical fish using the same basic body structure but changing the color patterns – clownfish, angelfish, or even fantasy rainbow fish are all possible! The seamless construction technique works beautifully for any fish design you can imagine.

Common Mistakes & How to Fix Them

βœ— Forgetting to switch yarn colors at the indicated rows can disrupt the distinctive stripe pattern of the fish βœ— Not stuffing firmly enough before closing can result in a floppy fish that doesn't hold its shape properly βœ— Placing safety eyes too far apart or at the wrong row creates an unbalanced facial expression βœ— Missing the color change indicators in bold underlined text leads to incorrect black stripe placement throughout the body

Blue Tang Fish (Dory) Amigurumi Pattern

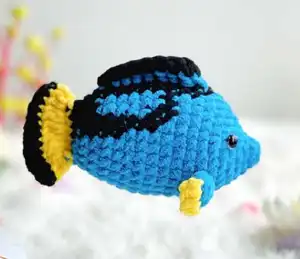
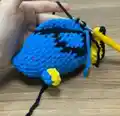
Dive into the ocean of creativity with this charming Blue Tang Fish amigurumi pattern inspired by everyone's favorite forgetful fish! This delightful crochet project features a vibrant blue body with distinctive black markings and a cheerful yellow tail that captures the playful spirit of this beloved character. Perfect for ocean lovers and Disney fans alike, this pattern uses a seamless construction technique from body to tail, minimizing sewing and creating a smooth, professional finish. Whether you're making it as a gift or adding to your own collection of sea creatures, this Blue Tang Fish will bring a splash of underwater magic to any space!

Intermediate 3-4 Hours

Materials Needed for Blue Tang Fish (Dory) Amigurumi Pattern

β€” Main Fabric

  • 01
    Super Bulky / Category 6 yarn in blue color for main body
  • 02
    Super Bulky / Category 6 yarn in black color for stripes and details
  • 03
    Super Bulky / Category 6 yarn in yellow color for tail fin

β€” Tools Required

  • 01
    3.5mm (E) crochet hook
  • 02
    Plastic safety eyes 8mm
  • 03
    Stitch markers
  • 04
    Sewing needle
  • 05
    Scissors
  • 06
    Hot glue gun
  • 07
    Fiberfill stuffing

Progress Tracker

0% Complete

β€” Body to Tail (No Sew Construction) :

Info :

Begin with Blue yarn. When text is bold and underlined, switch to BLACK yarn

Row 1 :

5 SC in an MR (5)

Row 2 :

2SC, INC, 2SC (6)

Row 3 :

INC, SC, 2INC, SC, INC (10)

Row 4 :

SC, 7INC, 2SC (17)

Row 5 :

4SC, (INC, SC) 4 times, INC, 4SC (22)

Row 6 :

5SC, (INC, SC) 6 times, 5SC (28)

Row 7 :

8SC, INC, 10SC, INC, 8SC (30)

Row 8 :

14SC, 2SC (black), 14SC (30)

Row 9-10 :

13SC, 4SC (black), 13SC (30)

Row 11 :

10SC, 10SC (black), 10SC (30)

Row 12 :

9SC, 2SC (black), 2SC, 4SC (black), 2SC, 2SC (black), 9SC (30)

Row 13 :

9SC, SC (black), 3SC, 4SC (black), 3SC, SC (black), 9SC (30)

Row 14 :

3SC, DEC, 3SC, DEC (black), 3SC, DEC, 2SC, SC (black), DEC, SC, 2SC, DEC, 3SC, DEC (24)

Row 15-16 :

6SC, 2SC (black), 3SC, 3SC (black), 2SC, 2SC (black), 6SC (24)

Row 17 :

2SC, DEC, 2SC, (DEC, 2SC) 3 times (black section), DEC, 2SC, DEC (18)

Row 18 :

5SC, 9SC, 4SC (18)

Row 19 :

(SC, DEC) 2 times, (SC, DEC) 3 times, SC, DEC

Info :

Stuffing. Cut the Black and Blue yarn. Change to Yellow yarn

Row 20 :

Crochet 2 sides together with 6SC

Row 21 :

Turn, 2CH, DC-INC 6 times (12)

Info :

Change to Black yarn

Row 22 :

Turn, CH, 12SC (12)

Info :

Weave in the yarn end and cut

β€” Dorsal Fins :

Part 1 (Make 2) :

Begin with Blue yarn. Pick up the yarn from row 7, apart 8 stitch

Row 1 :

(Chains 1, HDC, 3DC, HDC) in one stitch (5)

Info :

Change to Yellow yarn

Row 2 :

Turn, CH, 5SC (5)

Info :

Weave in the yarn end and cut

Part 2 :

Begin with Blue yarn. Pick up the yarn from R8 to R16, in the vertical line from head to tail

Row 1 :

(Chains 1, SC, 7DC, SC) in one stitch (9)

Info :

Change to Black yarn

Row 2 :

Turn, CH, 9SC (9)

Info :

Weave in the yarn end and cut

β€” Final Assembly :

Info :

Attach the eyes at R5-R6, apart 8 stitch

Assembly Instructions

  • Attach plastic safety eyes between rows 5-6, spacing them 8 stitches apart for proper facial proportion
  • Work dorsal fin Part 1 by picking up yarn from row 7, spacing the two fins 8 stitches apart
  • Create dorsal fin Part 2 along the vertical line from row 8 to row 16 for the distinctive spine
  • Secure all yarn ends by weaving them into the body using your sewing needle
  • Use hot glue gun to reinforce eye placement if needed for extra security
  • Ensure all color transitions are neat by hiding yarn tails inside the body during stuffing

Important Notes

  • πŸ’‘Pay close attention to bold and underlined text indicators for black yarn color changes throughout the pattern
  • πŸ’‘Stuff the body firmly before closing at Row 19 to maintain the fish's rounded shape
  • πŸ’‘Use stitch markers to track the beginning of each row, especially during color change sections
  • πŸ’‘The seamless construction means proper tension is crucial for smooth color transitions
  • πŸ’‘Safety eyes should be secured tightly before final stuffing as they cannot be adjusted later
  • πŸ’‘Super bulky yarn creates a chunky, huggable texture perfect for this ocean character

This adorable Blue Tang Fish pattern brings the ocean's most beloved character to your crochet hook! With its seamless body-to-tail construction and vibrant color blocking, you'll create a recognizable friend that's perfect for Disney fans and ocean enthusiasts alike. The pattern's clever design minimizes finishing work while maximizing charm, making it an enjoyable project from start to finish. Whether displayed on a shelf or cuddled by little hands, this cheerful fish is sure to make waves! 🐠✨ Happy crocheting! πŸ§ΆπŸ’™

You ask,

we answer.

FAQs

Can I use regular worsted weight yarn instead of super bulky?

Yes, you can substitute worsted weight yarn, but you'll need to use a smaller hook (2.5mm or 3mm) and your finished fish will be significantly smaller. Adjust stuffing amount accordingly for the reduced size.

How do I know when to switch to black yarn?

The pattern indicates color changes with bold and underlined text. Whenever you see this formatting in the instructions, switch to black yarn for those specific stitches, then return to blue yarn.

What does 'crochet 2 sides together' mean in Row 20?

This means you'll flatten the opening and crochet through both layers simultaneously to close the body before creating the tail, similar to closing a pouch or bag.

Can I make the dorsal fins optional?

While the fins add authentic character detail, you can skip them for a simpler version. However, they're relatively quick to add and really enhance the fish's recognizable appearance.

How do I pick up yarn for the dorsal fins?

Insert your hook into the stitch at the specified row, wrap the new yarn around your hook, and pull through to create a slip stitch. Then continue with the fin instructions from that anchor point.