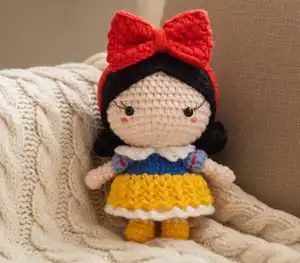
Create your own enchanting Snow White character with this delightful amigurumi crochet pattern! This charming design captures the beloved princess in all her fairy tale glory, complete with her iconic yellow and blue dress, black hair with red bow, and sweet details. Perfect for Disney fans and crochet enthusiasts alike, this pattern guides you through creating either an adorable finger puppet or a complete shorty doll. Whether you're making a gift for a little one or adding to your handmade collection, this Snow White brings magical storytelling to life stitch by stitch.
Progress Tracker
0% Complete
— Master 1st Leg (yarn A):
Round 1:
ch 4, start on the 2nd st from the hook, sc 2, (sc 3) on the last st, sc 1, inc (8)
Round 2:
inc, sc 1, inc 3, sc 1, inc 2 (14)
Round 3-4:
sc 14 (2 rnds) (14)
Round 5:
sc 2, dec 5, sc 2, change to yarn B (9)
Round 6-11:
sc 9 (6 rnds) (9)
— Master 2nd Leg (yarn A):
Round 1-11:
Repeat rnd 1-11 of the 1st Leg (9)
Info:
Do not break the yarn, join with the last st of the 1st leg, continue to crochet the Master's Body
— Master Body (yarn B):
Round 12:
sc 9 (on the 1st leg), sc 9 (on the 2nd leg) (18)
Round 13-15:
sc 18 (3 rnds) (18)
Round 16:
[sc 4, dec] 3x, stuff firmly (15)
Round 17:
[sc 3, dec] 3x (12)
Round 18:
[sc 2, dec] 3x (9)
Round 19-24:
sc 9 (6 rnds) (9)
Round 25:
[sc 1, dec] 3x (6)
Info:
Break the yarn, weave in the last 6 sts, hide the remaining yarn
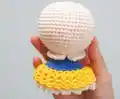
— Master Head (yarn B):
Round 1:
sc 6 into a magic loop (6)
Round 3-11:
sc 12 (9 rnds), ch 1, turn (12)
Round 12:
(blo) [sc 1, inc] 6x (18)
Round 13:
[sc 1, inc, sc 1] 6x (24)
Round 14:
[sc 3, inc] 6x (30)
Round 15:
[sc 2, inc, sc 2] 6x (36)
Round 16:
[sc 5, inc] 6x (42)
Round 17:
[sc 3, inc, sc 3] 6x (48)
Round 18-26:
sc 48 (9 rnds), insert the 6mm eyes between rnd 19&20, 8 sts apart (48)
Round 27:
[sc 3, dec, sc 3] 6x (42)
Round 28:
[sc 5, dec] 6x (36)
Round 29:
[sc 2, dec, sc 2] 6x (30)
Round 30:
[sc 3, dec] 6x (24)
Round 31:
[sc 1, dec, sc 1] 6x (18)
Info:
Before stuffing, if you do not make the body, you can use a 1cm-diameter cylinder or use the body you crocheted, then stuff firmly and continue to finish the head
Round 32:
[sc 1, dec] 6x (12)
Info:
Break the yarn, weave in the last 6 sts, hide the remaining yarn. Join yarn C on the 1st st of the flo on rnd 12
— Snow White's Dress (yarn C):
Round 1:
[sc 3, inc] 3x (15)
Round 2:
[sc 1, inc, sc 1] 5x (20)
Round 3:
[sc 3, inc] 5x (25)
Round 4:
[sc 2, inc, sc 2] 5x (30)
Round 5:
[sc 5, inc] 5x (35)
Round 6:
[sc 3, inc, sc 3] 5x, change to yarn D (40)
Round 8-12:
sc 40 (5 rnds) (40)
Round 13:
(flo) *ch 3, slst on the next st*, repeat ** till the end
Info:
Break the yarn, hide the remaining yarn. Join yarn A on the 1st of the flo on rnd 7, continue to crochet the following rnds
Sleeve Round 1:
*(sc 1, ch 2, sc 1) on the same st, skip 1 st*, repeat ** till the end
Sleeve Round 2:
*(sc 1, ch 2, sc 1) on the chain-space of the last rnd, skip 2 st*, repeat ** till the end
Info:
Break the yarn, hide the remaining yarn
— Snow White's Collar (yarn D):
Round 1:
ch 5, start on the 2nd st from the hook, slst 4, ch 1, turn (4)
Round 2:
(blo) 4 slst, ch 1, turn (4)
Round 3-41:
Repeat rnd 2 (39 rnds) (4)
Info:
Break the yarn. Sew the collar on the body
— Snow White's Arms (yarn B, X2):
Round 1:
sc 7 into a magic loop (7)
Round 2-3:
sc 7 (2 rnds) (7)
Round 5-6:
sc 6 (2 rnds), change to yarn E (6)
Round 7:
ch 2, [(dc 2) in the same st] 6x, slst on the ch 2 (12)
Info:
Break the yarn, sew 2 edges together, then sew the arms on the body. Use red yarn to embroider the dotted line on the arms
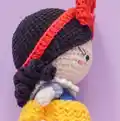
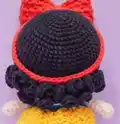
— Snow White's Hair (yarn F):
Round 1:
sc 6 into a magic loop (6)
Round 3:
[sc 1, inc] 6x (18)
Round 4:
[sc 1, inc, sc 1] 6x (24)
Round 5:
[sc 3, inc] 6x (30)
Round 6:
[sc 2, inc, sc 2] 6x (36)
Round 7:
[sc 5, inc] 6x (42)
Round 8:
[sc 3, inc, sc 3] 6x (48)
Round 9-18:
sc 48 (10 rnds) (48)
Round 19:
sc 13, hdc 2, dc 5, hdc 2, sc 1, slst 1, sc 1, hdc 2, dc 5, hdc 2, sc 14 (48)
Round 20:
[ch 8, start on the 3rd st from the hook, (hdc 2) 6x, slst on the next st] 7x, sc 4, hdc 3, dc 6, hdc 2, sc 1, slst 1, sc 1, hdc 2, dc 6, hdc 3, sc 5, [ch 8, start on the 3rd st from the hook, (hdc 2) 6x, slst on the next st] 7x
Info:
Break the yarn. Wear the hair on the head. Insert the 6mm eyes between rnd 19&20, 8 sts apart. Use brown thread to embroider eyelashes, white yarn to make the eyes bigger, pink thread to embroider the cheeks
— Snow White's Bowtie (yarn G):
Round 1:
ch 39, start on the 3rd st from the hook, [sc 1, ch 1, skip 1 st] 18x, sc on the last st, ch 1, turn (38)
Round 2:
[sc 1 on the chain-space of the last rnd, ch 1, skip 1 st] 18x, sc on the last st, ch 1, turn (38)
Round 3-9:
Repeat rnd 2 (7 rnds) (38)
Info:
Break the yarn with a really long rest, sew 2 edges together. Use a tapestry needle to make the bowtie shape, then wrap the remaining yarn around the bowtie
— Bowtie's Band (yarn G):
Round 1:
ch 54, start on the 3rd st from the hook, hdc 52, slst on the 1st ch (52)
Info:
Break the yarn, sew 2 edges together, and then sew the bowtie to the band. Wear the bowtie on the hair
— Final Assembly:
Info:
If you just make the finger puppet, your Snow White is ready to play with. Put the body inside the head, you have Snow White Doll
This enchanting Snow White amigurumi pattern captures the beloved Disney princess in the sweetest miniature form! With her signature black hair, red bow, and beautiful blue and white dress, she's perfect for fairy tale lovers of all ages. The pattern offers flexibility - create a quick finger puppet for storytelling or invest time in the complete doll version for display. Each detail has been carefully designed to bring this classic character to life through your crochet hook. 🧶✨ Happy crocheting! 🍎👸