🧢 Beautiful ✨ Detailed πŸ’ Adorable

Plush Psyduck Pokemon Amigurumi Pattern

Plush Psyduck Pokemon Amigurumi Pattern
4.1β˜… Rating
4-5 Hours Time Needed
3.5K Made This
βœ‚οΈ

Intermediate Level

Ideal for those with basic knitting experience, featuring slightly more advanced stitches and techniques to expand your skills.

⏱️

Weekend Treat

Takes 5-7 hours, making it an enjoyable project to finish over a couple of days.

🧸

Cute Companion

An adorable friend to cherish, handcrafted with love to bring comfort and joy for years to come.

About This Plush Psyduck Pokemon Amigurumi Pattern

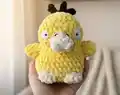
This Psyduck amigurumi pattern brings one of Pokemon's most endearing characters to your crochet hook. With its distinctive yellow coloring and charming webbed features, this pattern captures Psyduck's personality perfectly. The pattern includes detailed instructions for creating the head, body, limbs, and signature duck bill that makes Psyduck instantly recognizable to fans worldwide.

Plush Psyduck Pokemon Amigurumi Pattern crochet pattern - detailed view of completed project

Working in continuous rounds with color changes, you'll build each component separately before assembling them into your finished Psyduck. The pattern uses basic amigurumi techniques with careful shaping to achieve that authentic Pokemon look.

Why You'll Love This Plush Psyduck Pokemon Amigurumi Pattern

I absolutely love this pattern because it combines nostalgic Pokemon charm with satisfying crochet techniques. There's something incredibly rewarding about watching Psyduck's confused yet lovable expression come to life stitch by stitch. The yellow yarn works up beautifully, and seeing those webbed feet and tail take shape makes me smile every time. It's the perfect size for cuddling or displaying, and I find the color work engaging without being overwhelming. Plus, who can resist Psyduck's perpetual headache charm?

Plush Psyduck Pokemon Amigurumi Pattern step 1 - construction progress Plush Psyduck Pokemon Amigurumi Pattern step 2 - assembly progress Plush Psyduck Pokemon Amigurumi Pattern step 3 - details and accessories Plush Psyduck Pokemon Amigurumi Pattern step 4 - final assembly and finishing

Switch Things Up

I love experimenting with different yarn types to give Psyduck unique textures and personalities. Try using a fuzzy or chenille yarn for an ultra-soft, cuddly version that feels like a real plush toy. You could also play with the color palette - imagine a shiny Psyduck in blue tones, or even create a whole family with baby Psyducks in pastel yellows.

For a fun twist, I sometimes add a small crocheted headache symbol (those little stress lines) above Psyduck's head using black embroidery floss to really capture its signature perpetual confusion. You could also make the arms poseable by inserting thin pipe cleaners or wire before closing them up.

I've experimented with adding weighted beads in the bottom of the body to help Psyduck sit more stably - it makes a wonderful desk companion that won't topple over. Another variation I adore is making the bill slightly larger and more dimensional by working a few extra rounds, giving it a more pronounced duck-like appearance. The possibilities are endless, and each little modification makes your Psyduck uniquely yours!

Common Mistakes & How to Fix Them

βœ— Miscounting stitches during head shaping can create an asymmetrical look - use stitch markers at the beginning of each round to track your progress accurately βœ— Stuffing too firmly or too loosely affects the final shape dramatically - aim for a firm but slightly squishy feel that maintains the round head shape βœ— Placing safety eyes incorrectly changes Psyduck's signature confused expression - position them carefully between the specified rounds with proper spacing for authenticity βœ— Not securing color changes properly creates visible gaps when switching between yellow and orange yarn - weave in ends as you go and ensure tight transitions

Plush Psyduck Pokemon Amigurumi Pattern

Create your very own adorable Psyduck amigurumi with this detailed crochet pattern! This lovable Water-type Pokemon comes to life with its signature yellow body, webbed feet, and confused expression that fans adore. Perfect for Pokemon enthusiasts and amigurumi lovers alike, this pattern guides you through crafting a huggable Psyduck that captures all the charm of this beloved character. Whether you're making it for yourself or as a heartfelt gift for a Pokemon trainer in your life, this plush companion will bring smiles and nostalgia to anyone who sees it.

Intermediate 4-5 Hours

Materials Needed for Plush Psyduck Pokemon Amigurumi Pattern

β€” Main Fabric

  • 01
    Yellow yarn for body, head, arms, legs, and tail (main color)
  • 02
    Orange or burnt orange yarn for bill and webbed feet
  • 03
    Small amount of white yarn for eye highlights or details
  • 04
    Medium weight (worsted/aran) acrylic or cotton yarn recommended

β€” Tools Required

  • 01
    Crochet hook size 3.0mm or 3.5mm (US C/2 - E/4)
  • 02
    Safety eyes (6mm or 8mm black)
  • 03
    Fiberfill stuffing
  • 04
    Yarn needle for sewing
  • 05
    Scissors
  • 06
    Stitch markers
  • 07
    Pins for assembly

Progress Tracker

0% Complete

β€” Head :

Round 1 :

6 sc in MR (6)

Round 2 :

6 inc (12)

Round 3 :

(1 sc, 1 inc) x 6 (18)

Round 4 :

(2 sc, 1 inc) x 6 (24)

Round 5 :

(3 sc, 1 inc) x 6 (30)

Round 6 :

(4 sc, 1 inc) x 6 (36)

Round 7-12 :

1 sc in each st (36)

Round 13 :

(4 sc, 1 dec) x 6 (30)

Round 14 :

(3 sc, 1 dec) x 6 (24)

Info :

Insert safety eyes between rounds 10-11, approximately 6-7 stitches apart

Round 15 :

(2 sc, 1 dec) x 6 (18)

Info :

Stuff the head firmly

Round 16 :

(1 sc, 1 dec) x 6 (12)

Round 17 :

6 dec (6)

Info :

Fasten off, close the opening

β€” Body :

Round 1 :

6 sc in MR (6)

Round 2 :

6 inc (12)

Round 3 :

(1 sc, 1 inc) x 6 (18)

Round 4 :

(2 sc, 1 inc) x 6 (24)

Round 5 :

(3 sc, 1 inc) x 6 (30)

Round 6-10 :

1 sc in each st (30)

Round 11 :

(3 sc, 1 dec) x 6 (24)

Round 12-13 :

1 sc in each st (24)

Round 14 :

(2 sc, 1 dec) x 6 (18)

Info :

Stuff the body

Round 15 :

(1 sc, 1 dec) x 6 (12)

Info :

Fasten off, leaving a long tail for sewing

β€” Arms :

Info :

Make 2 pieces in yellow yarn

Round 1 :

6 sc in MR (6)

Round 2 :

6 inc (12)

Round 3 :

1 sc in each st (12)

Round 4 :

(1 sc, 1 dec) x 4 (8)

Round 5-9 :

1 sc in each st (8)

Info :

Stuff lightly, flatten and close, leaving tail for sewing

β€” Legs :

Info :

Make 2 pieces starting with orange yarn for webbed feet

Round 1 :

6 sc in MR (6)

Round 2 :

6 inc (12)

Round 3 :

1 sc in each st BLO (12)

Round 4 :

Switch to yellow, (1 sc, 1 dec) x 4 (8)

Round 5-7 :

1 sc in each st (8)

Info :

Stuff lightly, flatten and close, leaving tail for sewing

β€” Bill :

Info :

Use orange yarn

Round 1 :

6 sc in MR (6)

Round 2 :

(1 sc, 1 inc) x 3 (9)

Round 3 :

(2 sc, 1 inc) x 3 (12)

Round 4-5 :

1 sc in each st (12)

Info :

Stuff lightly, fasten off leaving tail for sewing to head

β€” Tail :

Info :

Use yellow yarn

Round 1 :

6 sc in MR (6)

Round 2 :

(1 sc, 1 inc) x 3 (9)

Round 3-6 :

1 sc in each st (9)

Info :

Flatten and close, leaving tail for sewing

Assembly Instructions

  • Sew the head securely to the body, ensuring it's centered and positioned at a slight forward tilt for Psyduck's characteristic posture
  • Attach the orange bill to the center front of the head, positioned just below the safety eyes for an authentic look
  • Sew arms to the sides of the body at approximately rounds 2-3 from the top, angled slightly downward
  • Attach legs to the bottom of the body, spacing them evenly for balance and stability when standing
  • Sew the tail to the back center of the body at the bottom rounds for proper Pokemon proportions
  • Weave in all remaining yarn ends securely on the inside of each piece
  • Optional: Add small white yarn highlights to the eyes or embroider small eyebrows for extra expression

Important Notes

  • πŸ’‘Use consistent tension throughout to ensure all body parts are proportional to each other
  • πŸ’‘Safety eyes must be inserted before closing the head - they cannot be added after stuffing
  • πŸ’‘The color transition from orange to yellow on the legs should be clean - cut yarn and rejoin rather than carrying it
  • πŸ’‘Don't overstuff the arms and legs as they should remain somewhat flexible and poseable
  • πŸ’‘Pin all pieces in place before final sewing to check positioning and proportions
  • πŸ’‘Keep the bill unstuffed or very lightly stuffed to maintain its flat duck bill appearance

This charming Psyduck amigurumi pattern brings the beloved Water-type Pokemon into cuddly crochet form! With its signature confused expression and adorable yellow body, this pattern is perfect for Pokemon fans of all ages. The combination of simple shaping techniques and thoughtful color changes creates an instantly recognizable character that's sure to become a treasured companion. Whether you're expanding your Pokemon collection or creating a heartfelt gift, this Psyduck will waddle its way into hearts everywhere. πŸ¦†πŸ’› Happy crocheting! 🧢✨

You ask,

we answer.

FAQs

What size will the finished Psyduck be?

The finished Psyduck measures approximately 15-18cm (6-7 inches) tall when made with worsted weight yarn and a 3.5mm hook, making it the perfect cuddly size.

Can I use different yarn weights for this pattern?

Yes! Using thicker yarn and a larger hook will create a bigger Psyduck, while thinner yarn makes a smaller version. Just ensure your hook size matches your yarn choice and adjust eye size accordingly.

Do I need to know how to change colors for this pattern?

Yes, you'll need basic color changing skills for the legs where orange transitions to yellow. The pattern uses simple color change techniques that are beginner-friendly with practice.

Can I make this without safety eyes?

Absolutely! You can embroider eyes with black yarn or use felt circles sewn onto the head. This makes the Psyduck safer for young children and babies.

How do I get the bill to stay in the right position?

Pin the bill in place before sewing and stuff it very lightly or not at all. Sew it securely with matching orange thread using small whip stitches all around the edge.