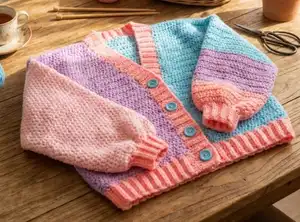
Transform your wardrobe with this stunning colorblock oversized cardigan that combines comfort and style effortlessly. This beginner-friendly pattern guides you through creating a versatile piece using simple stitches and customizable color combinations. Perfect for layering through any season, this cardigan features a flattering V-neck design, cozy ribbed edges, and custom button closures that make it uniquely yours.
Progress Tracker
0% Complete
— FRONT PANEL 1 :
Step 1 :
Chain 35 (39, 43, 47, 51, 55)
Step 2 :
Skip 2ch then hdc on the 3rd ch from the hook
Step 3 :
Hdc on each ch until you reach the end of the row. You should have a total of 33 (37, 41, 45, 49, 53) hdcs
Step 4 :
Ch 2. Flip your work then hdc on the same st. Hdc on each of the next sts until you reach the end of the row
Step 5 :
Repeat Step 4 until you make a total of 24 (26, 28, 30, 32, 34) rows
Step 6 :
Ch 2. Flip your work then hdc on the same st. Hdc on each of the next sts until you reach the last 2 sts. For the last 2 sts, make an hdc2tog (decrease row). Place a stitch marker on your hdc2tog
Step 7 :
Ch 2. Flip your work then hdc on the same st. Hdc on each of the next sts until you reach the end of the row (non-decrease row)
Step 8 :
Ch 2. Flip your work then hdc on the same st. Hdc on each of the next sts until you reach the last 2 sts. For the last 2 sts, make an hdc2tog (decrease row)
Step 9 :
Repeat steps 7-8 until you make a total of 18 (20, 22, 24, 26, 28) rows starting from the row where you placed the stitch marker
Step 10 :
After the last hdc on the last row, ch 1 and fasten off
— FRONT PANEL 2 :
Steps 1-5 :
Repeat steps 1-5 of Front Panel 1
Step 6 :
Ch 1. Flip your work then make an hdc2tog on the first 2 sts. Hdc on each of the next sts until you reach the end of the row (decrease row). Place a stitch marker on your hdc2tog
Step 7 :
Ch 2. Flip your work then hdc on the same st. Hdc on each of the next sts until you reach the end of the row (non-decrease row)
Step 8 :
Ch 1. Flip your work then make an hdc2tog on the first 2 sts. Hdc on each of the next sts until you reach the end of the row (decrease row)
Step 9 :
Repeat steps 7-8 until you make a total of 18 (20, 22, 24, 26, 28) rows starting from the row where you placed the stitch marker
Step 10 :
After the last hdc on the last row, ch 1 and fasten off
— CUFF RIBBING :
Step 2 :
Hdc on the 3rd chain from the hook. Hdc until you reach the end of the row. You should now have a total of 8hdcs
Step 3 :
Ch2. Flip your work. Do a BLOhdc until you reach the end of the row. Make sure you have a total of 8 hdcs
Step 4 :
Repeat step 3 until you make a total of 12 (13,14,15,16,17) rows or until the length of the cuff ribbing when stretched covers your entire wrist
Step 5 :
Attach both ends of the cuff ribbing by doing a sl st on the inner loops only
Step 6 :
Once you reach the end of the row, make 2sc on the 1st hdc post then 1 sc on the next hdc post
Step 7 :
Place alternating 2sc then 1 sc on each of the next hdc posts until you reach the end. When you reach the end of the row, sl st on the st before the 1st sc that you created
— SLEEVES :
Step 1 :
If using different color: Insert the hook into any st in the row. Sl st. Ch2 then dc on the same st
Step 2 :
2dc on the next st. Do the alternating 1dc and 2dc on each of the next sts until you reach the end of the row. Sl st on the 1st dc of the row
Step 3 :
Ch2. Dc on the next st then 2 dc on the next st
Step 4 :
Do the alternating 1dc and 2dc on each of the next sts until you reach the end of the row. Adjust last stitch based on pattern ending. Sl st on the 1st dc of the row
Step 5 :
Ch2. DC on the same st. 1dc on each of the next 2 sts. Then 2dcs on the next st
Step 6 :
Place 1dc into each of the next 3 sts then 2dcs on the next st. Repeat this step until you reach the end of the row. Sl st on the 1st dc of the row
Step 7 :
Ch2. DC on the next st then 1 dc on each of the next sts until you reach the end of your row. Add another dc on the same stitch where you placed the ch2 at the start of the row. Sl st on the 1st dc of the row
Step 8 :
Ch2. Dc on the same st then 1 dc on each of the next sts until you reach the end of the row. Sl st on the 1st dc of the row
Step 9 :
Repeat steps 7-8 until you reach your desired sleeve length
Step 10 :
After the last dc on the last row, ch 1, cut the yarn leaving a tail with a length that is equal to 4x the length of your front panels
Info :
Repeat all cuff and sleeve steps to create the 2nd sleeve
— BACK PANEL (Design 1 - Horizontal Layers) :
Step 1 :
Chain 76 (84, 92, 100, 108, 116). Hdc on the 3rd chain from the hook. Hdc on each of the next sts until you reach the end of the row
Step 2 :
Ch 2. Flip your work then hdc on the same st. Hdc on each of the next sts until you reach the end of the row
Step 3 :
Repeat Step 2 until you reach your desired length for that color. Cut the yarn and fasten off
Step 4 :
To start with your new color, create a slip knot with your new yarn color, sl st on the st where you ended
Step 5 :
Ch2. Flip your work then hdc on the same st. Hdc on each of the next sts until you reach the end of the row
Step 6 :
Repeat Step 5 until you reach your desired length for that color. Ch1, cut the yarn and fasten off. Repeat color changes as desired
Info :
Make sure the total number of rows of the back panel match the total number of rows of your front panel
— BACK PANEL (Design 2 - Colorblock Pattern) :
Step 1 :
Chain 39 (43, 47, 51, 55, 59). Hdc on the 3rd chain from the hook. Hdc on each of the next sts until you reach the end of the row
Step 2 :
Ch 2. Flip your work then hdc on the same st. Hdc on each of the next sts until you reach the end of the row
Step 3 :
Repeat Step 2 until you reach your desired length for that color. Cut the yarn and fasten off
Step 4 :
To start with your new color, create a slip knot with your new yarn color, sl st on the st where you ended
Step 5 :
Ch2. Flip your work then hdc on the same st. Hdc on each of the next sts until you reach the end of the row
Step 6 :
Repeat Step 5 until you reach your desired length for that color. Ch1, cut the yarn and fasten off. Create the second half using same steps with different colors
Info :
Connect the two halves using mattress stitch as detailed in assembly instructions
This colorblock oversized cardigan pattern was designed to give you the perfect cozy layer that's as fun to make as it is to wear! The pattern combines beginner-friendly stitches with professional finishing techniques, letting you customize every color choice to match your personal style. Whether you choose bold contrasting blocks or subtle tone-on-tone shades, you'll create a versatile piece that works for any season. The oversized fit ensures comfortable wear while the ribbed edges and button closures add that polished, handmade touch. Happy crocheting, and enjoy wearing your colorful creation! 🧶✨