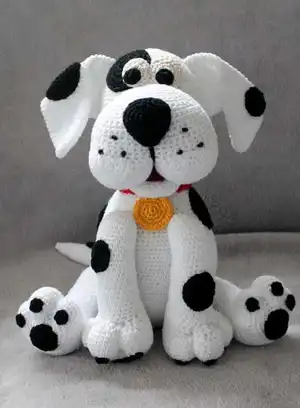
Create your own adorable spotted companion with this charming Dotty Dog amigurumi pattern! This delightful design features a playful white dog with distinctive black spots, floppy ears, and an endearing expression that captures hearts instantly. Perfect for dog lovers and crochet enthusiasts alike, Dotty comes complete with a vibrant red collar, yellow pendant, and even his own cozy blue pot. With detailed instructions for creating expressive eyes, a charming snout with tongue detail, and carefully positioned spots throughout, this pattern brings personality to every stitch. Whether displayed as home decor or gifted to someone special, Dotty Dog becomes a treasured handmade keepsake.
Progress Tracker
0% Complete
— Body in white, crochet in rounds :
Round 2 :
* 1 inc*, 6 times (12)
Round 3 :
* 1 sc, 1 inc*, 6 times (18)
Round 4 :
* 2 sc, 1 inc*, 6 times (24)
Round 5 :
* 3 sc, 1 inc*, 6 times (30)
Round 6 :
* 4 sc, 1 inc*, 6 times (36)
Round 7 :
* 5 sc, 1 inc*, 6 times (42)
Round 8 :
* 6 sc, 1 inc*, 6 times (48)
Round 9 :
* 7 sc, 1 inc*, 6 times (54)
Round 10 :
* 8 sc, 1 inc*, 6 times (60)
Round 11 :
* 9 sc, 1 inc*, 6 times (66)
Round 12 :
* 10 sc, 1 inc*, 6 times (72)
Round 13 :
* 11 sc, 1 inc*, 6 times (78)
Round 15 :
* 12 sc, 1 inc*, 6 times (84)
Round 18 :
* 13 sc, 1 inc*, 6 times (90)
Round 19 :
90 sc (repeat this round 11 times)
Round 20 :
* 28 sc, 1 dec*, 3 times (87)
Round 21 :
* 27 sc, 1 dec*, 3 times (84)
Round 22 :
* 26 sc, 1 dec*, 3 times (81)
Round 23 :
* 25 sc, 1 dec*, 3 times (78)
Round 24 :
* 24 sc, 1 dec*, 3 times (75)
Round 25 :
* 23 sc, 1 dec*, 3 times (72)
Round 26 :
* 22 sc, 1 dec*, 3 times (69)
Round 27 :
* 21 sc, 1 dec*, 3 times (66)
Round 28 :
* 20 sc, 1 dec*, 3 times (63)
Round 29 :
* 19 sc, 1 dec*, 3 times (60)
Round 30 :
* 18 sc, 1 dec*, 3 times (57)
Round 31 :
* 17 sc, 1 dec*, 3 times (54)
Round 32 :
* 16 sc, 1 dec*, 3 times (51)
Round 33 :
* 15 sc, 1 dec*, 3 times (48)
Round 34 :
* 14 sc, 1 dec*, 3 times (45)
Round 35 :
* 13 sc, 1 dec*, 3 times (42)
Round 36 :
* 12 sc, 1 dec*, 3 times (39)
Round 37 :
* 11 sc, 1 dec*, 3 times (36)
Round 38 :
* 10 sc, 1 dec*, 3 times (33)
Round 39 :
* 9 sc, 1 dec*, 3 times (30)
Round 40 :
* 8 sc, 1 dec*, 3 times (27)
Round 41 :
* 7 sc, 1 dec*, 3 times (24) - start of head, stuff body
Round 42 :
* 3 sc, 1 inc*, 6 times (30)
Round 43 :
* 4 sc, 1 inc*, 6 times (36)
Round 44 :
* 5 sc, 1 inc*, 6 times (42)
Round 45 :
* 6 sc, 1 inc*, 6 times (48)
Round 46 :
* 7 sc, 1 inc*, 6 times (54)
Round 47 :
* 8 sc, 1 inc*, 6 times (60)
Round 49 :
* 9 sc, 1 inc*, 6 times (66)
Round 50 :
* 10 sc, 1 inc*, 6 times (72)
Round 51 :
72 sc (repeat this round 9 times)
Round 52 :
* 22 sc, 1 dec*, 3 times (69)
Round 53 :
* 21 sc, 1 dec*, 3 times (66)
Round 54 :
* 20 sc, 1 dec*, 3 times (63)
Round 55 :
* 19 sc, 1 dec*, 3 times (60)
Round 56 :
* 18 sc, 1 dec*, 3 times (57)
Round 57 :
* 17 sc, 1 dec*, 3 times (54)
Round 58 :
* 16 sc, 1 dec*, 3 times (51)
Round 59 :
* 15 sc, 1 dec*, 3 times (48)
Round 60 :
* 14 sc, 1 dec*, 3 times (45)
Round 61 :
* 13 sc, 1 dec*, 3 times (42)
Round 62 :
* 12 sc, 1 dec*, 3 times (39)
Round 63 :
* 11 sc, 1 dec*, 3 times (36)
Round 64 :
* 10 sc, 1 dec*, 3 times (33)
Round 65 :
* 9 sc, 1 dec*, 3 times (30)
Round 66 :
* 8 sc, 1 dec*, 3 times (27)
Round 67 :
* 7 sc, 1 dec*, 3 times (24)
Round 68 :
* 2 sc, 1 dec*, 6 times (18) - stuff the rest
Round 69 :
* 1 sc, 1 dec*, 6 times (12)
Round 70 :
* 1 dec*, 6 times (6) - close
— Snout in white, start in rows :
Row 3 :
1 inc, 10 sc, 1 inc (14)
Row 4 :
1 inc, 12 sc, 1 inc (16)
Row 5 :
1 inc, 14 sc, 1 inc (18)
Row 6 :
1 inc, 16 sc, 1 inc (20)
Row 7 :
1 inc, 18 sc, 1 inc (22)
Row 8 :
22 sc (repeat this round 4 times)
Row 9 :
Start new and insert in stitch no 7 from the side
Row 10 :
3 sc in stitch no 7, 1 dc in the following stitch and turn, this is how the semi round part of the snout is adapted. Go on like this in the following rows.
Row 11 :
* 1 inc*, 3 times, dc (6)
Row 12 :
* 1 sc, 1 inc*, 3 times, st (9)
Row 13 :
* 2 sc, 1 inc*, 3 times, st (12)
Row 15 :
* 3 sc, 1 inc*, 3 times, st (15)
Row 17 :
* 4 sc, 1 inc*, 3 times, st (18)
Row 19 :
* 5 sc, 1 inc*, 3 times, st (21)
Row 20 :
Start over in row 10 on the other side of the snout, to get to semi round parts.
Row 21 :
Start over again, on the right side, right after the second semicircle. 36 sc around the upper part, 42 sc around the two semicircles. Go on in rounds. (78)
Round 22 :
78 sc (repeat this round 3 times)
Round 23 :
36 sc, * 3 sc, 1 dec*, 4 times, 2 sc, * 3 sc, 1 dec*, 4 times (70)
Round 24 :
36 sc, * 2 sc, 1 dec*, 4 times, 2 sc, * 2 sc, 1 dec*, 4 times (62)
Round 25 :
* 4 sc, 1 dec*, 6 times, * 1 dec*, 6 times, 2 sc, * 1 dec, 6 times (44)
Info :
Stuff the snout and sew it on the head, about 8 rounds away from the heals.
— Dot behind the eye in black, crochet in rounds :
Round 2 :
* 1 sc inc, 1 hdc inc*, 4 times (16)
Round 3 :
* 1 sc, 1 sc inc, 1 hdc, 1 hdc inc*, 4 times (24)
Round 4 :
* 2 sc, 1 inc*, 8 times (32)
Round 5 :
* 3 sc, 1 inc*, 8 times (40)
— Small, left eye in nature white, crochet in rounds :
Round 2 :
* 1 sc inc*, 4 times, * 1 hdc inc*, 2 times (12)
Round 3 :
* 1 sc, 1 sc inc*, 4 times, * 1 hdc, 1 hdc inc*, 2 times (18)
— Big, right eye in nature white, crochet in rounds :
Round 2 :
* 1 sc inc*, 4 times, * 1 hdc inc*, 2 times (12)
Round 3 :
* 1 sc, 1 sc inc*, 4 times, * 1 hdc, 1 hdc inc*, 2 times (18)
Round 4 :
* 2 sc, 1 sc inc*, 4 times, * 2 hdc, 1 hdc inc*, 2 times (24)
— Pupil in black, crochet in rounds, two times :
Round 2 :
* 1 inc*, 4 times (8)
Info :
Sew the black dot to the left, right above the snout, the left small eye onto it and the pupil onto the eye, on the bottom of it. The big eye directly right to it, sew the pupil onto the bottom of the second eye.
— Nose in black, crochet in rounds :
Round 2 :
* 1 inc*, 6 times (12)
Round 3 :
* 2 sc, 2 inc*, 3 times (18)
Round 4 :
3 sc, 2 inc, * 4 sc, 2 inc*, 2 times, 1 sc (24)
Round 5 :
4 sc, 2 inc, * 6 sc, 2 inc*, 2 times, 2 sc (30)
Round 7 :
5 sc, 2 dec, * 6 sc, 2 dec*, 2 times, 1 sc (24)
Round 8 :
* 2 sc, 1 dec*, 6 times (18)
Round 9 :
* 1 sc, 1 dec*, 6 times (12) - stuff
Round 10 :
* 1 dec*, 6 times (6) - close and leave a long string
Infos :
Sew the nose in the middle of the snout, one corner down. Stitch the string two times around the part, where the semicircles meet. With the end of the string, knot the stubbles onto the snout, three times a side.
— Snout bottom part, crochet in white and in rounds :
Round 2 :
* 1 inc*, 5 times (10)
Round 3 :
* 1 sc, 1 inc*, 5 times (15)
Round 4 :
* 2 sc, 1 inc*, 5 times (20)
Round 5 :
* 3 sc, 1 inc*, 5 times (25)
Round 6 :
25 sc (repeat this round 7 times)
Info :
Stuff it just a little, the stuffed part should be pushed in the edges. Sew the edge, about 1 cm (0.4 inches) away from the edge, so the stuffing stays where it's supposed to be. The middle stays unstuffed.
— Tongue in dark purple and in rows, turn with a ch :
Row 2 :
3 sc, 4 sc in the last ch, go on crocheting on the backside, 3 sc, turn (10)
Row 3 :
4 sc, 2 inc, 4 sc (12)
Row 4 :
5 sc, 2 inc, 5 sc (14)
Info :
Sew the tongue onto the bottom part of the snout, make sure the purple string doesn't shine through the underneath of this part. Sew the back part of the snout under the upper one. The right and left edge should be fixed as well, but only about 1.5 cm (0.6 inches) the rest stays like it is.
— Ears in white, crochet in rounds, two times :
Round 3 :
2 sc, 3 inc, 4 sc (12)
Round 4 :
4 sc, 3 inc, 5 sc (15)
Round 5 :
6 sc, 1 inc, 8 sc (16)
Round 6 :
5 sc, 3 inc, 8 sc (19)
Round 7 :
6 sc, 3 inc, 10 sc (22)
Round 8 :
8 sc, 1 inc, 13 sc (23)
Round 9 :
9 sc, 1 inc, 13 sc (24)
Round 11 :
10 sc, 1 inc, 13 sc (25)
Round 13 :
11 sc, 1 inc, 13 sc (26)
Round 15 :
11 sc, 1 inc, 14 sc (27)
Round 17 :
12 sc, 1 inc, 14 sc (28)
Round 19 :
13 sc, 1 inc, 14 sc (29)
Round 22 :
14 sc, 1 inc, 14 sc (30)
Round 23 :
30 sc (repeat this round 11 times)
Infos :
Sew the ears on top of the head, start about 8 rounds from the middle, peak down. Now fold the corners differently and fix this with two or three stitches.
— Paws and legs in white, crochet in rounds, four times :
Round 2 :
* 1 inc*, 6 times (12)
Round 3 :
* 1 sc, 1 inc*, 6 times (18)
Round 4 :
* 2 sc, 1 inc*, 6 times (24)
Round 5 :
* 3 sc, 1 inc*, 6 times (30)
Round 6 :
* 4 sc, 1 inc*, 6 times (36)
Round 7 :
* 5 sc, 1 inc*, 6 times (42)
Round 8 :
42 sc (repeat this round 4 times)
Round 9 :
* 2 hdc, 2 hdc dec*, 6 times, 18 sc (36)
Round 10 :
* 1 hdc, 2 hdc dec*, 6 times, 18 sc (30)
Round 11 :
* 2 hdc dec*, 6 times, 18 sc (24)
Round 12 :
24 sc (repeat this round 5 times)
Round 13 :
1 dec, 22 sc (23)
Round 14 :
23 sc (repeat this round 5 times)
Round 15 :
1 dec, 21 sc (22)
Round 16 :
22 sc (repeat this round 7 times)
Round 17 :
1 dec, 20 sc (21)
Round 18 :
* 5 sc, 1 dec*, 3 times (18)
Round 19 :
* 1 sc, 1 dec*, 6 times (12) - stuff
Round 20 :
* 1 dec*, 6 times (6) - close
Infos :
Now toes are worked out, by stitching a long white string through the paws, like shown on the photo, two times, to get 3 toes. I fixed the front legs from top till bottom, you can also just fix them on the upper end, about two fingers under the heals. Sew the back legs left and right to the body, fix the back paws on the front ones, so Dotty sits properly.
— Dots under the paws, big one, crochet in black once a paw :
Round 2 :
* 1 inc*, 6 times (12)
Round 3 :
* 1 sc, 1 inc*, 6 times (18)
— Small dots, crochet in black and in rounds, 3 times a paw :
Info :
Sew the dots under the four paws, like shown on the picture below.
— Tail in white, crochet in rounds :
Round 7 :
1 inc, 8 sc (10)
Round 9 :
1 inc, 9 sc (11)
Round 11 :
1 inc, 10 sc (12)
Round 13 :
1 inc, 11 sc (13)
Round 15 :
1 inc, 12 sc (14)
Round 17 :
1 inc, 13 sc (15)
Round 18 :
15 sc (repeat this round 19 times)
Round 19 :
* 1 sc, 1 dec*, 5 times (10) - stuff
Round 20 :
* 1 dec*, 5 times (5) - close
Info :
Sew the tail on the middle of the back, about 16 rounds away from the bottom middle.
— Big black dots, crochet in rounds 3 times :
Round 2 :
* 1 inc*, 6 times (12)
Round 3 :
* 1 sc, 1 inc*, 6 times (18)
Round 4 :
* 2 sc, 1 inc*, 6 times (24)
Round 5 :
* 3 sc, 1 inc*, 6 times (30)
— Small dots, crochet in rounds, 5 times :
Round 2 :
* 1 inc*, 6 times (12)
Round 3 :
* 1 sc, 1 inc*, 6 times (18)
Info :
Spread the dots equally all over the body, including leg, ears, back of the head and the tail.
— Collar in red, crochet in rounds, turn with a ch :
Row 2 :
4 sc (repeat this row, until the collar is about 19 cm / 8 inches long)
— Pendant in yellow, crochet in rounds :
Round 2 :
* 1 inc*, 6 times (12)
Round 3 :
* 1 sc, 1 inc*, 6 times (18)
Round 4 :
* 2 sc, 1 inc*, 6 times (24)
Info :
Place the pendant in the middle of the collar, close the collar round Dotty's neck.
— Bone in nude, crochet in rounds :
Round 2 :
* 1 inc*, 5 times (10)
Round 3 :
* 1 sc, 1 inc*, 5 times (15)
Info :
Crochet a second part like this, place them next to each other and crochet a big round around both of this part, you will have 30 stitches.
Round 4 :
* 3 sc, 1 dec*, 6 times (24)
Round 5 :
* 2 sc, 1 dec*, 6 times (18)
Round 6 :
18 sc (repeat this round 21 times)
Round 7 :
* 2 sc, 1 inc*, 6 times (24)
Round 8 :
* 3 sc, 1 inc*, 6 times (30) - stuff
Infos :
Now go on in two circles, therefor, close one circle with 15 sc, make sure, the middle is right above the lower ends of the bones. Leave out the other 15 stitches.
Round 11 :
* 1 sc, 1 dec*, 5 times (10)
Round 12 :
* 1 dec*, 5 times (5) - close
Info :
Repeat from round 9 with the left over 15 stitches. Make sure, everything is stuffed probably, before finally closed.
— Potty in blue, with double string and hook no 8/G, crochet in rounds :
Round 2 :
* 1 inc*, 6 times (12)
Round 3 :
* 1 sc, 1 inc*, 6 times (18)
Round 4 :
* 2 sc, 1 inc*, 6 times (24)
Round 5 :
* 3 sc, 1 inc*, 6 times (30)
Round 6 :
* 4 sc, 1 inc*, 6 times (36)
Round 7 :
36 sc (repeat this round 3 times)
Round 8 :
* 10 sc, 1 dec*, 3 times (33)
This delightful Dotty Dog pattern brings together advanced amigurumi techniques to create a personality-filled spotted companion that's sure to steal hearts! The unique construction method of working body and head continuously creates beautiful proportions, while the asymmetrical eye design gives Dotty unforgettable character. With detailed instructions for the dimensional snout, floppy ears, and charming accessories like the red collar and blue pot, this pattern rewards your patience with an absolutely adorable finished piece. Perfect for experienced crocheters ready to showcase their skills! 🐶🧶✨