🧢 Beautiful ✨ Detailed πŸ’ Adorable

Medina Mosaic Blanket Crochet Pattern

Medina Mosaic Blanket Crochet Pattern
4.7β˜… Rating
40-50 Hours Time Needed
3.5K Made This
βœ‚οΈ

Advanced Level

Designed for experienced knitters, these patterns involve intricate designs and complex techniques to challenge and inspire.

⏱️

Slow & Steady

A 10-12 hour projectβ€”great for savoring the process over several sessions.

🏑

Cozy Accent

A warm touch for your space that transforms ordinary corners into inviting nooks filled with handmade charm.

About This Medina Mosaic Blanket Crochet Pattern

The Medina Mosaic Pattern is a breathtaking crochet blanket project that celebrates Moroccan artistry through intricate mosaic crochet techniques. Each of the 36 tiles measures approximately 5x5 inches and features a unique geometric design created using strategic color placement and front loop/back loop stitching. The pattern incorporates five distinct colorways, each named after iconic Moroccan cities, creating visual variety while maintaining cohesive design harmony throughout the finished blanket.

Medina Mosaic Blanket Crochet Pattern crochet pattern - detailed view of completed project

This pattern requires precision and patience, making it ideal for experienced crocheters ready to tackle a rewarding long-term project. The finished 36x36 inch blanket becomes a stunning home accent piece that showcases your dedication to the craft.

Why You'll Love This Medina Mosaic Blanket Crochet Pattern

I absolutely love this pattern because it transforms simple crochet stitches into complex geometric artwork that looks incredibly professional. The mosaic technique creates dimensional texture and visual interest that makes people think you spent months on intricate stitchwork, when really it's just strategic color changes and loop placement. I find the process meditative and satisfying as each tile comes together to reveal its hidden pattern. The color combinations are inspired by Moroccan architecture and markets, bringing exotic elegance into your home. What I appreciate most is how customizable it is - you can rearrange tiles, change color schemes, or even make individual tiles as coasters or potholders while working toward the full blanket.

Medina Mosaic Blanket Crochet Pattern step 1 - construction progress Medina Mosaic Blanket Crochet Pattern step 2 - assembly progress Medina Mosaic Blanket Crochet Pattern step 3 - details and accessories Medina Mosaic Blanket Crochet Pattern step 4 - final assembly and finishing

Switch Things Up

I love how versatile this Medina Mosaic pattern truly is once you understand the basic structure. While the original uses 22 vibrant colors inspired by Moroccan architecture, I've experimented with completely different color schemes that create entirely new moods.

For a modern minimalist look, I made a version using just three colors - charcoal gray, soft cream, and one accent color like dusty rose or sage green. The geometric patterns still shine through beautifully but with a more contemporary, Scandinavian feel.

I've also created individual tiles as coasters or pot holders, which is perfect for testing color combinations before committing to a full blanket. Some of my favorite variations include an ocean-inspired palette with blues and teals, a sunset version with warm oranges and purples, and even a monochromatic gradient using different shades of the same color family.

Another fun adaptation I discovered is making the tiles in different sizes by using thicker or thinner yarn with appropriate hook sizes. A chunky weight yarn creates oversized tiles perfect for a quick throw, while fingering weight yarn produces delicate, intricate tiles ideal for wall art.

You can also mix and match tile designs - the pattern provides five different colorways, but there's nothing stopping you from creating your own sixth or seventh variation. I once made a rainbow version where each tile represented a different color of the spectrum, arranged in gradient order.

The border is another area for creativity. While the pattern includes a classic picot edge, I've substituted scalloped edges, simple ribbing, or even added fringe for a bohemian touch. Some makers skip the border entirely for a more modern, raw-edge aesthetic.

For those who find 36 tiles daunting, start with just 9 tiles arranged in a 3x3 grid for a beautiful baby blanket or decorative pillow cover. You get the satisfaction of completing a project while mastering the technique.

I've seen makers incorporate this pattern into bags, combining tiles with solid crochet panels, or even using single tiles as appliquΓ©s on plain tote bags or cushions. The possibilities truly are endless once you master the basic mosaic technique presented in this pattern.

Common Mistakes & How to Fix Them

βœ— Not maintaining consistent tension throughout color changes can create puckered or loose sections that distort the mosaic pattern visibility βœ— Forgetting to skip stitches when making double crochets in front loops two rounds down results in extra stitches and misshapen tiles βœ— Working stitches into corner spaces instead of actual chain stitches creates loose corners that won't join properly between tiles βœ— Losing track of which round you're on during repetitive sections leads to incorrect stitch counts and asymmetrical tile shapes

Medina Mosaic Blanket Crochet Pattern

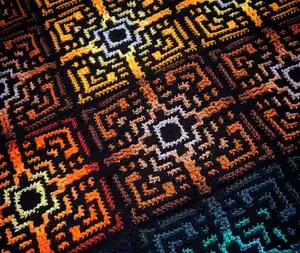
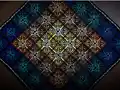
Create a stunning 36x36 inch Moroccan-inspired blanket featuring five unique mosaic tile designs. This intricate pattern combines geometric precision with vibrant colorwork, using 22 different shades to craft 36 individual tiles that join together into a mesmerizing masterpiece. Perfect for advanced crocheters who love colorful, detailed projects that showcase mosaic crochet techniques. The pattern includes complete instructions for five distinct tile designs named after iconic Moroccan locations: Medina, Casbah, Tunis, Souk, and Majorelle, each featuring its own unique color palette ranging from warm golds and oranges to cool blues and greens.

Advanced 40-50 Hours

Materials Needed for Medina Mosaic Blanket Crochet Pattern

β€” Main Fabric

  • 01
    Scheepjes Catona yarn in 22 different colors
  • 02
    Color A: 110 Jet Black - 10 balls of 50 grams (500 grams total)
  • 03
    Color B options: 101 Candle Light, 404 English Tea, 253 Tropic, 403 Lemonade, 146 Vivid Blue
  • 04
    Color C options: 522 Primrose, 179 Topaz, 514 Jade, 411 Sweet Orange, 400 Petrol Blue
  • 05
    Color D options: 208 Yellow Gold, 383 Ginger Gold, 391 Deep Ocean Green, 281 Tangerine, 201 Electric Blue
  • 06
    Color E options: 249 Saffron, 157 Root Beer, 525 Fir, 388 Rust, 124 Ultramarine
  • 07
    Border Color: 105 Bridal White - 20 grams

β€” Tools Required

  • 01
    Crochet hook size 3.0mm
  • 02
    Yarn needle for weaving in ends
  • 03
    Scissors
  • 04
    Stitch markers
  • 05
    Blocking pins and mat (optional)
  • 06
    Measuring tape

Progress Tracker

0% Complete

β€” Individual Tile Pattern :

Round 1 (RS) :

Take Color A and make a magic loop. Ch2 (doesn't count as st), make 12hdc in the magic loop. Ss in top of first st to connect. Put Color A aside. [12hdc]

Round 2 :

Take Color B and attach it in any hdc made. Ch1 (doesn't count as st), *2sc in blo, 1sc-ch2-1sc in next st. Rep from * 3 more times. Ss in top of first st to connect. Put Color B aside. [4 sides of 4sc and 4 times a ch2-crn]

Round 3 :

Pick up Color A and attach in the nearest third st of a side. Ch1, * 2sc in blo, 1sc in first ch of ch2-crn, ch2, 1sc in second ch of ch2-crn, 2sc in blo. Rep from * 3 more times. Ss in top of first st to connect. Put Color A aside. [4 sides of 6sc and 4 times a ch2-crn]

Round 4 :

Pick up Color B in the nearest fourth st on a side. Ch1, * 3sc in blo, 1sc in first ch of ch2-crn, ch2, 1sc in second ch of ch2-crn, 3sc in blo. Rep from * 3 more times. Ss in top of first st to connect. Fasten off Color B. [4 sides of 8sc and 4 times a ch2-crn]

Round 5 :

Pick up Color A in the nearest fourth st on a side. Ch1, *2dc in flo, 3sc in blo, 1sc in first ch of ch2-crn, ch2, 1sc in second ch of ch2-crn, 3sc in blo. Rep from * 3 more times. Ss in top of first st to connect. Put Color A aside. [4 sides of 8sc/2dc and 4 times a ch2-crn]

Round 6 :

Take Color C and attach it in the first dc out of two on a side. Ch1, *2sc in blo, 1dc in flo, 3sc in blo, 1sc in first ch of ch2-crn, ch2, 1sc in second ch of ch2-crn, 3sc in blo, 1dc in flo. Rep from * 3 more times. Ss in top of first st to connect. Put Color C aside. [4 sides of 10sc/2dc and 4 times a ch2-crn]

Round 7 :

Pick up Color A in the nearest first dc before 2 sc's on a side. Ch1, *4sc in blo, 1dc in flo, 3sc in blo, 1sc in first ch of ch2-crn, ch2, 1sc in second ch of ch2-crn, 3sc in blo, 1dc in flo. Rep from * 3 more times. Ss in top of first st to connect. Put Color A aside. [4 sides of 12sc/2dc and 4 times a ch2-crn]

Round 8 :

Pick up Color C in the nearest first dc before the 4 sc's on a side. Ch1, *2sc in blo, 2dc in flo, 6sc in blo, 1sc in first ch of ch2-crn, ch2, 1sc in second ch of ch2-crn, 4sc in blo. Rep from * 3 more times. Ss in top of first st to connect. Fasten off Color C. [4 sides of 14sc/2dc and 4 times a ch2-crn]

Round 9 :

Pick up Color A in the nearest first dc out of two made on a side. Ch1, *2sc in blo, 1dc in flo, 3sc in blo, 2dc in flo, 1sc in blo, 1sc in first ch of ch2-crn, ch2, 1sc in second ch of ch2-crn, 1sc in blo, 2dc in flo, 3sc in blo, 1dc in flo. Rep from * 3 more times. Ss in top of first st to connect. Put Color A aside. [4 sides of 12sc/6dc and 4 times a ch2-crn]

Round 10 :

Take Color D and attach it into the first of 2 sc's between the dc's on a side (middle st of a side). Ch1, *2dc in flo, 8sc in blo, 1sc in first ch of ch2-crn, ch2, 1sc in second ch of ch2-crn, 8sc in blo. Rep from * 3 more times. Ss in top of first st to connect. Put Color D aside. [4 sides of 18sc/2dc and 4 times a ch2-crn]

Round 11 :

Pick up Color A into the nearest first dc out of the two you made on a side. Ch1, *2sc in blo, 1dc in flo, 2sc in blo, 1dc in flo, 2sc in blo, 1dc in flo, 2sc in blo, 1sc in first ch of ch2-crn, ch2, 1sc in second ch of ch2-crn, 2sc in blo, 1dc in flo, 2sc in blo, 1dc in flo, 2sc in blo, 1dc in flo. Rep from * 3 more times. Ss in top of first st to connect. Put Color A aside. [4 sides of 16sc/6dc and 4 times a ch2-crn]

Round 12 :

Pick up Color D into the nearest first sc of the third 2sc-group made on a side (middle 2 sc-group on a side). Ch1, *2dc in flo, 4sc in blo, 2dc in flo, 4sc in blo, 1sc in first ch of ch2-crn, ch2, 1sc in second ch of ch2-crn, 4sc in blo, 2dc in flo, 4sc in blo. Rep from * 3 more times. Ss in top of first st to connect. Fasten off Color D. [4 sides of 18sc/6dc and 4 times a ch2-crn]

Round 13 :

Pick up Color A into the nearest first dc of the second 2dc-group on a side (middle 2dc-group on a side). Ch1, *2sc in blo, 1dc in flo, 2sc in blo, 1dc in flo, 7sc in blo, 1sc in first ch of ch2-crn, ch2, 1sc in second ch of ch2-crn, 7sc in blo, 1dc in flo, 2sc in blo, 1dc in flo. Rep from * 3 more times. Ss in top of first st to connect. Put Color A aside. [4 sides of 22sc/4dc and 4 times a ch2-crn]

Round 14 :

Take Color E and attach it into the first sc of the second 2sc-group which will be the middle one on a side. Ch1, *2dc in flo, 12sc in blo, 1sc in first ch of ch2-crn, ch2, 1sc in second ch of ch2-crn, 12sc in blo. Rep from * 3 more times. Ss in top of first st to connect. Fasten off Color E. [4 sides of 26sc/2dc and 4 times a ch2-crn]

Round 15 :

Pick up Color A into the nearest first dc of 2dc-group made on a side. Ch1, *2sc in blo, 2dc in flo, 8sc in blo, 1dc in flo, 2sc in blo, 1sc in first ch of ch2-crn, ch2, 1sc in second ch of ch2-crn, 2sc in blo, 1dc in flo, 8sc in blo, 2dc in flo. Rep from * 3 more times. Ss in top of first st to connect. Fasten off Color A. [4 sides of 24sc/6dc and 4 times a ch2-crn]

Info :

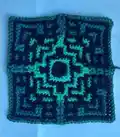
A tile is completed now! Weave in all ends and block if needed.
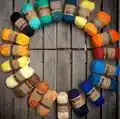
β€” Tile Quantities :

Tile 1 (Medina) :

Make 4 tiles - Colors: A=110 Jet Black, B=101 Candle Light, C=522 Primrose, D=208 Yellow Gold, E=249 Saffron

Tile 2 (Casbah) :

Make 8 tiles - Colors: A=110 Jet Black, B=404 English Tea, C=179 Topaz, D=383 Ginger Gold, E=157 Root Beer

Tile 3 (Tunis) :

Make 8 tiles - Colors: A=110 Jet Black, B=253 Tropic, C=514 Jade, D=391 Deep Ocean Green, E=525 Fir

Tile 4 (Souk) :

Make 4 tiles - Colors: A=110 Jet Black, B=403 Lemonade, C=411 Sweet Orange, D=281 Tangerine, E=388 Rust

Tile 5 (Majorelle) :

Make 12 tiles - Colors: A=110 Jet Black, B=146 Vivid Blue, C=400 Petrol Blue, D=201 Electric Blue, E=124 Ultramarine

β€” Joining the Squares :

Step 1 :

Join squares together with slip stitch. Attach two squares with stitch markers.

Step 2 :

Turn to backside of tiles and make ss through inner loops of both sides, leaving outer loops unworked for zipper effect.

Step 3 :

Work sc through both ch2-crns to join when working in corner at beginning or end. Do this on every side.

Step 4 :

Work in rows of 6 tiles. Make six long rows of 6 tiles that you individually connect.

Step 5 :

Attach the large six-tile pieces the same way you joined the tiles.

β€” Border :

Foundation Round (RS) :

Attach Color A in any ch2-corner. Ch1, *make sc-ch2-sc in ch2-crn, (make sc in next 30 st, sc3tog over next ch2-sp-the ss joining section and next ch2-sp of next tile) 5 times, make sc in next 30 st. Rep from * 3 more times. Ss in top of first st to connect. Ss to next ch2-crn. [4 sides of 187sc and 4 times a ch2-crn]

Round 1 :

Ch1, *1sc-ch2-1sc in ch2-crn, 1sc in blo of each st on side till next ch2-crn. Rep from * 3 more times. Ss in top of first st to connect. Put Color A aside. [4 sides of 189sc and 4 times a ch2-crn]

Round 2 :

Take Color B and attach in any ch2-crn. Ch2 (doesn't count as st), *1hdc-ch2-1hdc in ch2-crn, 1hdc in blo of each st on side till next ch2-crn. Rep from * 3 more times. Ss in top of first st to connect. Fasten off Color B. [4 sides of 191hdc and 4 times a ch2-crn]

Round 3 :

Pick up Color A in nearest ch2-crn. Ch1, *1sc-ch2-1sc in ch2-crn, 3sc in blo, 1dc in flo, (5sc in blo, 1dc in flo) 31 times, 2sc in blo. Rep from * 3 more times. Ss in top of first st to connect. Ss to next ch2-crn. [4 sides of 193 sts and 4 times a ch2-crn]

Round 4 :

Ch2 (doesn't count as st), *1hdc-picot-1hdc in ch2-crn, 1hdc in each st on side till next ch2-crn. Rep from * 3 more times. Ss in top of first st to connect. Fasten off Color A. [4 sides of 195 sts and 4 times a picot-crn]

Info :

Weave in remaining ends and block the project when needed. Optional: Add silk tassels into picot corners.

Assembly Instructions

  • Create all 36 tiles following the pattern: 4 Medina, 8 Casbah, 8 Tunis, 4 Souk, and 12 Majorelle tiles in their respective color combinations
  • Arrange tiles according to the layout chart provided, creating a 6x6 grid with the pattern placement shown
  • Join tiles in rows of 6 using slip stitch method through inner loops on wrong side, leaving outer loops free for clean finish
  • Work single crochet through both ch2 corners when joining at corner intersections to secure properly
  • Connect all six rows together using the same slip stitch joining method to complete the blanket body
  • Add foundation round to border by working around entire perimeter, using sc3tog to join at tile intersections for smooth edges
  • Complete all four border rounds with Color A and Color B, finishing with picot corners for decorative detail

Important Notes

  • πŸ’‘Always work on the right side of the project as pattern is worked in continuous rounds rather than turning rows
  • πŸ’‘When making double crochets in front loops, skip the corresponding stitch on current round to maintain proper stitch count
  • πŸ’‘Put colors aside between rounds instead of fastening off to minimize ends to weave in later
  • πŸ’‘Work corner stitches directly into chain stitches, not into the chain space, for proper corner structure
  • πŸ’‘Block individual tiles before joining for best results and easier assembly with consistent tile dimensions
  • πŸ’‘Use stitch markers to track position when attaching new colors, especially when finding specific stitches on sides
  • πŸ’‘Maintain consistent tension throughout, especially during color changes, to ensure mosaic pattern remains visible and tiles stay square

This stunning Medina Mosaic Blanket pattern brings the vibrant beauty of Moroccan tilework into your home through the magic of mosaic crochet. Each carefully designed tile represents a different Moroccan city, creating a rich tapestry of colors and geometric patterns that showcase advanced colorwork techniques. The pattern challenges experienced crocheters while providing clear, detailed instructions for success. Whether displayed as a wall hanging or used as a cozy throw, this blanket becomes a cherished heirloom piece. 🧢 Happy crocheting! 🧡✨

You ask,

we answer.

FAQs

Can I use different yarn than Scheepjes Catona for this pattern?

Yes, you can substitute any DK weight yarn that works with a 3.0mm hook and has similar yardage. Just ensure you maintain the contrast between light and dark colors so the mosaic pattern remains visible. Your finished tile size may vary slightly with different yarn weights.

How do I know where to attach the new color in each round?

The pattern specifies exactly where to attach each color, such as 'nearest third st of a side' or 'first dc out of two.' Use stitch markers to mark these positions before starting the new round to make color changes easier and more accurate.

Do I need to fasten off every color at the end of each round?

No! The pattern instructs you to 'put aside' most colors rather than fasten off. This technique allows you to carry colors up between rounds, significantly reducing the number of ends you need to weave in at the finish.

Can I make a smaller or larger version of this blanket?

Absolutely! You can adjust the size by making more or fewer tiles. Each tile is approximately 5x5 inches, so calculate your desired finished dimensions and create the appropriate number of tiles. You can also arrange them in different configurations like 4x4 or 8x8.

What does working in the front loop two rounds down mean?

This creates the mosaic effect. When making a double crochet in round 6, you work into the front loop of the stitch from round 4 (two rounds below), while skipping the stitch directly beneath it in the current round. This creates raised texture and reveals the hidden colors.

How long does it take to complete the entire blanket?

Each tile takes approximately 60-90 minutes depending on your speed and experience level. With 36 tiles plus joining and border work, expect to invest 40-50 hours total. Many crocheters work on this as a long-term project over several weeks or months.