🧢 Beautiful ✨ Detailed πŸ’ Adorable

Small Turtle Amigurumi Pattern

Small Turtle Amigurumi Pattern
4.0β˜… Rating
2-3 Hours Time Needed
1.1K Made This
βœ‚οΈ

Beginner Friendly Level

Perfect for those just starting their sewing journey, with clear instructions and simple techniques

⏱️

Bite-Sized Project

Complete in under 2 hoursβ€”quick, fun, and perfect for a little creative escape.

🐒

Pocket Pal

A mini friend to carry anywhere, providing comfort and companionship in a perfectly portable size.

About This Small Turtle Amigurumi Pattern

Small Turtle Amigurumi Pattern crochet pattern - detailed view of completed project

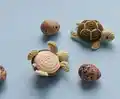
The pattern also includes a bonus egg design with a functional button closure, perfect for creating a turtle hatching scene or as a fun storage pouch. All pieces are stuffed firmly and assembled to create a sturdy, huggable friend.

Why You'll Love This Small Turtle Amigurumi Pattern

I absolutely love this pattern because it's such a quick and rewarding project that's perfect for using up yarn scraps! The spiral construction makes it flow seamlessly, and there's something so satisfying about watching the two-part shell come together. I especially enjoy the creative touch of the egg accessoryβ€”it adds such a sweet storytelling element to the finished piece. This little turtle is also wonderful for practicing color changes and basic shaping techniques without feeling overwhelming.

Small Turtle Amigurumi Pattern step 1 - construction progress Small Turtle Amigurumi Pattern step 2 - assembly progress Small Turtle Amigurumi Pattern step 3 - details and accessories Small Turtle Amigurumi Pattern step 4 - final assembly and finishing

Switch Things Up

I love experimenting with color combinations for this little turtle! Try using variegated yarn for the carapace to create a stunning multicolored shell effect, or go bold with bright, contrasting colors between detail 1 and detail 2 for a modern twist.

You could also add embroidered details like spots or patterns on the shell using a tapestry needle and contrasting yarnβ€”small French knots or simple straight stitches create beautiful texture. For a more realistic look, use shades of green and brown, or get creative with fantasy colors like purple and teal for a magical sea turtle vibe.

Consider making the turtle larger by using thicker yarn and a bigger hook, or create a whole family of turtles in graduated sizes. The egg accessory is perfect for customization tooβ€”add embroidered cracks to make it look like the turtle is hatching, or use it as a tiny pouch for storing small treasures or jewelry.

For gift-giving, attach a small keychain loop to make it a bag charm, or add a ribbon loop to hang it as a decoration. You could even create seasonal versions with holiday-themed colors!

Common Mistakes & How to Fix Them
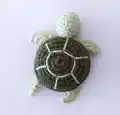
βœ— Forgetting to crochet in back loops only (BLO) for carapace detail 2 which creates the shell texture effect
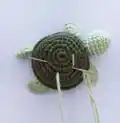
 βœ— Not stuffing the carapace firmly enough before crocheting the two parts together resulting in a flat shell appearance βœ— Placing button eyes too close together or at wrong rounds making the turtle look unbalanced or crossed βœ— Failing to leave long enough yarn tails for assembly causing difficulty when sewing parts to carapace securely

Small Turtle Amigurumi Pattern

Create an adorable small turtle amigurumi with this charming crochet pattern! This delightful project features a cute turtle with a detailed carapace made in two parts, complete with tiny paws, a sweet head, and a little tail. The pattern also includes instructions for a creative egg accessory with a button closure. Perfect for beginners looking to expand their amigurumi skills, this pattern uses simple stitches worked in a spiral to create a lovable companion that's sure to bring smiles.

Beginner Friendly 2-3 Hours

Materials Needed for Small Turtle Amigurumi Pattern

β€” Main Fabric

  • 01
    YarnArt Jeans yarn (50g/150m, 1.76oz/174yds, 55% cotton/45% polyacrylic) in basic colors: color 01 (white), color 11 (light color), color 82 (shell color)

β€” Tools Required

  • 01
    Crochet hook size 2.25mm (Crochet Soft Touch) or Gamma 1.5mm
  • 02
    Scissors
  • 03
    Markers
  • 04
    2 Button eyes
  • 05
    Beads (optional decoration)
  • 06
    Syntepuh or polyester fiberfill stuffing
  • 07
    Tapestry needle for assembly
  • 08
    Stitch markers (optional but helpful)

Progress Tracker

0% Complete

β€” Carapace (Detail 1) :

Color :

Basic color 82

Round 1 :

8 sc in mc (8)

Round 2 :

8 inc (16)

Round 3 :

(1 sc, inc) x 8 (24)

Round 4 :

1 sc, inc, (2 sc, inc) x 7, 1 sc (32)

Round 5 :

(3 sc, inc) x 8 (40)

Round 6-8 :

40 sc (40)

β€” Carapace (Detail 2) :

Color :

Basic color 11

Round 1 :

BLO: 8 sc in mc (8)

Round 2 :

BLO: 8 inc (16)

Round 3 :

BLO: (1 sc, inc) x 8 (24)

Round 4 :

BLO: 1 sc, inc, (2 sc, inc) x 7, 1 sc (32)

Round 5 :

BLO: (3 sc, inc) x 8 (40)

Round 6 :

BLO: 40 sc (40)

Info :

Now crochet detail 1 and detail 2 together around. Fill the carapace with Syntepuh stuffing before closing

β€” Head :

Color :

Basic color 11

Round 1 :

6 sc in mc (6)

Round 2 :

6 inc (12)

Round 3 :

(1 sc, inc) x 6 (18)

Round 4-7 :

18 sc (18)

Round 8 :

(1 sc, dec) x 6 (12)

Round 9 :

6 dec (6)

Finishing :

Fasten off leaving a 15cm tail. Using tapestry needle, weave yarn through front loops and pull tight to close. Weave in end

β€” Paws :

Info :

Make 4 pieces in basic color 11

Round 1 :

8 sc in mc (8)

Round 2 :

8 inc (16)

Finishing :

Fold piece in half and work sc across to close

β€” Tail :

Color :

Basic color 11

Round 1 :

5 ch (5)

Round 2 :

1 sc in second ch from hook, 3 sc (4)

β€” Assembly and Embroidery :

Step 1 :

Sew the paws to the carapace

Step 2 :

Sew the head to the carapace

Step 3 :

Sew button eyes to the head

Step 4 :

Attach tail to back of carapace

β€” Egg (Detail 1) :

Color :

Color 01

Round 1 :

8 sc in mc (8)

Round 2 :

8 inc (16)

Round 3 :

(1 sc, inc) x 8 (24)

Round 4 :

1 sc, inc, (2 sc, inc) x 7, 1 sc (32)

Round 5 :

32 sc (32)

Round 6 :

(3 sc, inc) x 8 (40)

Round 7 :

2 sc, inc, (4 sc, inc) x 7, 2 sc (48)

Round 8-14 :

48 sc (48)

Round 15 :

(4 sc, dec) x 8 (40)

Round 16-17 :

40 sc (40)

Finishing :

Fasten and cut thread, leave long yarn tail

β€” Egg (Detail 2) :

Color :

Color 01

Round 1 :

8 sc in mc (8)

Round 2 :

8 inc (16)

Round 3 :

16 sc (16)

Round 4 :

(1 sc, inc) x 8 (24)

Round 5-6 :

24 sc (24)

Round 7 :

1 sc, inc, (2 sc, inc) x 7, 1 sc (32)

Round 8-9 :

32 sc (32)

Round 10 :

(3 sc, inc) x 8 (40)

Round 11-12 :

40 sc (40)

Round 13 :

7 ch, 1 sc in eighth ch from hook, 39 sc (39)

Finishing :

Fasten and cut thread, leave long yarn tail

β€” Button :

Color :

Color 01

Round 1 :

8 sc in mc (8)

Finishing :

Fasten and cut thread, leave long yarn tail

Assembly :

Sew detail 1 and detail 2 together

Assembly Instructions

  • Begin by stuffing the carapace firmly with Syntepuh before crocheting detail 1 and detail 2 together around the edges.
  • Attach the four paws evenly around the underside of the carapace, positioning them at the front and back on each side.
  • Sew the head securely to the front of the carapace, ensuring it's centered and positioned at a natural angle.
  • Attach the button eyes to the head using the provided instructions or sewing them on securely.
  • Sew the small tail to the back center of the carapace.
  • For the egg accessory, sew egg detail 1 and detail 2 together, leaving the button loop opening functional.
  • Attach the small crocheted button to the corresponding position on the egg to create a closure mechanism.

Important Notes

  • πŸ’‘Work in a continuous spiral without joining rounds or turning chains for smooth, seamless results
  • πŸ’‘Use stitch markers to track the beginning of each round, especially important for beginners
  • πŸ’‘Crochet the carapace detail 2 in back loops only (BLO) to create the distinctive shell texture
  • πŸ’‘Stuff the head and carapace firmly but not overly tight to maintain proper shape
  • πŸ’‘Leave yarn tails at least 15cm long for easier assembly and secure attachment of parts
  • πŸ’‘Pin pieces in place before sewing to ensure proper positioning and symmetry

This charming small turtle amigurumi pattern is perfect for crafters who want to create something adorable in just a few hours! The unique two-part shell construction adds visual interest and texture, while the simple spiral technique keeps the project flowing smoothly. Complete with a creative egg accessory featuring a functional button closure, this pattern offers both a delightful finished piece and valuable practice with basic amigurumi techniques. Whether you're making it as a gift or adding to your own collection, this little turtle friend is sure to bring joy! 🐒🧢✨

You ask,

we answer.

FAQs

What does BLO mean and why is it important for the carapace?

BLO stands for 'back loops only,' which means you crochet into only the back loop of each stitch instead of both loops. This technique is crucial for carapace detail 2 as it creates the textured shell effect that makes the turtle look realistic.

Can I use different yarn than YarnArt Jeans?

Yes! You can substitute with any similar weight yarn (fine/sport weight). Just make sure your yarn has similar thickness and adjust your hook size if needed to maintain proper tension and sizing.

How do I crochet the two carapace details together?

After completing both detail 1 and detail 2, stuff the carapace firmly with fiberfill, then work single crochet stitches around the edges of both pieces together, joining them as you go to create the complete shell.

What size will the finished turtle be?

The finished turtle will be approximately 8-10cm (3-4 inches) depending on your tension, hook size, and yarn choice. It's a small, palm-sized amigurumi perfect as a pocket companion.

Is the egg accessory required or optional?

The egg is completely optional! The turtle stands alone as a finished project. The egg adds a cute storytelling element and can function as a small storage pouch with its button closure.