🧶 Beautiful ✨ Detailed 💝 Adorable

Sleeping Pink Puff (Sleeping Kirby) Amigurumi Pattern

Sleeping Pink Puff (Sleeping Kirby) Amigurumi Pattern
4.2★ Rating
4-5 Hours Time Needed
1.1K Made This
✂️

Intermediate Level

Ideal for those with basic knitting experience, featuring slightly more advanced stitches and techniques to expand your skills.

⏱️

Weekend Treat

Takes 5-7 hours, making it an enjoyable project to finish over a couple of days.

🧸

Cute Companion

An adorable friend to cherish, handcrafted with love to bring comfort and joy for years to come.

About This Sleeping Pink Puff (Sleeping Kirby) Amigurumi Pattern

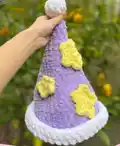
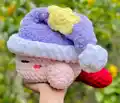
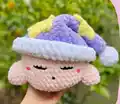
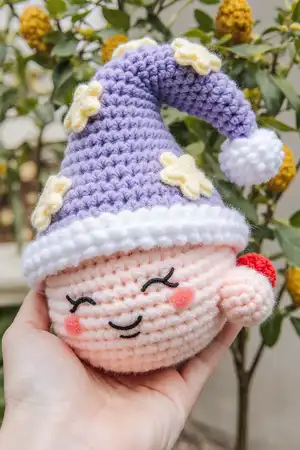
This Sleeping Kirby pattern is a delightful tribute to one of gaming's most beloved characters! The pattern features careful construction techniques that create a plush, rounded body perfect for displaying or cuddling. The removable nightcap with customizable stars or polka dots lets you personalize your creation, while the sweet facial features bring Kirby's peaceful sleeping expression to life. Every stitch comes together to capture the essence of this iconic character in adorable miniature form.

Sleeping Pink Puff (Sleeping Kirby) Amigurumi Pattern crochet pattern - detailed view of completed project

Working in continuous rounds with bulky yarn creates a satisfyingly quick project that's perfect for gift-giving or adding to your collection of handmade gaming treasures. The detailed instructions guide you through each component, from the cozy hat to the tiny arms and feet.

Why You'll Love This Sleeping Pink Puff (Sleeping Kirby) Amigurumi Pattern

I absolutely love this pattern because it brings such joy and nostalgia to every stitch! There's something incredibly satisfying about watching Kirby's round, peaceful form take shape in your hands. The customization options for the nightcap mean you can make each one unique, and I especially enjoy the creative freedom of choosing different color combinations. The removable hat feature is brilliant because it adds an interactive element that makes this more than just a decoration. What really captured my heart is how the simple facial details perfectly capture Kirby's sweet sleeping expression—it never fails to make me smile!

Sleeping Pink Puff (Sleeping Kirby) Amigurumi Pattern step 1 - construction progress Sleeping Pink Puff (Sleeping Kirby) Amigurumi Pattern step 2 - assembly progress Sleeping Pink Puff (Sleeping Kirby) Amigurumi Pattern step 3 - details and accessories Sleeping Pink Puff (Sleeping Kirby) Amigurumi Pattern step 4 - final assembly and finishing

Switch Things Up

I love experimenting with different color combinations for Kirby's nightcap! While the classic purple and white look is absolutely adorable, I've tried making versions with blue and silver for a starry night theme, or even pastel rainbow colors for a dreamy effect. You could also swap the stars for moons, hearts, or other small embellishments that match your personal style.

Another fun variation I've explored is adding a small pillow underneath Kirby or creating a matching blanket using simple granny squares. This turns the project into a complete bedroom scene that's perfect for display! I've also made mini versions using worsted weight yarn and a smaller hook—these pocket-sized Kirbys are fantastic as keychains or bag charms.

For those who want to add extra personality, consider embroidering tiny Z's near Kirby's head to emphasize the sleeping theme, or add small eyelashes above the eyes for a different expression. I've even seen crafters create an entire set of Kirbys with different colored nightcaps representing various abilities from the games. The possibilities are truly endless, and each variation brings its own special charm to this already delightful pattern!

Common Mistakes & How to Fix Them

✗ Overstuffing the body can prevent Kirby from laying flat on his stomach as intended, so stuff lightly and test the hat fit frequently during assembly. ✗ Missing the color change rounds in the hat can throw off the entire white border placement, so use stitch markers at the beginning of each round. ✗ Pulling the mouth knot too tight will cause it to disappear into the fabric instead of creating the visible circular mouth shape needed. ✗ Forgetting to work in continuous rounds without joining can create a visible seam line that disrupts Kirby's smooth, rounded appearance throughout the body.

Sleeping Pink Puff (Sleeping Kirby) Amigurumi Pattern

Bring the adorable world of video games into your home with this charming Sleeping Kirby crochet pattern! This delightful design captures Kirby peacefully sleeping with his signature nightcap, complete with stars and a fluffy pom-pom. Perfect for gaming fans and crochet enthusiasts alike, this pattern creates a soft, huggable companion that measures approximately 7 inches tall and 8.5 inches wide. The removable sleepy hat adds an extra touch of whimsy, and you can customize the colors to match your favorite theme!

Intermediate 4-5 Hours

Materials Needed for Sleeping Pink Puff (Sleeping Kirby) Amigurumi Pattern

— Main Fabric

  • 01
    Bulky weight yarn in Light Pink (Blush Pink) - approximately 100g for body
  • 02
    Bulky weight yarn in Purple (Lilac) - for nightcap base
  • 03
    Bulky weight yarn in White - for hat trim and pom-pom
  • 04
    Bulky weight yarn in Yellow (Buttercup) - for stars
  • 05
    Bulky weight yarn in Black (Coal) - for facial features
  • 06
    Bulky weight yarn in Red (Crimson) - for feet
  • 07
    Worsted weight yarn in Dark Pink (Watermelon) - for blush cheeks
  • 08
    Bernat Blanket or Bernat Baby Blanket yarn recommended for bulky weight
  • 09
    Big Twist Value Worsted yarn recommended for worsted weight

— Tools Required

  • 01
    8mm crochet hook (for main project)
  • 02
    4mm crochet hook (optional, for smaller stars)
  • 03
    Polyester fiberfill stuffing
  • 04
    Stitch markers
  • 05
    Yarn needle for sewing
  • 06
    Embroidery needle
  • 07
    Scissors

Progress Tracker

0% Complete

— Sleepy Hat :

Round 1 :

MR 5 (5)

Round 2 :

INC x 5 (10)

Round 3-5 :

10 SC [3 rounds] (10)

Round 6 :

(1 SC, INC) x 5 (15)

Round 7 :

15 SC (15)

Round 8 :

(2 SC, INC) x 5 (20)

Round 9 :

20 SC (20)

Round 10 :

(3 SC, INC) x 5 (25)

Round 11 :

25 SC (25)

Round 12 :

(4 SC, INC) x 5 (30)

Round 13 :

30 SC (30)

Round 14 :

(5 SC, INC) x 5 (35)

Round 15-16 :

35 SC (35)

Round 17 :

(6 SC, INC) x 5 (40)

Round 18 :

40 SC (40)

Round 19 :

(7 SC, INC) x 5 (45)

Round 20 :

45 SC (45)

Round 21 :

(8 SC, INC) x 5 (50)

Round 22 :

50 SC (50)

Round 23 :

(9 SC, INC) x 5 (55)

Round 24-25 :

55 SC [2 rounds] (55)

Info :

Change to white yarn

Round 26-30 :

55 SC [5 rounds] (55)

Info :

Finish off. Flip the hat inside out if desired. Sew in any remaining ends. Fold the hat's white border (between rows 25-26) to create a raised border on the hat.

— Hat's Pom Pom :

Round 1 :

MR 4 (4)

Round 2 :

INC x 4 (8)

Round 3 :

(1 SC, INC) x 4 (12)

Round 4-5 :

12 SC [2 rounds] (12)

Round 6 :

(1 SC, DEC) x 4 (8)

Info :

Begin to stuff the pom pom

Round 7 :

DEC x 4 (4)

Info :

Finish stuffing. Finish off and leave a long yarn tail to close the hole. Weave the yarn tail through the front loops of the last round and pull tightly to close the hole. Use the yarn tail to sew the pom pom onto the end of the hat. Sew in any remaining ends.

— Stars On Hat (Make 3) :

Info :

Make 2 big stars using 8mm hook and 1 small star using 4mm hook

Round 1 :

MR 10 (10)

Round 2 :

(SC, INC) x 5 (15)

Round 3 :

(SLST, [HDC, DC, HDC in one stitch], SLST) x 5 (25)

Info :

Finish off and leave a long yarn tail. Use the yarn tail to sew the stars onto the hat.

— Optional Circles On Hat :

Round 1 :

MR 8 (8)

Round 2 :

(SC, INC) x 4 (12)

Info :

Finish off and leave a long yarn tail. Use the yarn tail to sew the circles onto the hat. Fold down the top part of the hat based on how you would like it to flop to determine placement.

— Kirby's Body :

Round 1 :

MR 6 (6)

Round 2 :

INC x 6 (12)

Round 3 :

(1 SC, INC) x 6 (18)

Round 4 :

(1 SC, INC, 1 SC) x 6 (24)

Round 5 :

(3 SC, INC) x 6 (30)

Round 6 :

(2 SC, INC, 2 SC) x 6 (36)

Round 7 :

(5 SC, INC) x 6 (42)

Round 8 :

(3 SC, INC, 3 SC) x 6 (48)

Round 9-16 :

48 SC [8 rounds] (48)

Round 17 :

(6 SC, DEC) x 6 (42)

Round 18 :

(5 SC, DEC) x 6 (36)

Round 19 :

(4 SC, DEC) x 6 (30)

Info :

Begin stuffing the body. Try on Kirby's sleepy hat as you stuff his head to make sure you do not overstuff or understuff and that the hat fits right. The hat should fit comfortably around row 10 of Kirby's head. Avoid overstuffing so that Kirby's body is able to lay flat on its stomach.

Round 20 :

(3 SC, DEC) x 6 (24)

Round 21 :

(2 SC, DEC) x 6 (18)

Round 22 :

(1 SC, DEC) x 6 (12)

Round 23 :

DEC x 6 (6)

Info :

Finish stuffing. Try on Kirby's sleeping hat to make sure it fits just right. Finish off and leave a yarn tail to close the hole. Weave the yarn tail through the front loops of the last round and pull tightly to close the hole. Weave in the remaining end.

— Kirby's Facial Features :

Eyes :

Using black bulky weight yarn, sew a straight line for each eye between row 12-13. Each eye should be across 4 stitches, and the eyes should be 3 stitches apart.

Mouth :

Using a new piece of black bulky weight yarn, sew Kirby's mouth between row 14 and 15 of his head, in between Kirby's eyes. Pull yarn from the bottom of Kirby's stomach out to where the mouth is placed. Tie an overhand knot and tighten it. Pull the bottom yarn strand so that the knot hits Kirby's face. Thread the top yarn strand onto your needle and insert it back into the same hole. The mouth has been formed with the knot. Don't pull too tight. Alternatively, cut a small circle out of felt and glue it.

Blush :

Using dark pink worsted weight yarn, sew on the blush for Kirby's cheeks between row 13 and 14, just below the eyes. The blush should be sewed one stitch to the side of the eyes and each blush should be across 2 stitches.

Hat Placement :

Try on Kirby's hat. The hat is removable and should fit around row 10 of his head. You may need to sew down the top of the hat to the bottom part of the hat so it stays flopped down.

— Kirby's Arms (Make 2) :

Round 1 :

MR 5 (5)

Round 2 :

INC x 5 (10)

Round 3 :

(SC, INC) x 5 (15)

Round 4-5 :

15 SC [2 rounds] (15)

Info :

Stuff lightly. Finish off and leave a long tail for sewing. Sew the arms onto row 13-17 of Kirby's body. The arms should be near the outer edge of Kirby's blush.

— Kirby's Feet (Make 2) :

Round 1 :

MR 6 (6)

Round 2 :

(SC, INC) x 3 (9)

Round 3 :

(2 SC, INC) x 3 (12)

Round 4-8 :

12 SC [5 rounds] (12)

Info :

Start stuffing the feet lightly

Round 9 :

(2 SC, DEC) x 3 (9)

Round 10 :

(SC, DEC) x 3 (6)

Info :

Finish stuffing. Finish off and leave a long tail for sewing. You do not need to close the hole. Attach the feet onto row 16-17 of Kirby's body, approximately 4 stitches apart from each other.

Assembly Instructions

  • Sew the white pom-pom securely onto the pointed end of the purple nightcap using the long yarn tail.
  • Fold down the top portion of the hat to determine the desired flop position, then sew the stars onto the visible surface of the hat.
  • Attach the completed nightcap around row 10 of Kirby's head, ensuring it fits comfortably and can be removed if desired.
  • Sew the arms onto rows 13-17 of Kirby's body, positioning them near the outer edges of the blush cheeks.
  • Attach the red feet to rows 16-17 at the bottom of Kirby's body, spacing them approximately 4 stitches apart.
  • Add facial features: sew black yarn for eyes between rows 12-13, create the mouth knot between rows 14-15, and add dark pink blush between rows 13-14.
  • Make final adjustments to ensure Kirby can lay flat on his stomach and that all pieces are securely attached.

Important Notes

  • 💡Use stitch markers at the beginning of each round to track your progress, especially during the hat construction
  • 💡Stuff the body lightly to allow Kirby to lay flat on his stomach as designed
  • 💡Test the nightcap fit frequently while stuffing to ensure proper sizing around row 10
  • 💡Work in continuous rounds without joining to maintain a seamless appearance throughout
  • 💡The hat can be flipped inside out for a different texture look if preferred
  • 💡Pin all parts in place before sewing to ensure correct positioning and symmetry

This adorable Sleeping Kirby pattern brings Nintendo's beloved pink puff to life in the sweetest way possible! With his removable nightcap decorated with twinkling stars and a fluffy pom-pom, this peaceful character makes the perfect cuddle buddy or gaming room decoration. The pattern's clear instructions and customizable details ensure your creation will be uniquely yours. Whether you're a long-time Kirby fan or simply love cute amigurumi projects, this design delivers pure handmade joy! 🧶✨💤

You ask,

we answer.

FAQs

Can I use different yarn weights for this pattern?

While the pattern is designed for bulky weight yarn with an 8mm hook, you can use different yarn weights. Just remember that using lighter yarn will create a smaller Kirby, and heavier yarn will make a larger one. Adjust your hook size accordingly to maintain proper stitch tension.

Is the nightcap permanently attached to Kirby's head?

No! The nightcap is designed to be removable, fitting comfortably around row 10 of Kirby's head. However, you can choose to sew it in place permanently if you prefer, or tack down the flopped portion to keep it in your desired position.

How do I make the mouth knot without it pulling into the fabric?

The key is not pulling too tightly after creating the overhand knot. The knot should sit on the surface of the fabric to create a visible circular mouth. If your stitches are looser, you may need to use a double knot instead of a single overhand knot to ensure it stays visible.

Can I make polka dots instead of stars on the nightcap?

Absolutely! The pattern includes optional instructions for creating circles instead of stars. Simply work the circle pattern in Round 1 (MR 8) and Round 2 ((SC, INC) x 4) with yellow yarn, then sew as many as you'd like onto the hat.

What's the best way to stuff Kirby so he lays flat?

Stuff the body moderately—not too firmly—and frequently test the nightcap fit as you go. The body should maintain its round shape but have enough give to allow Kirby to rest on his stomach. The ending rounds form the bottom, so avoid overstuffing in this area especially.