🧶 Beautiful ✨ Detailed 💝 Adorable

Little Bull Amigurumi Pattern

Little Bull Amigurumi Pattern
3.9★ Rating
8-10 Hours Time Needed
2.6K Made This
✂️

Intermediate Level

Ideal for those with basic knitting experience, featuring slightly more advanced stitches and techniques to expand your skills.

⏱️

All-Day Adventure

Requires 8-10 hours, ideal for a full day of immersive knitting.

🐥

Charming Critter

Delightful animal designs with sweet details that capture the essence of your favorite woodland and farmyard friends.

About This Little Bull Amigurumi Pattern

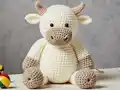
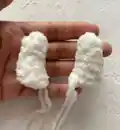
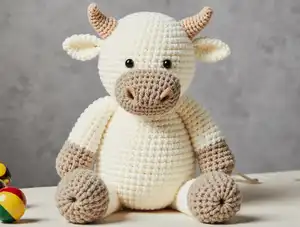
This Little Bull pattern brings farmyard charm into your crafting world with its generous 39cm height and cuddly construction. The pattern uses double-stranded yarn technique with a 4.5mm hook, creating a plush, sturdy toy that's perfect for children or collectors alike. Special details like the cream-colored muzzle, embroidered hooves, and unique brush-tipped tail give this bull incredible personality and character. The spiral round construction ensures smooth, seamless results throughout every piece.

Little Bull Amigurumi Pattern crochet pattern - detailed view of completed project

This bull features posable limbs that can be stuffed to your preferred firmness, safety eyes for durability, and charming horns that add authentic farmyard appeal. The pattern's clear structure takes you through each component systematically, from the rounded head to the tapered legs.

Why You'll Love This Little Bull Amigurumi Pattern

I absolutely love this bull pattern because it creates such a substantial, huggable toy that feels impressive to complete. The double-stranded yarn technique gives the finished piece wonderful body and durability, making it perfect for actual play rather than just display. I find the color combination of beige, cream, and gray creates such a soft, natural aesthetic that appeals to both children and adults. The embroidered details like the nostrils and hooves add professional touches that make you feel like a real toy designer. What really gets me excited is how the tail comes together with that adorable brush tip made from yarn pieces—it's such a clever detail that brings the whole character to life. The spiral construction means no obvious seams or joins, giving your bull a polished, store-bought quality. I also appreciate that this pattern doesn't require complex color changes or tiny pieces, making it a relaxing yet engaging project. The generous size means you can really see your progress with each round, which keeps motivation high throughout the crafting process.

Little Bull Amigurumi Pattern step 1 - construction progress Little Bull Amigurumi Pattern step 2 - assembly progress Little Bull Amigurumi Pattern step 3 - details and accessories Little Bull Amigurumi Pattern step 4 - final assembly and finishing

Switch Things Up

I love experimenting with this bull pattern to create entirely different farmyard friends and personalities. Sometimes I'll swap the beige for brown or spotted colors to make a dairy cow, using white as the base with black or brown patches randomly placed throughout the body. For a more whimsical approach, I've created rainbow bulls using gradient yarns or working each body section in different bright colors, which children absolutely adore.

One of my favorite variations is making a Highland cow by adding longer, shaggy fringe around the head and body using loop stitch techniques or by attaching yarn pieces similar to the tail brush method. I've also experimented with different horn styles - twisting cream and white yarn together for striped horns, or making them longer and more curved for a Texas longhorn effect.

For seasonal variations, I enjoy adding accessories like a small crocheted flower crown for spring, a tiny bell collar for a Swiss Alps theme, or even a miniature scarf for winter versions. Sometimes I embroider different facial expressions to give each bull unique personality - sleepy eyes, winking eyes, or even adding felt eyelashes for a feminine touch. I've also played with ear positioning, making them floppier by adding extra rounds or more perky by using wire supports inside. The muzzle offers great customization too - I've made pink noses for a more cartoonish look or added embroidered mouth details for extra character. Each variation teaches me something new about how small changes can create completely different personalities in amigurumi.

Common Mistakes & How to Fix Them

✗ Working with single strand instead of double strands creates a floppy, understuffed appearance—always use yarn doubled as specified for proper structure ✗ Forgetting to mark the beginning of spiral rounds leads to misaligned features and uneven shaping—use stitch markers consistently throughout every piece ✗ Stuffing too loosely causes the bull to lose its shape and flop over—pack holofiber firmly especially in the head and body 
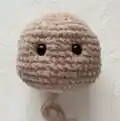
✗ Attaching safety eyes after stuffing the head makes positioning impossible—insert eyes between rounds 11-12 before completing the head stuffing ✗ Sewing pieces without pinning first results in crooked limbs and awkward proportions—always pin parts in place and check from all angles before final sewing

Little Bull Amigurumi Pattern

Create this adorable 39cm tall bull amigurumi that's perfect for gifting or adding to your handmade collection. This charming farmyard friend features soft beige coloring with cream accents, detailed horns, and a playful tail with a brush tip. Working with double-stranded yarn and a larger hook, you'll enjoy watching this cuddly companion come to life stitch by stitch. The pattern includes clear instructions for every body part, from the sweet muzzle to the embroidered hooves, making it a rewarding project that results in a huggable friend that'll be treasured for years.

Intermediate 8-10 Hours

Materials Needed for Little Bull Amigurumi Pattern

— Main Fabric

  • 01
    Alize Softy yarn (115m/50g): 3 skeins of color 617 (beige)
  • 02
    Alize Softy yarn: less than half a skein of color 62 (cream)
  • 03
    Alize Softy yarn: less than half a skein of color 119 (gray)

— Tools Required

  • 01
    Crochet hook size 4.5 mm
  • 02
    Safety eyes 12 mm
  • 03
    Wide-eye needle for sewing parts
  • 04
    Scissors
  • 05
    Stitch markers or contrast color thread
  • 06
    Holofiber stuffing for toys
  • 07
    Embroidery thread for nostrils and hooves

Progress Tracker

0% Complete

— Head :

Info :

Beige color. Crochet all details with yarn in two strands.

Round 1 :

6 sc in mr

Round 2 :

6 inc (12)

Round 3 :

(1 sc, inc)*6 (18)

Round 4 :

(2 sc, inc)*6 (24)

Round 5 :

(3 sc, inc)*6 (30)

Round 6 :

(4 sc, inc)*6 (36)

Round 7 :

(5 sc, inc)*6 (42)

Round 8 :

(6 sc, inc)*6 (48)

Round 9-16 :

48 sc in each row

Round 17 :

(6 sc, dec)*6 (42)

Round 18 :

(5 sc, dec)*6 (36)

Round 19 :

(4 sc, dec)*6 (30)

Round 20 :

(3 sc, dec)*6 (24)

Infos :

Finish crocheting. Leave a long thread for sewing the head to the body later. Attach safe eyes between 11 and 12 rows, the distance between the eyes is 4 sc. Stuff head tight with holofiber.

— Muzzle :

Info :

Cream color. Crochet 9 ch, from the second loop from the hook:

Round 1 :

7 sc, 3 sc in one loop, 6 sc, inc (18)

Round 2 :

inc, 6 sc, 3 inc, 6 sc, 2 inc (24)

Round 3 :

1 sc, inc, 6 sc, (1 sc, inc)*3, 6 sc, (1 sc, inc)*2 (30)

Round 4-6 :

30 sc in each row

Info :

Finish crocheting. Leave a long thread for sewing to the head later.

— Horns :

Info :

Cream color. Make 2 pieces.

Round 1 :

4 sc in mr

Round 2 :

4 sc

Round 3 :

(1 sc, inc)*2 (6)

Round 4 :

6 sc

Round 5 :

5 sc, inc (7)

Round 6 :

6 sc, inc (8)

Info :

1 sl st and finish crocheting. Leave a long thread for sewing to the head.

— Ears :

Info :

Beige color. Make 2 pieces.

Round 1 :

4 sc in mr

Round 2 :

4 inc (8)

Round 3 :

(3 sc, inc)*2 (10)

Round 4 :

(4 sc, inc)*2 (12)

Round 5 :

(5 sc, inc)*2 (14)

Round 6 :

14 sc

Info :

Fold in half and crochet 7 sc. Leave a long thread for sewing to the head.

— Arms (First) :

Info :

Start gray yarn

Round 1 :

7 sc in mr

Round 2 :

7 inc (14)

Round 3-5 :

14 sc in each row

Round 6 :

2 sc, dec, 10 sc (13)

Round 7 :

2 sc, dec, 9 sc (12)

Info :

Change color to beige

Round 8-18 :

12 sc in each row

Info :

2 sc, then fold in half and crochet 6 sc. Leave a long thread for sewing to the body. Stuff arm to half.

— Arms (Second) :

Info :

Start gray yarn

Round 1 :

7 sc in mr

Round 2 :

7 inc (14)

Round 3-5 :

14 sc in each row

Round 6 :

6 sc, dec, 6 sc (13)

Round 7 :

6 sc, dec, 5 sc (12)

Info :

Change color to beige

Round 8-18 :

12 sc in each row

Info :

1 sc, then fold in half and crochet 6 sc. Leave a long thread for sewing to the body. Stuff arm to half.

— Legs :

Info :

Start gray yarn. Make 2 pieces.

Round 1 :

6 sc in mr

Round 2 :

6 inc (12)

Round 3 :

(1 sc, inc)*6 (18)

Round 4 :

(2 sc, inc)*6 (24)

Round 5-7 :

24 sc in each row

Round 8 :

4 sc, 6 dec, 6 sc, change color to beige and crochet 2 sc (18)

Round 9 :

5 sc, 2 dec, 9 sc (16)

Round 10 :

5 sc, dec, 9 sc (15)

Round 11 :

3 sc, 2 dec, 8 sc (13)

Round 12 :

3 sc, dec, 8 sc (12)

Round 13-23 :

12 sc in each row

Infos :

First leg: 1 sc, fold in half and crochet 6 sc. Leave a long thread for sewing to the body. Second leg: after the 23 row, crochet 2 sc, fold in half and crochet 6 sc. Leave a long thread for sewing to the body. Add stuffing. Embroider imitation hooves.

— Tail :

Info :

Beige color

Foundation :

Crochet 11 ch, from the second loop from the hook crochet 10 sc. Finish crocheting. Leave a long thread for sewing to the body.

Tail tip (brush) :

1. Cut the gray yarn into pieces of about 8-10 cm. 2. Fold these pieces in half and pull out with a hook at the end of the tail, forming a loop. 3. Pull all the ends into the resulting loop.

— Body :

Info :

Beige color

Round 1 :

6 sc in mr

Round 2 :

6 inc (12)

Round 3 :

(1 sc, inc)*6 (18)

Round 4 :

(2 sc, inc)*6 (24)

Round 5 :

(3 sc, inc)*6 (30)

Round 6 :

(4 sc, inc)*6 (36)

Round 7 :

(5 sc, inc)*6 (42)

Round 8 :

(6 sc, inc)*6 (48)

Round 9-14 :

48 sc in each row

Round 15 :

(6 sc, dec)*6 (42)

Round 16-17 :

42 sc in each row

Round 18 :

(5 sc, dec)*6 (36)

Round 19-20 :

36 sc in each row

Round 21 :

(4 sc, dec)*6 (30)

Round 22 :

30 sc

Round 23 :

(3 sc, dec)*6 (24)

Info :

Finish crocheting. Cut off the tip, fasten inside. Add stuffing.

Assembly Instructions

  • Stuff the muzzle tightly with holofiber and sew it securely to the front of the head between rounds 13-17.
  • Fold the ears in half and sew them to the sides of the head around rounds 8-10, positioning them slightly angled outward.
  • Attach the cream horns to the top of the head between rounds 5-7, spacing them evenly apart for symmetrical appearance.
  • Embroider the nostrils on the muzzle using gray yarn or embroidery thread with small horizontal stitches.
  • Sew the completed head firmly to the body, ensuring the muzzle faces forward and the neck connection is secure.
  • Attach both arms to the sides of the body between rounds 15-17, making sure they're positioned symmetrically and hang naturally.
  • Sew the legs to the bottom of the body at rounds 23-24, positioning them for stable sitting or standing pose, then sew the tail to the back center of the body around round 20-22.

Important Notes

  • 💡Always work in spiral rounds without joining - mark the beginning of each round with a stitch marker or contrast thread
  • 💡Use yarn in two strands throughout the entire project for proper thickness and structural integrity
  • 💡Read the entire pattern before starting to familiarize yourself with construction sequence and color changes
  • 💡Stuff all pieces firmly but not overly tight to maintain proper shaping while allowing some softness for hugging
  • 💡Leave long tails when finishing each piece for sewing - at least 12 inches makes assembly much easier
  • 💡The pattern creator's first language is not English, so if instructions seem unclear, look at the context of surrounding rounds

This Little Bull pattern creates a substantial 39cm companion that's perfect for cuddles and display alike. The thoughtful construction using double-stranded yarn results in a durable, professional-looking toy that can withstand years of love. From the sweet cream muzzle to the playful brush-tipped tail, every detail has been carefully designed to capture the gentle charm of a farmyard bull. Whether you're making this adorable critter for a child who loves farm animals or adding to your own amigurumi collection, you'll find the process rewarding and the results absolutely delightful. 🧶 Happy crocheting! 🐂✨

You ask,

we answer.

FAQs

Why does the pattern specify using yarn in two strands?

Working with doubled yarn creates a thicker, more substantial fabric that holds stuffing better and gives the bull a sturdy, professional appearance. It also helps achieve the correct gauge with a 4.5mm hook and creates a tighter weave that prevents stuffing from showing through.

Can I use a different yarn brand instead of Alize Softy?

Absolutely! Any worsted weight or light bulky yarn will work well for this pattern. Just make sure to use two strands together if using thinner yarn, or adjust your hook size accordingly. Your finished bull may vary slightly in size depending on your yarn choice.

How do I create the brush tip for the tail?

Cut several 8-10cm pieces of gray yarn, fold each piece in half, then use your crochet hook to pull the folded loop through the end stitch of the tail. Pull the loose ends through the loop to secure. Repeat until you have a full, bushy tail tip, then trim evenly.

When should I insert the safety eyes?

Insert the 12mm safety eyes between rounds 11 and 12 of the head, spacing them 4 single crochet stitches apart. Do this before stuffing the head completely, as you need access to the inside to secure the eye backs properly.

What's the best way to embroider the hooves and nostrils?

Use gray embroidery thread or yarn to create small horizontal stitches for hooves on the bottom of each gray foot section. For nostrils, make two small vertical or diagonal stitches on the muzzle, spacing them evenly. Use photos as reference for placement.

Can I make the bull smaller or larger?

Yes! To make a smaller bull, use thinner yarn with a smaller hook (try sport weight with a 3mm hook). For a larger bull, use bulky yarn with a 6mm or larger hook. Keep in mind you'll need to adjust the safety eye size accordingly.