Create beautifully realistic pumpkins with this innovative pattern that forms natural segments as you crochet! Using linked double crochet stitches, you'll craft dense, textured pumpkins in six different sizes, from tiny decorative accents to statement pieces. Each pattern offers two distinct looks - simply turn your work inside out for a completely different texture. Perfect for autumn décor, Halloween celebrations, or year-round farmhouse charm, these pumpkins showcase your crochet skills while being surprisingly approachable.
Progress Tracker
0% Complete
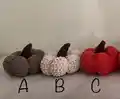
— SMALL PUMPKIN A :
Info :
This pumpkin has the appearance of horizontal stripes and is the smallest of the pumpkins. With 4.5mm H, ch2.
Round 1 :
in second ch from H, make 6 sc, (don't end the round, simply begin next round sts) [6 sts]
Round 2 :
*sl st in next st, sc in same st*, mark first sl st with a SM, rep from * to * another 5 times [12 sts]
Round 3 :
*sl st in next st (from here on, all sl sts will always be in the sl st of the prev round and is made under both loops, all other sts in the BL), starting-l-dc in BL of next st, 2 l-dc in BL of same st*, rep from * to * another 5 times [24 sts]
Round 4 :
*sl st in next st, starting-l-dc in BL of next st, l-dc in BL of same st, (2 l-dc in BL of next st) x 2*, rep from * to * another 5 times [42 sts]
Round 5-9 :
(sl st in next st, starting-l-dc in BL of next st, l-dc in BL of each of next 5 sts) x 6 [42 sts]
Round 10 :
*sl st in next st, (2sc-tog in BL of next 2 sts with invisible decrease method) x 3*, rep from * to * another 5 times [24 sts]
Round 11 :
sl st in next st 1 row below, sc in BL of each of next 3 sts [24 sts]
Round 12 :
(sl st, 3sc-tog in BL of next 3 sts with invisible decrease method) x 6 [12 sts]
Info :
stuff the pumpkin before the next round, make sure to stuff it firmly
Round 13 :
sl st in next st 1 row below, sc in BL of next st [12 sts]
Round 14 :
(2sc-tog over next 2 sts) x 6 (these are normal 2sc-tog under both loops of the sc and sl st), [6 sts], sl st into next st, leave a long tail and cut the yarn, fasten off.
— SMALL PUMPKIN B :
Info :
Pumpkin B has the appearance of bumps and looks a little bigger than Pumpkin A, however, it is the exact same pattern as for Pumpkin A, it is simply turned inside out! Repeat the pattern for Pumpkin A, but before you stuff it, turn it inside out, then complete the instructions as for Pumpkin A.
— SMALL PUMPKIN C :
Info :
This pumpkin is slightly bigger than the smallest pumpkin. It is the same pattern as for Pumpkin A, but with two extra rows after Row 9, making it slightly higher. With 4.5mm H, ch2.
Round 1 :
in second ch from H, make 6 sc, (don't end the round, simply begin next round sts) [6 sts]
Round 2 :
*sl st in next st, sc in same st*, mark first sl st with a SM, rep from * to * another 5 times [12 sts]
Round 3 :
*sl st in next st (from here on, all sl sts will always be in the sl st of the prev round and is made under both loops, all other sts in the BL), starting-l-dc in BL of next st, 2 l-dc in BL of same st*, rep from * to * another 5 times [24 sts]
Round 4 :
*sl st in next st, starting-l-dc in BL of next st, l-dc in BL of same st, (2 l-dc in BL of next st) x 2*, rep from * to * another 5 times [42 sts]
Round 5-11 :
(sl st in next st, starting-l-dc in BL of next st, l-dc in BL of each of next 5 sts) x 6 [42 sts]
Round 12 :
*sl st in next st, (2sc-tog in BL of next 2 sts with invisible decrease method) x 3*, rep from * to * another 5 times [24 sts]
Round 13 :
sl st in next st 1 row below, sc in BL of each of next 3 sts [24 sts]
Round 14 :
(sl st, 3sc-tog in BL of next 3 sts with invisible decrease method) x 6 [12 sts]
Info :
stuff the pumpkin before the next round, make sure to stuff it firmly
Round 15 :
sl st in next st 1 row below, sc in BL of next st [12 sts]
Round 16 :
(2sc-tog over next 2 sts) x 6 (these are normal 2sc-tog under both loops of the sc and sl st), [6 sts], sl st into next st, leave a long tail and cut the yarn, fasten off.
— LARGE PUMPKIN D :
Round 1 :
in second ch from H, make 6 sc, (don't end the round, simply begin next round sts) [6 sts]
Round 2 :
*sl st in next st, sc in same st*, mark first sl st with a SM, rep from * to * another 5 times [12 sts]
Round 3 :
*sl st in next st (from here on, all sl sts will always be in the sl st of the prev round and is made under both loops, all other sts in the BL), starting-l-dc in BL of next st, 2 l-dc in BL of same st*, rep from * to * another 5 times [24 sts]
Round 4 :
*sl st in next st, starting-l-dc in BL of next st, l-dc in BL of same st, (2 l-dc in BL of next st) x 2*, rep from * to * another 5 times [42 sts]
Round 5 :
*sl st in next st, starting-l-dc in BL of next st, l-dc in BL of same st, l-dc in BL of each of next 4 sts, 2 l-dc in BL of next st*, rep from * to * another 5 times [54 sts]
Round 6 :
*sl st in next st, starting-l-dc in BL of next st, l-dc in BL of same st, l-dc in BL of each of next 6 sts, 2 l-dc in BL of next st*, rep from * to * another 5 times [66 sts]
Round 7-13 :
(sl st in next st, starting-l-dc in BL of next st, l-dc in BL of each of next 9 sts) x 6 [66 sts]
Round 14 :
*sl st in next st, 2sc-tog in BL of next 2 sts with invisible decrease method, sc in BL of each of next 6 sts, 2sc-tog in BL of next 2 sts with invisible decrease method*, rep from * to * another 5 times [54 sts]
Round 15 :
sl st in next st 1 row below, sc in BL of each of next 8 sts [54 sts]
Round 16 :
*sl st in next st, 2sc-tog in BL of next 2 sts with invisible decrease method, sc in BL of each of next 4 sts, 2sc-tog in BL of next 2 sts with invisible decrease method*, rep from * to * another 5 times [42 sts]
Round 17 :
sl st in next st 1 row below, sc in BL of each of next 6 sts [42 sts]
Round 18 :
*sl st in next st, (2sc-tog in BL of next 2 sts with invisible decrease method) x 3*, rep from * to * another 5 times [24 sts]
Round 19 :
sl st in next st 1 row below, sc in BL of each of next 3 sts [24 sts]
Info :
stuff the pumpkin before the next round, make sure to stuff it firmly
Round 20 :
(sl st, 3sc-tog in BL of next 3 sts with invisible decrease method) x 6 [12 sts]
Round 21 :
(sl st in next st 1 row below, sc in BL of next st) x 6 [12 sts]
Round 22 :
(2sc-tog in next 2 sts) x 6, [6 sts] (these are normal 2sc-tog under both loops of the sc and sl st), sl st into next st, leave a long tail and cut the yarn, fasten off.
— LARGE PUMPKIN E :
Info :
Pumpkin E has the appearance of bumps and looks a little bigger than Pumpkin D, however, it is the exact same pattern as for Pumpkin D, it is simply turned inside out. Repeat the pattern for Pumpkin D, but before you stuff it, turn it inside out, then complete the instructions as for Pumpkin D.
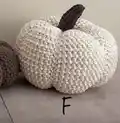
— LARGE PUMPKIN F :
Info :
Pumpkin F follows the same pattern as Pumpkin D but includes extra rows to increase its height. When stuffed firmly, the width will also expand, creating the illusion of a larger pumpkin. With 4.5mm H, ch2.
Round 1 :
in second ch from H, make 6 sc, (don't end the round, simply begin next round sts) [6 sts]
Round 2 :
*sl st in next st, sc in same st*, mark first sl st with a SM, rep from * to * another 5 times [12 sts]
Round 3 :
*sl st in next st (from here on, all sl sts will always be in the sl st of the prev round and is made under both loops, all other sts in the BL), starting-l-dc in BL of next st, 2 l-dc in BL of same st*, rep from * to * another 5 times [24 sts]
Round 4 :
*sl st in next st, starting-l-dc in BL of next st, l-dc in BL of same st, (2 l-dc in BL of next st) x 2*, rep from * to * another 5 times [42 sts]
Round 5 :
*sl st in next st, starting-l-dc in BL of next st, l-dc in BL of same st, l-dc in BL of each of next 4 sts, 2 l-dc in BL of next st*, rep from * to * another 5 times [54 sts]
Round 6 :
*sl st in next st, starting-l-dc in BL of next st, l-dc in BL of same st, l-dc in BL of each of next 6 sts, 2 l-dc in BL of next st*, rep from * to * another 5 times [66 sts]
Round 7-19 :
(sl st in next st, starting-l-dc in BL of next st, l-dc in BL of each of next 9 sts) x 6 [66 sts]
Round 20 :
*sl st in next st, 2sc-tog in BL of next 2 sts with invisible decrease method, sc in BL of each of next 6 sts, 2sc-tog in BL of next 2 sts with invisible decrease method*, rep from * to * another 5 times [54 sts]
Round 21 :
sl st in next st 1 row below, sc in BL of each of next 8 sts [54 sts]
Round 22 :
*sl st in next st, 2sc-tog in BL of next 2 sts with invisible decrease method, sc in BL of each of next 4 sts, 2sc-tog in BL of next 2 sts with invisible decrease method*, rep from * to * another 5 times [42 sts]
Round 23 :
sl st in next st 1 row below, sc in BL of each of next 6 sts [42 sts]
Round 24 :
*sl st in next st, (2sc-tog in BL of next 2 sts with invisible decrease method) x 3*, rep from * to * another 5 times [24 sts]
Round 25 :
sl st in next st 1 row below, sc in BL of each of next 3 sts [24 sts]
Info :
stuff the pumpkin before the next round, make sure to stuff it firmly
Round 26 :
(sl st, 3sc-tog in BL of next 3 sts with invisible decrease method) x 6 [12 sts]
Round 27 :
(sl st in next st 1 row below, sc in BL of next st) x 6 [12 sts]
Round 28 :
(2sc-tog in next 2 sts) x 6, [6 sts] (these are normal 2sc-tog under both loops of the sc and sl st), sl st into next st, leave a long tail and cut the yarn, fasten off.
— SMALL STEM :
Info :
Use this stem for the smaller pumpkins A, B and C. With a 4mm H, ch 10
Row 1 :
sc in 2nd ch from H and in next 5 ch, sl st in last 3 ch [9 sts]
Row 2 :
ch 1, sl st in BL of next 3 sts, sc in BL of next 6 sts
Row 3 :
ch 1, sc in BL of next 6 sts, sl st in BL of next 3 sts
Rows 4-7 :
rep Rows 2-3 another 2 times, fasten off, leaving a long tail.
— LARGE STEM :
Info :
Use this stem for the larger pumpkins D, E and F. With a 4mm H, ch 13
Row 1 :
sc in 2nd ch from H and in next 6 ch, sl st in last 5 ch [12 sts]
Row 2 :
ch 1, sl st in BL of next 5 sts, sc in BL of next 7 sts
Row 3 :
ch 1, sc in BL of next 7 sts, sl st in BL of next 5 sts
Rows 4-9 :
rep Rows 2-3 another 2 times, fasten off, leaving a long tail.
Row 10 :
rep Row 2, fasten off, leaving a long tail.
This innovative segmented pumpkin pattern brings autumn magic to your crochet hook! Created by Ouma Ralie after extensive experimentation, this design eliminates the frustration of tying strings or sewing rectangles by naturally forming pumpkin segments as you crochet. With six versatile sizes and the option to flip each pumpkin inside out for two distinct textures, you can create an entire harvest display from one brilliant pattern. The linked double crochet technique might seem challenging at first, but the detailed photo references guide you through every step. Happy fall crafting! 🎃🧶✨