๐Ÿงถ Beautiful โœจ Detailed ๐Ÿ’ Adorable

Grandpa Amigurumi Pattern

Grandpa Amigurumi Pattern
4.3โ˜… Rating
8-10 Hours Time Needed
2.1K Made This
โœ‚๏ธ

Intermediate Level

Ideal for those with basic knitting experience, featuring slightly more advanced stitches and techniques to expand your skills.

โฑ๏ธ

All-Day Adventure

Requires 8-10 hours, ideal for a full day of immersive knitting.

๐Ÿงธ

Cute Companion

An adorable friend to cherish, handcrafted with love to bring comfort and joy for years to come.

About This Grandpa Amigurumi Pattern

This grandpa amigurumi pattern combines classic charm with modern crochet techniques to create a truly special keepsake. Every detail has been thoughtfully designed, from the realistic grey mustache and hair to the carefully embroidered eyebrows that give him such character. The pattern features multiple color changes to create his authentic outfit including a patterned sweater, blue trousers with belt loops, and brown suspenders. With poseable wire-frame arms, your finished grandpa can be positioned in various ways, making him perfect for display or imaginative play.

Grandpa Amigurumi Pattern crochet pattern - detailed view of completed project

Standing at a huggable 22 cm tall, this pattern uses accessible materials and straightforward techniques while still offering enough detail to keep intermediate crocheters engaged. The comprehensive instructions guide you through each component with clear round-by-round directions and helpful assembly tips.

Why You'll Love This Grandpa Amigurumi Pattern

I absolutely love this grandpa pattern because it captures such warmth and nostalgia in every stitch! There's something incredibly special about bringing a character to life who represents wisdom, kindness, and comfort. I find the facial details particularly rewarding to create - watching those embroidered eyebrows and sweet mustache come together is magical. The color-work on the sweater adds a beautiful handmade touch without being overwhelming, and the poseable arms mean you can give him personality through different poses. This isn't just a toy; it's a heartfelt creation that can become a treasured family heirloom or a touching gift that brings genuine smiles.

Grandpa Amigurumi Pattern step 1 - construction progress Grandpa Amigurumi Pattern step 2 - assembly progress Grandpa Amigurumi Pattern step 3 - details and accessories Grandpa Amigurumi Pattern step 4 - final assembly and finishing

Switch Things Up

I absolutely love experimenting with this grandpa pattern to create unique family characters! For a grandmother version, I swap the mustache for a sweet embroidered smile and add a simple crocheted shawl or apron over the sweater. You could change the hair color to white, silver, or even keep some brown tones for a younger look.

I've also created different outfit variations by changing the sweater pattern colors - try pastels for a softer look or bright primary colors for a playful grandpa. The suspenders can be eliminated for a cleaner cardigan-only look, or you could add a tiny crocheted newspaper or pipe accessory for extra character.

For a more modern grandpa, I sometimes replace the traditional sweater with solid colors and add tiny crocheted glasses using wire and thread. You could even create seasonal versions - add a tiny Santa hat for Christmas or a sun hat for summer. The poseable arms are perfect for holding mini accessories like a walking stick, book, or even a tiny crocheted grandchild!

I've found that adjusting the shoe color to black creates a more formal appearance, while keeping them brown maintains that cozy, comfortable grandfather vibe. Don't be afraid to personalize the facial features too - you can adjust the eye placement slightly or add smile lines with embroidery to match your own grandparent's unique expression.

Common Mistakes & How to Fix Them

โœ— Not stuffing the head firmly enough which can cause the face to lose its rounded shape and make eye placement uneven โœ— Placing safety eyes too close together or at wrong height, always mark with pins first between rounds 13-14 with 9 stitches apart โœ— Forgetting to insert cardboard insoles into shoes before closing which makes the figure unstable and unable to stand properly โœ— Crocheting too loosely causing visible gaps and holes between stitches, use smaller hook if needed to maintain tight tension โœ— Not securing wire ends properly in arms causing sharp edges to poke through or arms to become loose over time

Grandpa Amigurumi Pattern

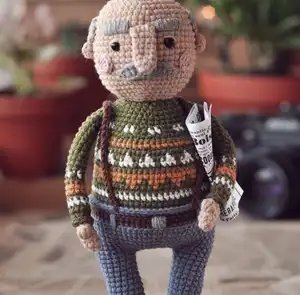
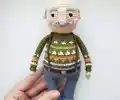
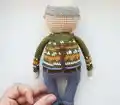
Create an adorable and heartwarming grandpa amigurumi with this detailed crochet pattern! Standing at approximately 22 cm tall, this charming character features realistic details including a bushy grey mustache, embroidered eyebrows, rosy cheeks, and a complete outfit with a striped sweater, brown shoes, and suspenders. Perfect for gifting to grandparents or displaying as a nostalgic keepsake, this lovable grandpa figure brings warmth and personality to any crochet collection. The pattern includes poseable wire-frame arms and step-by-step assembly instructions to help you craft every endearing detail from his grey hair to his cozy cardigan.

Intermediate 8-10 Hours

Materials Needed for Grandpa Amigurumi Pattern

โ€” Main Fabric

  • 01
    Gazzal Jeans 1122 beige color for head and hands
  • 02
    Yarnart Jeans 83 powder color for nose and cheeks
  • 03
    Alize Cotton Gold 21 grey melange for hair and mustache
  • 04
    Gazzal Jeans 1101 white color for shirt stripes
  • 05
    Yarnart Jeans 68 blue color for trousers
  • 06
    Alize Cotton Gold 02 mustard yellow for sweater pattern
  • 07
    Yarnart Jeans 82 green color for sweater and cardigan
  • 08
    Yarnart Jeans 70 brown color for shoes and suspenders
  • 09
    Any similar weight yarn (number 2 Standard Yarn Weight System) can substitute these brands

โ€” Tools Required

  • 01
    Crochet hook 2mm (US size 4) or size appropriate for your tension
  • 02
    6mm safety eyes
  • 03
    Wire for arms wireframe approximately 20-22 cm pieces
  • 04
    Thick cardboard or plastic sheet for shoe insoles
  • 05
    Stitch markers
  • 06
    Yarn needle for sewing
  • 07
    Scissors
  • 08
    Pins for assembly
  • 09
    Fiberfill stuffing
  • 10
    Adhesive tape or scotch tape for wire ends

Progress Tracker

0% Complete

โ€” HEAD :

Round 1 :

6 sc in MR (6)

Round 2 :

6 inc (12)

Round 3 :

(1 sc, inc) x 6 (18)

Round 4 :

(2 sc, inc) x 6 (24)

Round 5 :

(3 sc, inc) x 6 (30)

Round 6 :

(4 sc, inc) x 6 (36)

Round 7 :

(5 sc, inc) x 6 (42)

Round 8 :

(6 sc, inc) x 6 (48)

Round 9-20 :

48 sc (12 rounds)

Info :

Mark two points between rounds 13 and 14 with pins leaving 9 stitches apart, insert safety eyes and secure them

Round 21 :

(6 sc, dec) x 6 (42)

Info :

Stuff the piece firmly as you go

Round 22 :

(5 sc, dec) x 6 (36)

Round 23 :

(4 sc, dec) x 6 (30)

Round 24 :

(3 sc, dec) x 6 (24)

Round 25 :

(2 sc, dec) x 6 (18)

Round 26 :

(1 sc, dec) x 6 (12)

Round 27 :

6 dec, cut thread, fasten off, pull opening closed through front loops using needle, weave in thread tail inside

โ€” NOSE :

Round 1 :

8 sc in MR in powder color (8)

Round 2 :

8 sc in powder color (8)

Info :

Change to beige color

Round 3-7 :

8 sc in beige color (5 rounds)

Info :

Don't stuff the piece, fold in half and crochet 4 sc through both layers, fasten off leaving long thread tail for sewing

โ€” CHEEKS (2 PIECES) :

Round 1 :

6 sc in MR in powder color, sl st, fasten off leaving long thread tail for sewing

โ€” MOUSTACHE :

Row 1 :

Make ch11 in grey melange color

Row 2 :

From second ch from hook crochet 1 sc, 2 hdc, 4 dc, 2 hdc, 1 sc, fasten off leaving long thread tail for sewing

โ€” EARS (2 PIECES) :

Round 1 :

4 sc in MR in beige color, pull ring closed, fasten off leaving long thread tail for sewing

โ€” HAIR :

Row 1 :

Make ch33 in grey melange color

Row 2 :

Work from second ch from hook: 31 sc, 3 sc into one ch, continue crocheting across another side of chain: 30 sc, inc (66)

Row 3 :

inc, 30 sc, 3 inc, 30 sc, 2 inc (72), fasten off leaving long thread tail for sewing

โ€” ARMS (2 PIECES) :

Round 1 :

6 sc in MR in beige color (6)

Round 2 :

(1 sc, inc) x 3 (9)

Round 3 :

9 sc

Round 4 :

4 sc, puff stitch consisting of three dc sts, 4 sc (9)

Round 5 :

9 sc

Info :

This part of arm can be slightly stuffed, rest part doesn't need stuffing, change to green color

Round 6 :

9 sc into back loops only in green color (9)

Round 7 :

4 sc, inc, 4 sc (10)

Round 8 :

10 sc

Info :

Change to white color

Round 9 :

10 sc in white color

Info :

Change to green color

Round 10 :

10 sc in green color

Info :

Change to mustard color

Round 11-12 :

10 sc in mustard color (2 rounds)

Info :

Change to green color

Round 13 :

10 sc in green color

Round 14 :

(1 sc in green color, 1 sc in white color) x 5 (10), then crochet in green color

Round 15-28 :

10 sc in green color (14 rounds), fasten off, cut, weave in thread end inside

Info :

In round 6 crochet 9 sc in green color into free front loops

โ€” LEGS AND BODY :

Round 1 :

Make ch8 in brown color, from second ch from hook 6 sc, 3 sc into 1 stitch, continue crocheting across another side of chain 5 sc, inc (16)

Round 2 :

inc, 5 sc, 3 inc, 5 sc, 2 inc (22)

Round 3 :

22 sc into back loops only

Round 4-6 :

22 sc (3 rounds)

Info :

Cut two identical ovals with sole size from thick cardboard or plastic sheet, insert into shoe

Round 7 :

5 sc, 6 dec, 5 sc (16)

Info :

Change to blue color

Round 8 :

16 sc into back loops only in blue color

Info :

Stuff piece firmly, then stuff as you go

Round 9-21 :

16 sc (13 rounds)

Info :

Don't work last stitch in round 21, so toes of both legs will be facing outward, fasten off, cut, weave in thread tail inside

Info :

Second leg is crocheted same way till round 21. For 21st round of second leg crochet: 16 sc + work 5 sc more additionally. Don't cut thread, continue crocheting body

Body Round 1 :

Make ch8 and join with first leg: 16 sc across first leg, 8 sc across chain, 16 sc across second leg, 8 sc across second side of chain (48)

Round 2 :

(7 sc, inc) x 6 (54)

Round 3 :

54 sc

Round 4 :

16 sc, (1 sc, inc) x 6, 26 sc (60)

Round 5-9 :

60 sc (5 rounds)

Info :

Change to brown color

Round 10 :

60 sc into back loops only in brown color

Round 11 :

60 sc in brown color

Info :

Change to blue color

Round 12 :

60 sc into back loops only in blue color

Info :

Change to green color

Round 13 :

60 sc into back loops only in green color

Round 14 :

60 sc in green color

Info :

Change to white color

Round 15 :

60 sc in white color

Info :

Change to green color

Round 16 :

60 sc in green color

Round 17 :

2 sc in green color, 1 sc in mustard color, (3 sc in green color, 1 sc in mustard color) x 14, 1 sc in green color (60)

Round 18 :

(1 sc in green color, 3 sc in mustard color) x 15 (60)

Round 19 :

60 sc in mustard color

Round 20 :

60 sc in green color

Round 21 :

2 sc in white color, 1 sc in green color, (3 sc in white color, 1 sc in green color) x 14, 1 sc in white color (60)

Round 22 :

(1 sc in white color, 3 sc in green color) x 15 (60)

Round 23 :

60 sc in green color

Round 24 :

14 sc, (2 sc, dec) x 6, 22 sc in mustard color (54)

Round 25 :

54 sc in green color

Round 26 :

14 sc, (1 sc, dec) x 6, 22 sc in green color (48)

Round 27 :

(2 sc in white color, 2 sc in green color) x 12 (48)

Info :

All next rounds are crocheted in green color

Round 28 :

(6 sc, dec) x 6 (42)

Round 29 :

6 sc, crochet 5 sc together with arm (make sure arm is correctly located), 16 sc, 5 sc together with second arm, 10 sc (42)

Round 30 :

6 sc, 5 sc across rest stitches on arm, continue crocheting across body 16 sc, then 5 sc across second arm, continue crocheting across body 10 sc (42)

Info :

Cut two pieces of wire with length of about 20-22 cm, bend one wire end and wrap with adhesive tape or scotch tape, insert wire with bent end inside arm, twist wire ends around each other, cut excess length, wrap with adhesive tape, bend and hide inside body

Round 31 :

(5 sc, dec) x 6 (36)

Round 32 :

36 sc, fasten off leaving long thread tail for sewing

โ€” SUSPENDERS :

Step 1 :

Make ch60 in brown color, fasten off leaving long thread tail

Step 2 :

To make back part of suspenders make ch11, join with middle of first piece, turn work and crochet 11 sc across chain, fasten off leaving long thread tail for sewing

Assembly Instructions

  • Make two beige stitches above each eye for eyebrow placement preparation
  • Sew nose between eyes, 2 stitches higher than eye level, through beige part only inserting needle through both nose layers, sew nose base as well
  • Position moustache under pink part of nose, sew across upper edge only leaving lower edge free
  • Attach ears between rounds 13 and 16, skipping 7 stitches to each side of both eyes, secure with pins first then sew
  • Fix hair above ears with pins, lower back part slightly to form slight bend, sew hair across perimeter
  • Sew cheeks in appropriate positions on face as shown in pattern photos
  • Embroider eyebrows 1 stitch higher from eyes and 1 stitch to both sides from nose using grey melange yarn divided into single strand folded in half, make vertical stitches 2 stitches long spanning 5 stitches width, work moving from nose making stitches close together until bushy
  • Fix head on body with pins ensuring symmetrical placement, sew with invisible seam, fasten off and weave in thread tail
  • Crochet 16 dc into free front loops of stitches in legs round 8 with blue thread
  • Crochet 60 sc into free front loops of stitches in body round 12 with blue thread
  • Embroider belt loops with blue thread: 2 loops at front symmetrically above legs, 3 loops on back side, use several vertical stitches
  • Embroider belt plaque in grey color using same technique
  • Find location for suspenders, fix with pins, sew to free edge of trousers

Important Notes

  • ๐Ÿ’กCrochet tightly in non-joining rounds without turning chains to avoid holes between stitches, use smaller hook if needed
  • ๐Ÿ’กStuff toy firmly and spread stuffing material evenly for best shape, stuff as you go especially for head and body
  • ๐Ÿ’กMark eye placement with pins first between rounds 13 and 14 with 9 stitches spacing before inserting safety eyes
  • ๐Ÿ’กInsert cardboard or plastic insoles into shoes before closing to provide stability and help figure stand properly
  • ๐Ÿ’กWhen adding wire armature for arms, bend and wrap wire ends securely with adhesive tape to prevent poking through
  • ๐Ÿ’กFor color changes in patterned sweater section, follow diagram carefully or written color-changing instructions round by round
  • ๐Ÿ’กDon't work last stitch in round 21 of first leg so toes of both legs face outward when joined
  • ๐Ÿ’กPin all pieces in place during assembly before sewing to ensure correct symmetrical positioning

This heartwarming Grandpa amigurumi pattern brings generations together through the timeless craft of crochet! With his gentle expression, cozy sweater, and distinguished grey mustache, this 22 cm figure captures the essence of love and wisdom that grandparents represent. Every stitch is designed with care, from his embroidered bushy eyebrows to his poseable arms that can hold tiny treasures. Whether you're creating a special gift for your own grandpa or crafting a nostalgic keepsake for your family, this pattern offers both an enjoyable creative journey and a touching finished piece. Happy crocheting, and may your grandpa amigurumi bring as much joy to make as he will to display!

You ask,

we answer.

FAQs

What size will the finished grandpa amigurumi be?

The finished grandpa measures approximately 22 cm (8.6 inches) tall when using the recommended yarn weights and 2mm crochet hook. Size may vary slightly based on your personal crochet tension and hook size.

Can I make the arms poseable?

Yes! The pattern includes instructions for adding a wire armature to the arms. You'll need two pieces of wire about 20-22 cm long. The pattern provides detailed steps on how to properly secure and wrap the wire ends safely.

Do I need to know how to do color changes?

Yes, this intermediate pattern includes multiple color changes, especially in the sweater section where there's a decorative pattern. The instructions guide you through each color change round by round, and a diagram is provided for the sweater pattern.

What are the cardboard insoles for?

The cardboard or plastic sheet insoles go inside the shoes to provide stability and help the grandpa figure stand upright. Cut two oval shapes matching the sole size and insert them before closing the shoe section.

Can I use different yarn brands than those listed?

Absolutely! The pattern specifies that any yarn with similar weight (number 2 in the Standard Yarn Weight System) can be substituted. Just make sure all your colors have the same thickness for consistent results.

How do I embroider the bushy eyebrows?

Use grey melange yarn divided into one strand folded in half. The eyebrows sit 1 stitch higher than the eyes and 1 stitch to each side of the nose, spanning 5 stitches. Make vertical stitches 2 stitches long, working from the nose outward, placing stitches close together until they look bushy.

Is this pattern suitable for beginners?

This is an intermediate level pattern. While it uses basic stitches, it requires experience with color changes, assembly of multiple pieces, embroidery details, and working with wire armatures. Beginners with some experience may find it challenging but rewarding.