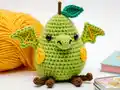
Create your very own adorable Pearodactyl with this delightful fruit-themed dinosaur amigurumi pattern! This charming pterodactyl combines the sweetness of a pear with prehistoric fun, featuring a pear-shaped body, whimsical wings with sunny yellow accents, and cute spotted details. Standing at 11cm tall when completed, this Pearodactyl makes a perfect gift for dinosaur lovers, fruit enthusiasts, or anyone who appreciates quirky handmade creations. The pattern includes detailed instructions with helpful photos to guide you through every step of creating this unique flying friend.
Progress Tracker
0% Complete
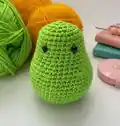
— Body :
Round 1 :
Using Grass Green, 6sc in MR (6)
Round 2 :
inc each st around (12)
Round 3 :
*1sc, inc* rep 6 times (18)
Round 4 :
*2sc, inc* rep 6 times (24)
Round 5 :
*3sc, inc* rep 6 times (30)
Round 6 :
*4sc, inc* rep 6 times (36)
Round 7 :
*5sc, inc* rep 6 times (42)
Round 8 :
*6sc, inc* rep 6 times (48)
Rounds 9-16 :
sc each st around (48) (8 rnds)
Round 17 :
*6sc, dec* rep 6 times (42)
Round 18 :
sc each st around (42)
Round 19 :
*5sc, dec* rep 6 times (36)
Round 20 :
sc each st around (36)
Round 21 :
*4sc, dec* rep 6 times (30)
Rounds 22-27 :
sc each st around (30) (6 rnds)
Info :
Insert safety eyes between rnds 24-25 five visible sts apart. Start adding stuffing and continue to stuff as we decrease.
Round 28 :
*3sc, dec* rep 6 times (24)
Round 29 :
*2sc, dec* rep 6 times (18)
Round 30 :
*1sc, dec* rep 6 times (12)
Round 31 :
dec 6 times (6)
Info :
Fasten off and leave a long tail. Complete invisible close. Weave in ends.
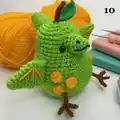
— Wings (make two) :
Round 1 :
Using Grass Green, 6sc in MR (6)
Round 2 :
sc each st around (6)
Round 3 :
*sc, inc* rep 3 times (9)
Round 4 :
sc each st around (9)
Round 5 :
*2sc, inc* rep 3 times (12)
Round 6 :
sc each st around (12)
Round 7 :
*3sc, inc* rep 3 times (15)
Round 8 :
sc each st around (15)
Round 9 :
dec, 5sc, inc, 5sc, dec (14)
Round 10 :
dec, 4sc, 2inc, 4sc, dec (14)
Info :
Fold and stitch together. Cut yarn leaving a long tail. Using sunshine make three long sts on each wing making sure they are only visible on the front
— Crest :
Round 1 :
Using Grass Green, 6sc in MR (6)
Round 2 :
*sc, inc* rep 3 times (9)
Round 3 :
sc each st around (9)
Round 4 :
*2sc, inc* rep 3 times (12)
Round 5 :
sc each st around (12)
Round 6 :
5sc, 2inc, 5sc (14)
Round 7 :
sc each st around (14)
Info :
Cut yarn leaving a long tail.
— Beak :
Round 1 :
Using Grass Green, 6sc in MR (6)
Round 2 :
*sc, inc* rep 3 times (9)
Round 3 :
sc each st around (9)
Round 4 :
3sc, 3inc, 3sc (12)
Round 5 :
5sc, 2inc, 5sc (14)
Info :
Cut yarn leaving a long tail. Using black embroidery floss, stitch two nostrils and a mouth to the beak.
— Legs (make two) :
Instructions :
Using Gingerbread, Ch8, *slst in 2nd ch from hook, 2slst, ch4* rep 2 times. Slst in 2nd ch from hook, 2slst, now working back up the original ch, 4slst. Cut yarn leaving a long tail
— Stem :
Instructions :
Using Gingerbread, Ch7, slst in 2nd ch from hook, 5slst (6)
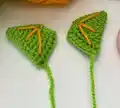
— Leaf :
Round 1 :
Using Kelly Green, ch10, sc in 2nd ch from hook, 2hdc, dc, dcinc, dc, 2hdc, work the following sts in the final st (sc, ch2, slst in 2nd ch from hook, sc)
Info :
Now working down the other side of the ch, 2hdc, dc, dcinc, dc, 2hdc, sc, slst to join (20). Cut yarn leaving a long tail
— Spots (make five) :
Round 1 :
Using Sunshine, 6sc in MR, slst to join
Info :
Cut yarn leaving a long tail
This adorable Pearodactyl pattern brings together the best of both worlds—fruity freshness and prehistoric charm! Designed by Candy Downs for Hooked on Candy, this whimsical creation stands at a perfect 11cm tall and features charming details like sunshine spots, folded wings, and an embroidered beak. Whether you're building a collection of fruit dinosaurs or creating a unique gift for someone special, this Pearodactyl will surely become a treasured handmade companion. The pattern's clear instructions and helpful photos make it an enjoyable project that results in a character full of personality. Happy crocheting! 🧶✨🍐