🧢 Beautiful ✨ Detailed πŸ’ Adorable

Eira Snowy Owl Amigurumi Pattern

Eira Snowy Owl Amigurumi Pattern
4.7β˜… Rating
4-5 Hours Time Needed
3.1K Made This
βœ‚οΈ

Intermediate Level

Ideal for those with basic knitting experience, featuring slightly more advanced stitches and techniques to expand your skills.

⏱️

Weekend Treat

Takes 5-7 hours, making it an enjoyable project to finish over a couple of days.

🧸

Cute Companion

An adorable friend to cherish, handcrafted with love to bring comfort and joy for years to come.

About This Eira Snowy Owl Amigurumi Pattern

This delightful snowy owl pattern brings a touch of magic to your crochet collection. Eira stands proudly on her own thanks to a cleverly designed tail kickstand and sturdy feet construction. The pattern features unique eye patches with dimensional folding, a functional beak that can hold her tiny envelope, and wings positioned for a natural, lifelike appearance. Every detail has been thoughtfully crafted to create an owl full of personality and charm.

Eira Snowy Owl Amigurumi Pattern crochet pattern - detailed view of completed project

The included miniature envelope with wax seal and customizable striped scarf add extra character to this already enchanting design. Perfect as a gift for book lovers or as a decorative piece for your own space.

Why You'll Love This Eira Snowy Owl Amigurumi Pattern

I absolutely love how this pattern combines functionality with adorable detailsβ€”the beak actually holds the envelope, and the owl stands on its own without any support needed! The dimensional eye patches give Eira such an expressive, lifelike quality that makes her feel like a real companion. I'm particularly fond of the tiny embroidered talons and the way the scarf can be customized with your favorite color combinations. What really won me over is how the pattern guides you through creating those perfect little feet with individual toesβ€”it's these small touches that transform a simple amigurumi into something truly special and magical.

Eira Snowy Owl Amigurumi Pattern step 1 - construction progress Eira Snowy Owl Amigurumi Pattern step 2 - assembly progress Eira Snowy Owl Amigurumi Pattern step 3 - details and accessories Eira Snowy Owl Amigurumi Pattern step 4 - final assembly and finishing

Switch Things Up

I love experimenting with color variations when making Eira! While the classic snowy white is beautiful, I've created versions in soft greys, browns, and even pastel colors for a whimsical twist. The eye patches look stunning when you switch the yellow to gold metallic yarn or even a sparkly option for extra magic.

For the scarf, I've tried everything from Hogwarts house colors to rainbow gradients and seasonal palettes. A burgundy and gold scarf gives her a regal appearance, while pastel pinks and blues create a softer, nursery-friendly version. I've even made mini bow ties instead of scarves for a dapper gentleman owl look!

The envelope is another fun area to customize. I've used patterned fabric stiffened with mod podge instead of crocheted beige, and I've experimented with different wax seal colorsβ€”emerald green looks particularly magical. You could even add tiny stamped details or paint miniature address lines for extra realism.

Some makers add wire to the wings for poseable flight positions, though this isn't in the original pattern. I've also seen people embroider more detailed feather patterns on the chest instead of simple V shapes, creating intricate plumage designs that really make the owl stand out on a shelf.

Common Mistakes & How to Fix Them

βœ— Not leaving enough room in the magic ring when making the eyes can make it impossible to insert the safety eye post through the center βœ— Attaching the tail before the feet will prevent the owl from standing properly and functioning as a freestanding piece βœ— Sewing the eye patches completely flat removes the dimensional fold effect that gives the owl its characteristic expressive look βœ— Forgetting to mark the starting stitch when making the feet can cause confusion when working the toes in front loop only βœ— Stuffing too loosely in the body will cause the owl to slump and not maintain its upright posture when standing

Eira Snowy Owl Amigurumi Pattern

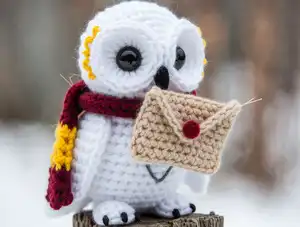
Create your own magical snowy owl companion with this enchanting amigurumi pattern! Eira features adorable eye patches, poseable wings, tiny detailed feet with embroidered talons, and comes complete with her own miniature envelope sealed with wax. This charming design captures the essence of a beloved mail-delivery owl, perfect for Harry Potter fans or anyone who loves whimsical woodland creatures. The pattern includes detailed instructions for creating a tiny scarf with customizable color stripes, making each owl uniquely yours.

Intermediate 4-5 Hours

Materials Needed for Eira Snowy Owl Amigurumi Pattern

β€” Main Fabric

  • 01
    Approximately 92 metres of white worsted weight yarn (#4)
  • 02
    Small amounts of yellow, black, grey, beige, and red worsted weight yarn (#4)
  • 03
    Poly-fil stuffing

β€” Tools Required

  • 01
    3.5mm crochet hook
  • 02
    5mm crochet hook (for scarf)
  • 03
    12mm safety eyes (2)
  • 04
    Black embroidery thread
  • 05
    Stitch markers
  • 06
    Darning needle
  • 07
    Sewing needle
  • 08
    Scissors

Progress Tracker

0% Complete

β€” Eyes (make 2) :

Info :

Must be made first

Round 1 :

Using YELLOW - In MR, SC 3, HDC, DC, HDC, SC 2. Close the MR loosely, leaving enough room to insert the safety eye post through the middle. Join with a SlSt (8sts)

Round 2 :

Using WHITE - Ch 2 (counts as a st). HDC in same st as the ch. HDC INC in each stitch around. Join with a SlSt (16sts)

Round 3 :

Ch 1. SC in the same stitch. {SC, INC} 7x, SC in last stitch (24sts)

Info :

Fasten off with a tail for sewing. Insert the safety eye into the centre of the MR and pull the tail to tighten

β€” Body :

Round 1 :

In MR, SC 6. Pull yarn tail to close ring (6sts)

Round 2 :

INC once in each stitch (12sts)

Round 3 :

{SC, INC} 6x (18sts)

Round 4 :

SC, INC, {SC 2, INC} 5x, SC (24sts)

Round 5 :

{SC 3, INC} 6x (30sts)

Round 6-15 :

SC once in each stitch (30sts)

Round 16 :

{SC 3, DEC} 6x (24sts)

Round 17 :

{SC 3, INC} 6x (30sts)

Round 18 :

SC 2, INC, {SC 4, INC} 5x, SC 2 (36sts)

Round 19 :

{SC 5, INC} 6x (42sts)

Round 20-24 :

SC once in each stitch (42sts)

Round 25 :

{SC 5, DEC} 6x (36sts)

Round 26 :

SC once in each stitch (36sts)

Round 27 :

SC 2, DEC, {SC 4, DEC} 5x, SC 2 (30sts)

Round 28 :

{SC 3, DEC} 6x (24sts)

Info :

Stop and attach the eyes. Counting down 7 rows from the current one, insert the eye post between the 21st and 22nd row, with 3 stitches visible between the eye patches. The patches can be sewn in place now, or later. Stuff the lower body, and as much of the head as you comfortably can. Continue with the following rounds to close the head, stuffing as needed

Round 29 :

SC, DEC, {SC 2, DEC} 5x, SC (18sts)

Round 30 :

{SC, DEC} 6x (12sts)

Round 31 :

DEC all (6sts)

Info :

Fasten off, and weave in the end

β€” Feet (make 2) :

Round 1 :

Ch 4. SC in the 2nd Ch from the hook (mark this stitch as the start). SC. In last Ch, SC 3. Rotate the piece so you're now working the other side of the chain (skipping the loop the previous 3 sts were worked in) INC once in each of the 2 open Ch spaces (9sts)

Round 2 :

In FLO, {SlSt, Ch 2, SC in 2nd Ch from hook, SlSt in the same stitch as first SlSt} once in each of the next 3 sts. Working in both loops again, SC 2 (mark the first SC). In FLO, SlSt, Ch 3, SC in 2nd Ch from hook, SC, SlSt in the FLO of the following stitch. Working in both loops again, SC 2 (4 toes, 4 SC sts)

Round 3 :

Flip the toes down towards the sole, and work 3 SC into the back loops left open from rnd 3 (one near the middle of each toe). Skip the marked stitch. Working in both loops again, SC in the next stitch, and then SC into the SlSt. Flip the back toe down, and SC in the BLO of the next 2 sts. Working in both loops again, SC 2 (9sts)

Info :

Fasten off with a tail for sewing

β€” Wings (make 2) :

Round 1 :

In MR, SC 6. Pull yarn tail to close ring (6sts)

Round 2 :

INC once in each stitch (12sts)

Round 3 :

{SC, INC} 6x (18sts)

Round 4 :

{SC 5, INC} 3x (21sts)

Round 5-6 :

SC once in each stitch (21sts)

Round 7 :

{SC 5, DEC} 3x (18sts)

Round 8 :

SC once in each stitch (18sts)

Round 9 :

{SC, DEC} 6x (12sts)

Round 10 :

SC once in each stitch (12sts)

Round 11 :

DEC all (6sts)

Round 12 :

SC once in each stitch (6sts)

Info :

Fasten off, and weave in ends

β€” Beak :

Round 1 :

Using BLACK - Leaving a long tail for sewing, Ch 4. SlSt in 2nd Ch from hook. HDC. In last Ch, DC, SC, DC. Turn. Working on the other side of the chain (skipping the loop the previous 3 sts were worked in), HDC, SlSt to last Ch (7sts)

Info :

Fasten off with a tail for sewing. Pinch the tip of the beak (SlSt side) closed and sew back and forth a couple times to secure the point in place. Weave in end

β€” Tail :

Round 1 :

Ch 6. SC in 2nd Ch from hook. SC 3. In last Ch, SC 3. Turn (7sts)

Round 2 :

Working on the other side of the chain, SC 3. In last Ch, SC 2 (5sts)

Round 3-4 :

Working in rounds from this point on, SC once in each stitch (12sts)

Round 4 :

{DEC, SC 4} 2x (10sts)

Round 5 :

SC once in each stitch (10sts)

Round 6 :

{DEC, SC 3} 2x (8sts)

Info :

Fasten off with a tail for sewing. Because you worked in the round there will be a low side and a high side; take note of this for assembly, as the low side will be sewn on facing down so the tail is angled correctly

β€” Wax Seal :

Round 1 :

Using RED - In MR, SC 4 (4sts)

Info :

Pull ring closed tightly, and fasten off with a small tail for sewing

β€” Envelope :

Round 1 :

Using BEIGE, and a 5mm hook - Leaving a 6 inch tail, Ch 15. SC in 2nd Ch from hook, and once in each stitch across (14sts)

Round 3-14 :

SC once in each stitch (14sts)

Info :

Your goal here is to make a 3x3 inch square, so depending on your gauge you may need to go up/down a hook size, adjust the chain length, or add/subtract rows to correctly achieve this. Once the proper size is reached, fasten off with another tail for sewing

β€” Scarf :

Round 1 :

Ch 4. SC in 2nd Ch from hook, SC 2 (3sts)

Round 2-4 :

Ch 1. SC once in each stitch (3sts)

Info :

Change yarn colour

Round 5-7 :

Ch 1, SC once in each stitch (3sts)

Info :

Change yarn colour back to the first colour used. Repeat your colour change rows until your scarf is around 13 inches long, or long enough to wrap around the owls neck at least 1.5x. Pattern ended up being 17 coloured sections, and 51 rows, but yours may need to be adjusted depending on your gauge. Work in colour block rows of 3, but you can alter your colour changes however you like. Weave in all the ends. Sew a loop on one end, big enough to pull the scarf through, to secure it on her

Assembly Instructions

  • Position eye patches so the DC side of yellow faces towards the outside edge of head. Starting at inside corner, sew 2/3 around the patch, then sew through patch on downward angle at outside corner leaving top edge able to fold down slightly.
  • Position beak so top is level with bottom of safety eyes. Sew 2 stitches on one side, across top, and 2 stitches on other side to secure 1/3 of beak, leaving tip free so owl can carry mail.
  • Embroider small V shapes onto front of body using grey yarn for feather texture details.
  • Position wings to abut bottom edge of head, center on body when viewed from side, slightly tilted back. Stitch only through layer closest to body and secure just the top portion.
  • Attach feet one row over from starting MR of body, centered when viewed from side. Sew around final SC round of leg only, leaving toes free. Embroider talons after attachment.
  • Position tail in center of owl's back, 7-8 rows up from starting MR on bottom of body. Ensure low side faces down so tail functions as kickstand allowing owl to stand freely.
  • Fold envelope to create square pocket: fold left section in and bottom up, whip stitch seam. Fold right section in and whip stitch to bottom section. Fold top down and sew wax seal to tip. Add small stitch in middle of top flap through to front to keep envelope closed.

Important Notes

  • πŸ’‘Use invisible decrease method (using FLO) whenever a decrease is called for to maintain smooth surface texture
  • πŸ’‘Pattern is worked in continuous rounds unless specified otherwise, so use stitch markers to mark beginning of each round
  • πŸ’‘Work stitches tight enough that no visible holes appear, otherwise stuffing will show through the fabric
  • πŸ’‘Eyes must be made first before starting body, as safety eye posts need to be inserted through center of magic ring
  • πŸ’‘Attach feet before attaching tail, otherwise owl may not stand properly as a freestanding piece
  • πŸ’‘When making envelope, gauge may vary so adjust hook size or number of rows to achieve proper 3x3 inch square measurement

This enchanting Eira Snowy Owl pattern was lovingly designed to capture the magic and charm of everyone's favorite mail-delivery companion! With dimensional eye patches, functional details like a beak that holds a tiny envelope, and the ability to stand freely thanks to clever construction techniques, this owl is truly special. The customizable striped scarf adds a personal touch that makes each creation uniquely yours. Whether you're a fan of magical stories or simply love adorable woodland creatures, Eira will bring joy and whimsy to your crochet collection. πŸ¦‰πŸ’Œ Happy crocheting and may your stitches be as magical as the owl you create! ✨🧢

You ask,

we answer.

FAQs

Why won't my owl stand up on its own?

Make sure you attach the feet before the tail, and position the tail 7-8 rows up from the bottom with the low side facing down. The tail acts as a kickstand, so proper positioning is crucial. Also ensure you've stuffed the body firmly enough to provide stability.

Can I use a different yarn weight for this pattern?

Yes, you can substitute any yarn weight, but you'll need to adjust your hook size, safety eye size, and yarn amounts accordingly. The gauge isn't critical, but make sure your stitches are tight enough that stuffing won't show through.

How do I get the eye patches to have that dimensional fold?

When sewing the eye patches, leave the top section for last. Sew 2/3 around starting at the inside corner, then at the outside corner sew through the patch on a downward angle toward your starting point. This leaves the top edge able to fold down slightly, creating the dimensional effect.

What size should the finished owl be?

Using the recommended 3.5mm hook and worsted weight yarn, the finished owl will be approximately 4-5 inches tall. Size will vary depending on your tension and yarn choice.

Can the beak really hold the envelope?

Yes! The beak is designed to be sewn only partially to the faceβ€”just the top portion. This leaves the tip free and functional so you can tuck the tiny envelope inside, making it a truly interactive detail.

Do I need to make the scarf in stripes?

No, the striped pattern is just a suggestion! You can make the scarf in a solid color, use more or fewer colors, or change the width of your stripes. The pattern gives you complete creative freedom for personalization.