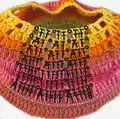
Create stunning boho-style lanterns that bring magical ambiance to your garden or home! This beautiful crochet lampion pattern combines colorful mercerized cotton yarn with metal rings to create a stable, elegant lantern perfect for warm summer evenings. The pattern works from top to bottom, incorporating two metal rings for structure, and finishes with a decorative tassel. Customize with your favorite color combinations and add LED lights for a enchanting glow that transforms any outdoor or indoor space into a cozy paradise.
Progress Tracker
0% Complete
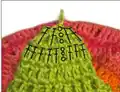
— Starting Round (around 10cm ring) :
Initial Setup :
Crochet 95 sc around the ring, end with 1 sl st in first sc to create closed circle
— Round 1 :
Round 1 :
Start with ch3, then 1 dc in same st, *ch1, skip 4 sts, 2 dc in same st, repeat from * continuously. End round with 1 sl-st in uppermost ch (57 sts)
— Round 2 :
Round 2 :
Start with ch3, then 2 dc in n. st, ch1, *skip 1 st, 1 dc in n. st, 2 dc in n. st, ch1, repeat from * cont. End rd with 1 sl-st. Change color (76 sts)
— Round 3 :
Round 3 :
Start on the right dc of any dcg of prev. rd with ch3, then 1 dc in n. st, 2 dc in n. st, ch1, skip 1 st, *2 dc, 2 dc in n. st, ch1, skip 1 st, repeat from * cont. End rd with 1 sl-st (95 sts)
— Round 4 :
Round 4 :
1 dc on each dc of prev. rd and ch1 above each ch1/ch-sp of prev. rd. In detail: Start with ch3, then 3 dc, ch1, skip 1 st, *4 dc, ch1, skip 1 st, repeat from * cont. End rd with 1 sl-st. Change color (95 sts)
— Round 5 :
Round 5 :
Start on the right dc of any dcg of prev. rd with ch3, then crochet exactly as 4th rd (95 sts)
— Round 6 :
Round 6 :
Start with ch3, then 2 dc, 2 dc in n. st, ch1, skip 1 st, *3 dc, 2 dc in n. st, ch1, skip 1 st, repeat from * cont. End rd with 1 sl-st. Change color (114 sts)
— Round 7 :
Round 7 :
1 dc on each dc of prev. rd and ch1 above each ch1/ch-sp of prev. rd. In detail: Start with ch3, then 4 dc, ch1, skip 1 st, *5 dc, ch1, skip 1 st, repeat from * cont. End rd with 1 sl-st (114 sts)
— Round 8 :
Round 8 :
Start with ch3, then 3 dc, 2 dc in n. st, ch1, skip 1 st, *4 dc, 2 dc in n. st, ch1, skip 1 st, repeat from * cont. End rd with 1 sl-st. Change color (133 sts)
— Round 9 :
Round 9 :
Begin with ch4, then crochet 1 tr on each dc of prev. rd and 1 tr in each ch-sp. End rd with 1 sl-st (133 sts)
— Round 10 (incorporating 20cm ring) :
Round 10 :
Crochet sc all around, embracing the 20 cm ring. Crochet 1 sc on each st of prev. rd. End round with 1 sl-st (133 sts)
— Round 11 :
Round 11 :
Start above the right dc of any dcg of rd 8 (continue ch-sp line direction). Start with ch4, then 3 tr, 2trtog, ch1, skip 1 st, *4 tr, 2trtog, ch1, skip 1 st, repeat from * cont. End round with 1 sl-st. Change color (114 sts)
— Round 12 :
Round 12 :
1 dc on each tr of prev. rd and ch1 above each ch1/ch-sp of prev. rd. In detail: Start on the right dc of any dcg of prev. rd with ch3, then 4 dc, ch1, skip 1 st, *5 dc, ch1, skip 1 st, repeat from * cont. End rd with 1 sl-st. Change color (114 sts)
— Round 13 :
Round 13 :
Start on the right dc of any dcg of prev. rd with ch3, then crochet exactly as 12th rd. Change color (114 sts)
— Round 14 :
Round 14 :
Start on the right dc of any dcg of prev. rd with ch3, then 2 dc, 2dctog, ch1, skip 1 st, *3 dc, 2dctog, ch1, skip 1 st, repeat from * cont. End rd with 1 sl-st. Change color (95 sts)
— Round 15 :
Round 15 :
Start on the right dc of any dcg of prev. rd with ch3, then 1 dc, 2dctog, ch1, skip 1 st, *2 dc, 2dctog, ch1, skip 1 st, repeat from * cont. End rd with 1 sl-st. Change color (76 sts)
— Round 16 :
Round 16 :
Start on the right dc of any dcg of prev. rd with ch3, then 2dctog, ch1, skip 1 st, *1 dc, 2dctog, ch1, skip 1 st, repeat from * cont. End rd with 1 sl-st. Change color (57 sts)
— Round 17 :
Round 17 :
Start on the right dc of any dcg of prev. rd with ch3, then 1 dc, ch1, skip 1 st, *2 dc, ch1, skip 1 st, repeat from * cont. End rd with 1 sl-st. Change color (57 sts)
— Round 18 :
Round 18 :
Start on the right dc of any dcg of prev. rd with ch3, then work exactly as prev. rd 17 (57 sts)
— Round 19 :
Round 19 :
Start with ch2, then start to crochet 1 dc and finish it by making 2dctog with the ch2, ch1, skip 1 st, *2dctog, ch1, skip 1 st, repeat from * cont (38 sts)
— Round 20 :
Round 20 :
Start with ch4, skip 1st, *1 dc, ch1, skip 1st, repeat from * cont (38 sts)
— Round 21 :
Round 21 :
Start with ch3, *skip 1 st (the ch of prev. rd), 1 dc above dc of prev. rd, repeat from * cont (19 sts)
— Round 22 :
Round 22 :
Start with ch3, 1 dc above each dc of prev. rd (19 sts)
— Round 23 :
Round 23 :
Crochet exactly as 22nd rd (19 sts)
— Round 24 :
Round 24 :
Start with ch3, *skip 1 st, 1 dc, repeat from * cont. This results in 9 final decreases (10 sts)
— Round 25 (final round) :
Round 25 :
Start with ch3, then 1 dc above each dc of prev. rd (10 sts)
Finishing :
Cut thread with length of approx. 15 cm, pull onto darning needle, thread through remaining stitches and close opening by pulling thread. Pull remaining thread to inner side for tassel attachment
This enchanting Boho Summer Lampion pattern transforms simple yarn and metal rings into stunning decorative lanterns that create magical atmosphere in any space! The pattern combines practical structure with beautiful openwork design, offering endless color customization possibilities. Whether you're lighting up warm summer evenings in the garden or creating cozy ambiance indoors, these lanterns are the perfect handmade accent. The detailed instructions make it approachable for intermediate crocheters while the stunning results will impress everyone who sees them. 🧶 Happy crocheting and enjoy your beautiful glowing creations! 🏮✨