🧢 Beautiful ✨ Detailed πŸ’ Adorable

Ruffled By The Wind Shawlette Knitting Pattern

Ruffled By The Wind Shawlette Knitting Pattern
4.6β˜… Rating
12-15 Hours Time Needed
2.5K Made This
βœ‚οΈ

Intermediate Level

Ideal for those with basic knitting experience, featuring slightly more advanced stitches and techniques to expand your skills.

⏱️

Slow & Steady

A 10-12 hour projectβ€”great for savoring the process over several sessions.

🧣

Snug Essential

Everyday comfort with practical charm, designed for both functionality and style through changing seasons.

About This Ruffled By The Wind Shawlette Knitting Pattern

Ruffled By The Wind Shawlette Knitting Pattern crochet pattern - detailed view of completed project

The pattern includes optional contrast sections that add depth and dimension, though it works equally well in a single color. The signature ruffle edge is created through strategic stitch doubling, giving the finished piece movement and grace without complicated techniques.

Why You'll Love This Ruffled By The Wind Shawlette Knitting Pattern

I absolutely love how this pattern transforms simple garter stitch and stockinette into something truly special. The way the ruffle edge catches the light and creates movement is mesmerizing, and I'm always amazed at how blocking brings the crescent shape to life. What really drew me to this design is its versatilityβ€”you can make it bold with contrasting colors or subtle with tonal shades. I also appreciate that it's a relatively quick knit that looks far more complicated than it actually is, making it perfect for gift-giving or treating yourself to something beautiful.

Ruffled By The Wind Shawlette Knitting Pattern step 1 - construction progress Ruffled By The Wind Shawlette Knitting Pattern step 2 - assembly progress Ruffled By The Wind Shawlette Knitting Pattern step 3 - details and accessories Ruffled By The Wind Shawlette Knitting Pattern step 4 - final assembly and finishing

Switch Things Up

I love experimenting with this pattern because it's so versatile and forgiving. One of my favorite variations is using a gradient yarn for the main color and watching the colors shift naturally as the shawl growsβ€”it creates a stunning ombre effect that needs no contrast color at all.

For a more dramatic look, I've tried using three contrast colors instead of one, changing the contrast yarn each time the pattern calls for it. This creates multiple bands of texture that really pop against the main color.

Sometimes I'll skip the second ruffle doubling for a more subtle edge, or I'll add an extra repeat of the stockinette section to make the shawl larger. The pattern is structured in a way that makes it easy to customize the size.

I've also played with bead placement along the yarn-over rows in the contrast sections, sliding beads onto the yarn before working those rows. The beads catch the light beautifully and add a touch of elegance.

For a completely different aesthetic, try using a solid for the main color and a variegated or speckled yarn for the contrast sections. The high-energy yarn in small doses creates amazing visual interest without overwhelming the piece.

Common Mistakes & How to Fix Them

βœ— Forgetting to maintain the three-stitch garter border on each edge which provides essential structure and prevents curling throughout the piece βœ— Pulling the ruffle edge too flat during blocking which eliminates the dramatic dimensional effect that makes this shawlette special βœ— Not counting stitches after the stitch-doubling rows for the ruffle sections which can throw off the entire pattern progression βœ— Skipping the k1m1 increases at the edges or confusing them with regular increases leading to uneven shaping and growth βœ— Running out of yarn because contrast sections weren't accounted for when calculating yardage needed for the full project

Ruffled By The Wind Shawlette Knitting Pattern

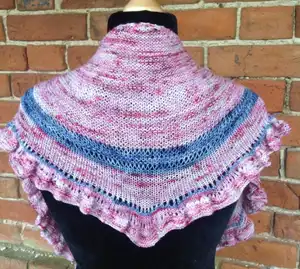
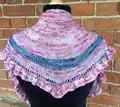
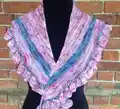
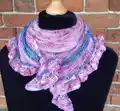
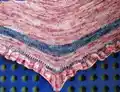
Create a stunning crescent-shaped shawlette inspired by 'Gone With The Wind' with this elegant knitting pattern. This beautiful piece features delicate ruffle edges and contrasting color sections that come to life once blocked. Perfect for showcasing your favorite fingering weight yarns, this shawlette works up quickly and offers versatile styling options. Whether you're looking to add a romantic touch to your wardrobe or create a thoughtful handmade gift, this pattern delivers both beauty and practicality in one gorgeous accessory.

Intermediate 12-15 Hours

Materials Needed for Ruffled By The Wind Shawlette Knitting Pattern

β€” Main Fabric

  • 01
    100g fingering weight or 4ply yarn approximately 425 meters in main color
  • 02
    20g fingering weight or 4ply yarn approximately 80 meters in contrast color (optional)
  • 03
    75% superwash merino and 25% nylon blend recommended or similar fingering weight yarn

β€” Tools Required

  • 01
    3.75mm knitting needles (US size 5)
  • 02
    Tapestry needle for weaving in ends
  • 03
    Blocking pins
  • 04
    Scissors
  • 05
    Measuring tape
  • 06
    Stitch markers (optional but helpful)

Progress Tracker

0% Complete

β€” Set Up Tab

Step 1:

Cast on 3 stitches

Step 2:

Knit 6 rows

Step 3:

Turn the work 90 degrees and pick up and knit 3 stitches along the edge, one in each garter ridge

Step 4:

Turn the work another 90 degrees and pick up and knit 3 stitches in the cast on edge (9 sts total)

β€” Main Body Section

Row 1:

K1, k1m1, k5, k1m1, k1

Row 2:

K2, yo, k7, yo, k2

Row 3:

K2, k1, yo, knit to the last 3 stitches, yo, k1, k2

Row 4:

K2, k1m1, knit to the last 3 stitches, k1m1, k2

Info:

Repeat rows 3 and 4 until your work measures 17cm

β€” First Contrast Section

Info:

Change to your contrast color

Row 1:

K2, k1, yo, (k1, yo) repeat bracket to the last 3 stitches, yo, k1, k2

Row 2:

K2, k1m1, k1, (p1, drop the yo stitch) repeat bracket to the last 4 stitches, k1, k1m1, k2

Row 3:

K2, k1, yo, knit to the last 3 stitches, yo, k1, k2

Row 4:

K2, k1m1, knit to the last 3 stitches, k1m1, k2

Row 5:

K2, k1, yo, knit to the last 3 stitches, yo, k1, k2

Row 6:

K2, k1m1, knit to the last 3 stitches, k1m1, k2

Row 7:

K2, k1, yo, (k1, yo) repeat bracket to the last 3 stitches, yo, k1, k2

Row 8:

K2, k1m1, k1, (p1, drop the yo stitch) repeat bracket to the last 4 stitches, k1, k1m1, k2

Row 9:

K2, k1, yo, knit to the last 3 stitches, yo, k1, k2

Row 10:

Return to main color and work K2, k1m1, purl to the last 3 stitches, k1m1, k2

β€” Stockinette Section

Row 1:

K2, k1, yo, knit to the last 3 stitches, yo, k1, k2

Row 2:

K2, k1m1, purl to the last 3 stitches, yo, k1, k2

Info:

Repeat these two rows another 7 times

β€” Second Contrast Section and First Ruffle Doubling

Info:

Change to contrast yarn

Row 1:

K2, k1, yo, (k1, yo) repeat bracket to last 3 stitches, yo, k1, k2

Row 2:

K2, k1m1, knit all stitches to last 3 stitches, k1m1, k2 (this row doubles your stitch count to begin making the ruffle edge)

Info:

Change to main color

Row 1:

K2, k1, yo, knit to the last 3 stitches, yo, k1, k2

Row 2:

K2, k1m1, purl to the last 3 stitches, yo, k1, k2

Info:

Repeat these 2 rows once more

β€” Second Ruffle Doubling

Row 1:

K2, k1, yo, (k1, yo) repeat bracket to last 3 stitches, yo, k1, k2

Row 2:

K2, k1m1, knit all stitches to last 3 stitches, k1m1, k2 (this row doubles your stitch count again)

β€” Final Ruffle Rows

Row 1:

K2, k1, yo, knit to the last 3 stitches, yo, k1, k2

Row 2:

K2, k1m1, knit to the last 3 stitches, k1m1, k2

Info:

Repeat the above 2 rows a further 4 times

Final Row:

K2, k1, yo, knit to the last 3 stitches, yo, k1, k2

Finishing:

Cast off all stitches

Assembly Instructions

  • Weave in all loose yarn ends carefully using a tapestry needle, making sure they're secure on the wrong side of the work
  • Soak the shawlette in cool water with wool wash for about 15 minutes to relax the fibers and prepare for blocking
  • Gently squeeze out excess water without wringing, then roll in a towel to remove more moisture before blocking
  • Pin out the top edge of the shawl creating the crescent shape, placing pins just under the eyelets in the contrast sections
  • For a pointed finish, pull the center of the ruffle edge down and pin to create a dramatic point as shown in pattern photos
  • Allow the shawlette to dry completely while blocked, which may take 24-48 hours depending on humidity and yarn fiber content
  • Do not pin or pull the ruffle edge flat as this will eliminate the dimensional ruffled effect that gives the piece its character

Important Notes

  • πŸ’‘Gauge is not critical for this project but will affect the finished size and yarn usage
  • πŸ’‘The three-stitch garter border on each edge (K2 at beginning and K2 at end) must be maintained throughout all rows
  • πŸ’‘When dropping yarn overs in the contrast sections, let them drop completely to create the elongated stitch effect
  • πŸ’‘The stitch count will double twice during the ruffle creation, so count carefully after these rows to ensure accuracy
  • πŸ’‘Blocking is essential for this pattern to achieve the proper crescent shape and showcase the ruffle detail
  • πŸ’‘If working without a contrast color, you'll need the full 425 meters in your main color
  • πŸ’‘The k1m1 increase creates a nearly invisible increase that maintains the clean lines of the garter border edges

This elegant Ruffled By The Wind shawlette brings literary romance to life through beautiful knitting. Inspired by classic Southern charm and designed to showcase hand-dyed yarns, this pattern creates a versatile accessory that's perfect for cool evenings or special occasions. The dramatic ruffle edge and optional contrast sections make each finished piece uniquely stunning. Whether you're an experienced knitter looking for a relaxing project or ready to expand your skills with new techniques, this shawlette offers the perfect blend of simplicity and sophistication. 🧢 Happy knitting! ✨

You ask,

we answer.

FAQs

Can I make this shawlette without the contrast color sections?

Absolutely! The pattern works beautifully in a single color. Just make sure you have the full 425 meters of yarn in your main color, and continue with the same yarn when the pattern indicates color changes. The ruffle effect will still be stunning.

What does k1m1 mean and why use it instead of a regular increase?

K1m1 means knit one make one - you knit into the front of a stitch, then knit into the back of the same stitch before removing it from the needle. This creates a nearly invisible increase that's perfect for maintaining clean edges in the garter border.

How important is blocking for this pattern?

Blocking is essential for this shawlette. The piece will look quite different before blocking - blocking transforms it into the beautiful crescent shape and allows the ruffle edge to develop its full dimensional effect. Don't skip this crucial step!

Will this pattern work with other yarn weights?

While designed for fingering weight yarn, you can adapt it to other weights by choosing appropriate needles and being aware that your finished measurements and yardage requirements will differ. Keep the same gauge ratio for best results.

What happens when I drop the yarn overs in the contrast sections?

Dropping the yarn overs creates elongated stitches that add a lacy, open texture to the contrast bands. This technique creates visual interest without complicated lace patterns. Just let the yarn overs slip off the needle completely when instructed.

How do I prevent my edges from being too tight?

The garter stitch border (always K2 at each edge) helps prevent tight edges. Make sure you're not pulling your yarn too tight when working the edge stitches, and keep consistent tension throughout. The yarn overs also add ease.