🧢 Beautiful ✨ Detailed πŸ’ Adorable

Garden Snail Amigurumi Pattern

Garden Snail Amigurumi Pattern
4.7β˜… Rating
2-3 Hours Time Needed
1.7K Made This
βœ‚οΈ

Beginner Friendly Level

Perfect for those just starting their sewing journey, with clear instructions and simple techniques

⏱️

Bite-Sized Project

Complete in under 2 hoursβ€”quick, fun, and perfect for a little creative escape.

🐌

Cute Companion

An adorable friend to cherish, handcrafted with love to bring comfort and joy for years to come.

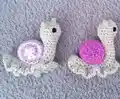
About This Garden Snail Amigurumi Pattern

This Garden Snail pattern is a delightful introduction to creating textured amigurumi pieces. The distinctive ridged shell is achieved through a special technique of working through back loops only, creating that authentic spiral pattern snails are known for. The body features charming details like tiny crocheted antennae and a decorative ruffled skirt that gives your snail character and movement. With clear instructions for both UK and US crochet terms, this pattern ensures crafters worldwide can bring their little garden friend to life!

Garden Snail Amigurumi Pattern crochet pattern - detailed view of completed project

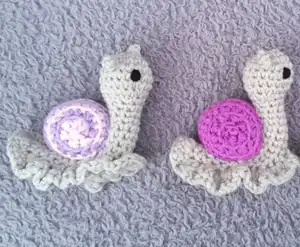
What makes this pattern special is its versatility - create a single-color shell for a natural look, or switch colors after each row for a playful candy-stripe effect. The finished snail is perfectly sized for gifting or as a sweet addition to your amigurumi collection!

Why You'll Love This Garden Snail Amigurumi Pattern

I absolutely love this garden snail pattern because it teaches you a fantastic texturing technique that you'll use again and again in future projects! The back loop only method for creating the shell's ridges is so satisfying to work, and watching that spiral pattern emerge feels like magic. I also appreciate how quick this project is - you can complete a whole snail in just a few hours, making it perfect for gift-giving or when you need a creative pick-me-up. The ruffled body skirt adds such a charming touch, and those tiny antennae? They just melt my heart every time!

Garden Snail Amigurumi Pattern step 1 - construction progress Garden Snail Amigurumi Pattern step 2 - assembly progress Garden Snail Amigurumi Pattern step 3 - details and accessories Garden Snail Amigurumi Pattern step 4 - final assembly and finishing

Switch Things Up

I love experimenting with this garden snail pattern because it's so versatile! Try creating a whole family of snails in different sizes by using various yarn weights - from fingering weight for tiny baby snails to super bulky for a mama snail. You can also play with the shell colors to create realistic garden snails in browns and tans, or go wild with rainbow stripes and pastels for a fantasy feel.

For a fun twist, add little details like a tiny crocheted flower on the shell or make the body skirt extra ruffled by adding more increases in the final round. I've even added small embroidered spots to the shell for a more realistic touch. You could also experiment with different eye styles - try safety eyes for a cuter look, or add white highlights to the embroidered eyes for more expression.

Another idea I adore is making seasonal snails - add a tiny Santa hat for Christmas, pastel shells for Easter, or autumn-colored shells with little leaf decorations. The possibilities are endless, and each variation teaches you something new about color work and embellishment techniques!

Common Mistakes & How to Fix Them

βœ— Not working through the back loops only and third loop for the shell, which creates the distinctive ridge pattern that makes the shell look authentic βœ— Overstuffing the body or shell which causes the stitches to stretch and stuffing to show through the work βœ— Forgetting to place stitch markers at the end of each round, leading to lost count and uneven shaping throughout the project βœ— Pulling the shell attachment too tight when securing to the body, which distorts the snail's iconic curved shape and shell positioning

Garden Snail Amigurumi Pattern

Create your own adorable garden snail with this charming crochet pattern! This delightful project features a sweet snail with a distinctive ridged shell, tiny antennae, and a ruffled body skirt that gives it that classic snail silhouette. Perfect for beginners looking to expand their amigurumi skills, this pattern uses simple stitches and techniques to create a cute companion that's just the right size for little hands or display. The shell can be made in a single color or as a whimsical lollipop swirl by changing colors after each row, making each snail uniquely yours!

Beginner Friendly 2-3 Hours

Materials Needed for Garden Snail Amigurumi Pattern

β€” Main Fabric

  • 01
    Scheepjes Chunky Monkey Main Color in Stone 2017 - 20g
  • 02
    Scheepjes Chunky Monkey Contrast Color (Wild Orchid, Amethyst, or Baby Pink) - 10g
  • 03
    Scheepjes Chunky Monkey Black 1002 - small amount for eyes
  • 04
    Hi-Loft Quality Toy Stuffing

β€” Tools Required

  • 01
    4.5mm Crochet Hook
  • 02
    Wool Needle for sewing
  • 03
    Stitch markers
  • 04
    Scissors

Progress Tracker

0% Complete

β€” Shell :

Info :

Using Contrast color

Row 1 :

ch2, hdc6 into 2nd st from hook (alternatively hdc 6sts into magic ring) (6)

Info :

From this point on the shell is worked through the BLO and 3rd LOOP of the st below in order to create the distinctive ridge pattern. If you wish to make the shell as a lollipop type swirl change color after every row, swapping colours up behind work with no sl st joins. Do not change colour mid stitch.

Row 2 :

hdcinc x6 (12)

Row 3 :

(hdc into next st, hdcinc) x6 (18)

Row 4 :

(hdc into next 2sts, hdcinc) x6 (24)

Rows 5-6 :

sc (24) (2 rows)

Row 7 :

(hdc into next 2sts, hdcdec) x6 (18)

Row 8 :

(hdc into next st, hdcdec) x6 (12)

Info :

Stuff shell

Row 9 :

hdcdec x6 (6)

Info :

F/O leaving a 25cm end. Using 25cm end, and running sts, thread through front loops of last 6sts and gather tightly. Secure end with a couple of small sts.

β€” Body :

Info :

Using Main color

Row 1 :

ch2, sc6 into 2nd st from hook (alternatively sc 6sts into magic ring) (6)

Row 2 :

inc x2, 1st Antennae: ch6, sl st into 5th and 6th ch from hook, inc x3, 2nd Antennae: ch6, sl st into 5th and 6th ch from hook, inc into last st (12)

Row 3 :

(sc into next st, inc) x6 (18)

Rows 4-6 :

sc (18) (3 rows)

Row 7 :

(sc into next st, dec) x6 (12)

Row 8 :

(sc into next 2sts, dec) x3 (9)

Info :

Stuffing throughout, as you work on the next section:

Rows 9-26 :

sc (9) (18 rows)

Row 27 :

(sc into next st, dec) x3 (6)

Row 28 :

sc (6)

Info :

Stuff remainder of body. F/O leaving a 60cm end. Using 60cm end, and running sts, thread through front loops of last 6sts and gather tightly. Secure end with a couple of small sts.

β€” Body Skirt :

Info :

Place a stitch marker at centre front of body, 8 rows down from the neck. Using Main color

Row 1 :

leaving a 10cm end, sl st into the base of body 1 row down from bottom of shell on the furthest side from you, the base should be facing towards you and the head should be facing left, 1st Side: ch3 and then 3dcinc into 1st in every row up to the stitch marker, 2nd Side: turn so you are working down the opposite side and 3dcinc into every row, keeping in line with the 1st st down from shell 3dcinc until you get to point of tail, 1st Side: turn and 3dcinc in every row down 1st side until you are back at the start, sl st to join at top of ch3 to finish.

Info :

F/O leaving a 10cm end. Secure both ends with a couple of small sts before weaving through frill and body. Cut flush to finish.

β€” Features (Eyes) :

Info :

Using black oddment, thread through head 2sts from the centre of face and 1 row down from the antennae. Do 5 small back sts 1 row in depth. Thread through to opposite side of face and repeat. Weave through head and cut flush to finish.

Assembly Instructions

  • Making sure that the antennae are central to top of head, thread the long tail through body and come out 4 rows in front of the tail end, securing with small stitches
  • Pick up the shell and thread through the middle of the outer edge of shell, between the 2 central ridges, coming out at the opposite side while remaining central
  • Thread end into body at the centre back of neck, 2 rows down from the base of the head, catch in a single stitch and pull tight to create the iconic snail body shape
  • Attach the shell to the body along BLO ridge, 1 row out from the centre, securing with small stitches
  • Weave remaining ends through shell and body, cutting flush to finish for a neat appearance

Important Notes

  • πŸ’‘Work through back loops only and the third loop when creating the shell to achieve the distinctive ridge pattern
  • πŸ’‘Use stitch markers consistently to track the end of each round and maintain accurate stitch counts
  • πŸ’‘Stuff parts just enough that they can be squeezed when pinched firmly - avoid overstuffing to prevent stitches from stretching
  • πŸ’‘When changing colors for a swirl effect, swap colors up behind the work without slip stitch joins for a seamless look
  • πŸ’‘Keep the 60cm tail from the body intact as it's essential for attaching and shaping the snail properly
  • πŸ’‘Pin the shell in position before final attachment to ensure the antennae remain centered and the shell sits correctly

This charming Garden Snail pattern brings a touch of whimsy to your amigurumi collection! With its distinctive ridged shell technique and adorable ruffled skirt, this little creature is both fun to make and delightful to display. The pattern teaches valuable texturing skills while creating a gift-worthy companion that captures the gentle spirit of garden snails. Whether you choose natural tones or create a colorful candy-striped shell, your finished snail will have personality and charm that makes everyone smile! 🐌🧢✨

You ask,

we answer.

FAQs

Can I use different yarn weight for this pattern?

Yes, you can use different yarn weights, but remember to adjust your hook size accordingly. Using lighter weight yarn will create a smaller snail, while bulkier yarn will make a larger one. Just ensure your stitches are tight enough that stuffing doesn't show through.

How do I work through the back loops only and third loop for the shell?

When working in back loops only for the shell, you insert your hook through the back loop of the stitch AND pick up the third loop (the unused front loop) from the row below. This creates the distinctive raised ridge that gives the shell its spiral texture.

Can I make the shell in multiple colors for a striped effect?

Absolutely! The pattern specifically mentions creating a 'lollipop type swirl' by changing colors after every row. Simply swap colors behind your work without making slip stitch joins, and avoid changing color mid-stitch for the best results.

What's the best way to attach the shell to the body?

Thread the long tail from the body through the center of the shell between the central ridges, then bring it through to the back of the neck. Pull tight to create the characteristic snail curve, then secure the shell along the back loop only ridge for stability.

How can I make the eyes more visible?

The pattern uses embroidered eyes with black yarn. Make sure to use 5 small back stitches positioned 2 stitches from center and 1 row down from antennae. You can also use small safety eyes (4-6mm) as an alternative for a different look.