๐Ÿงถ Beautiful โœจ Detailed ๐Ÿ’ Adorable

Reversible Octopus Bucket Hat Pattern

Reversible Octopus Bucket Hat Pattern
4.2โ˜… Rating
6-8 Hours Time Needed
2.1K Made This
โœ‚๏ธ

Intermediate Level

Ideal for those with basic knitting experience, featuring slightly more advanced stitches and techniques to expand your skills.

โฑ๏ธ

Weekend Treat

Takes 5-7 hours, making it an enjoyable project to finish over a couple of days.

๐Ÿงฃ

Snug Essential

Everyday comfort with practical charm, designed for both functionality and style through changing seasons.

About This Reversible Octopus Bucket Hat Pattern

Reversible Octopus Bucket Hat Pattern crochet pattern - detailed view of completed project

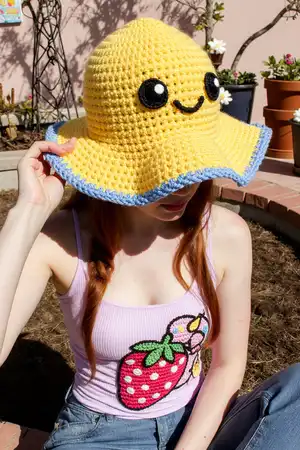
The hat is worked from the top down in separate rows, creating a comfortable adult-sized bucket hat. The unique front loop only technique creates the signature brim, while the contrasting color edging gives it a polished, professional finish.

Why You'll Love This Reversible Octopus Bucket Hat Pattern

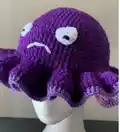
I absolutely love how this pattern combines creativity with practicality! The reversible design means you're essentially getting two hats in one, and the no-sew construction makes it so much faster to complete. I'm a big fan of how you can express your mood simply by flipping the hat inside out - it's such a clever concept. The embroidery work for the faces is straightforward yet adds so much character, and watching the two sides come together at the end is incredibly satisfying. Plus, you can customize the color combinations endlessly!

Reversible Octopus Bucket Hat Pattern step 1 - construction progress Reversible Octopus Bucket Hat Pattern step 2 - assembly progress Reversible Octopus Bucket Hat Pattern step 3 - details and accessories Reversible Octopus Bucket Hat Pattern step 4 - final assembly and finishing

Switch Things Up

I love experimenting with different color combinations for this reversible octopus hat! Instead of the traditional contrasting bright colors, try going monochromatic with different shades of the same color family - like light blue and navy with a white brim. It creates such an elegant, sophisticated look.

For a bolder statement, I sometimes use neon colors on one side and pastels on the other - it's perfect for festival season! You could also theme your hat for holidays: orange and black for Halloween with spooky expressions, or red and green for Christmas with jolly and mischievous faces.

I've found that adding small embroidered details like sparkles around the eyes or rosy cheeks can really enhance the personality of each face. Some crafters even add small crocheted tentacles hanging from the brim for extra octopus vibes!

If you want to make it more wearable for everyday, try neutral tones like beige, cream, and taupe with subtle facial expressions. The beauty of this pattern is that you can truly make it your own while keeping the clever reversible functionality intact!

Common Mistakes & How to Fix Them

โœ— Not maintaining medium to tight tension throughout, which can result in a floppy hat that doesn't hold its bucket shape properly โœ— Forgetting to embroider face details before joining the two hat bases together, making it impossible to access the inside later โœ— Skipping the slip stitch at the end of each row, causing the hat to have an uneven spiral instead of clean rounds โœ— Not aligning the face details properly when joining the brims with stitch markers, resulting in mismatched expressions when flipped โœ— Working too loosely during the brim increase rows (14-16), which can make the brim too floppy and lose its structured bucket hat appearance

Reversible Octopus Bucket Hat Pattern

Create this charming reversible mood hat featuring happy and grumpy octopus faces! This no-sew construction pattern lets you craft a dual-sided bucket hat that showcases your mood. Perfect for expressing yourself with style, this unique hat features embroidered face details and a contrasting color brim. Switch between cheerful and grumpy expressions whenever you like, making it a fun accessory for any occasion!

Intermediate 6-8 Hours

Materials Needed for Reversible Octopus Bucket Hat Pattern

โ€” Main Fabric

  • 01
    8 ply/worsted weight yarn in two contrasting colors for the hat bases
  • 02
    8 ply/worsted weight yarn in a third matching color for the brim edge
  • 03
    Black yarn for face embroidery details
  • 04
    White yarn for face embroidery details
  • 05
    Marvel 8ply acrylic yarn recommended (Australian)

โ€” Tools Required

  • 01
    4mm crochet hook
  • 02
    Darning needle for embroidery and sewing
  • 03
    Stitch markers

Progress Tracker

0% Complete

โ€” HAT BASE (Make 2 in contrasting colors) :

Note :

Sl st into end of each row. Each row starts with ch2 which counts as your first dc stitch

Row 1 :

Mc dc 12 (12)

Row 2 :

2 dc into each st (24)

Row 3 :

(2 dc into first stitch, 2 dc) x 8 (32)

Row 4 :

(2 dc into first st, 3 dc) x 8 (40)

Row 5 :

(2 dc into first st, 4 dc) x 8 (48)

Row 6 :

(2 dc into first st, 5 dc) x 8 (56)

Row 7 :

(2 dc into first st, 6 dc) x 8 (64)

Row 8 :

(2 dc into first st, 7 dc) x 8 (72)

Row 9 :

dc around (72)

Rows 10-13 :

dc around (72)

Row 14 :

working in flo, 2 x dc in each st (144)

Row 15 :

(2 dc in first st, 1 dc) x 72 (216)

Row 16 :

(2 dc in first st, 7 dc) x 27 (243)

Row 17 :

sew in tail

โ€” FACE DETAILS :

Important :

Make sure to do this before joining the two hat bases together

Eyes :

mc(dc) x 12 leaving a long tail for stitching on

Pupil :

contrast colour embroider pupil - double strand stitch twice

Assembly :

Stitch on eyes and embroider mouth - see images for placement

Happy Face :

eye pupils pointing up and smiley mouth

Grumpy Face :

eye pupils facing down and frowny mouth

โ€” Joining Hats to Make Reversible :

Step 1 :

Tie the tails from the crown of each hat together with a triple knot, insides touching

Step 2 :

Place stitch marker to join the brims of each hat making sure face details are in line

Step 3 :

Using your third chosen colour HDC both brim edges together working through both stitches on each hat base

Step 4 :

HDC in each st all the way around, sl st into first hdc and sew in tail

Final Step :

Shape the completed hat by shoving that beauty on your head and making sure everything is in line

Assembly Instructions

  • Create two complete hat bases in your chosen contrasting colors, following all rows 1-17.
  • Embroider the face details on both hat bases before joining - add eyes with pupils pointing up for happy face and down for grumpy face.
  • Stitch embroidered eyes onto each hat and add corresponding mouth expressions using embroidery techniques.
  • Tie the tail ends from the crown of each hat together with a triple knot, placing the insides of both hats touching.
  • Use stitch markers to align the brims carefully, ensuring both face details are positioned correctly opposite each other.
  • Using your third color yarn, half double crochet through both brim edges simultaneously, working all the way around the circumference.
  • Finish with a slip stitch into the first half double crochet, weave in the tail, and shape the hat on your head for final adjustments.

Important Notes

  • ๐Ÿ’กMaintain medium to tight tension throughout the project to ensure the hat holds its bucket shape properly
  • ๐Ÿ’กAlways remember to slip stitch at the end of each row for clean, even edges
  • ๐Ÿ’กComplete all face embroidery before joining the two hats together - you won't have access to the inside afterwards
  • ๐Ÿ’กUse stitch markers when joining the brims to ensure face details align perfectly on both sides
  • ๐Ÿ’กThe ch2 at the beginning of each row counts as your first double crochet stitch
  • ๐Ÿ’กFor smaller sizes, eliminate increase rows between rows 6-8 to adjust the hat circumference
  • ๐Ÿ’กLeave all yarn ends inside the two hats during construction - only the brim joining requires visible sewing

This delightful reversible octopus bucket hat pattern brings personality and versatility to your crochet accessories! With its clever no-sew construction and dual mood expressions, you'll have a unique hat that reflects how you're feeling. The pattern combines simple techniques with creative embroidery to create a wearable piece of art that's both fun and functional. Perfect for gifting or keeping for yourself! ๐Ÿงถ Happy crocheting! ๐Ÿ™โœจ

You ask,

we answer.

FAQs

Can I make this hat in a smaller size for children?

Yes! The pattern mentions you can create smaller sizes by eliminating increase rows between rows 6-8. This will reduce the overall circumference while maintaining the bucket hat shape.

Do I really need to sew anything for this pattern?

The construction is completely no-sew - all ends are left inside the two hats. The only sewing required is for embroidering the face details (eyes and mouth) onto each hat base before joining them together.

What does 'working in flo' mean in row 14?

FLO stands for 'front loop only,' which means you insert your hook only through the front loop of each stitch rather than under both loops. This creates a ridge effect and is what gives the brim its distinctive bucket hat structure.

How do I ensure both faces line up correctly when I flip the hat?

Use stitch markers when joining the brims to align the face details properly. Make sure you check that when one face is showing correctly, the other face will also be positioned right when you flip the hat inside out.

What yarn weight works best for this project?

The pattern calls for 8 ply/worsted weight yarn with a 4mm hook. Using the correct weight with medium to tight tension is important for the hat to hold its structured bucket shape.

Can I use different color combinations than suggested?

Absolutely! You'll need two contrasting colors for the main hat bases and a third coordinating color for the brim edge. Feel free to get creative with your color choices to match your personal style.