About This Retro Blossom Crochet Zipper Pouch Pattern
A wonderful project for gifting to friends who appreciate handmade vintage aesthetics, or as a beautiful storage solution for your favorite crochet hooks and notions.
Ideal for those with basic crocheting experience, featuring slightly more advanced stitches and techniques to expand your skills.
Fits nicely into a free afternoon — 2 to 5 hours of focused, enjoyable crocheting.
An elegant detail to elevate any look, combining traditional techniques with contemporary design sensibilities.
A wonderful project for gifting to friends who appreciate handmade vintage aesthetics, or as a beautiful storage solution for your favorite crochet hooks and notions.
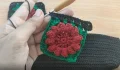
I absolutely adore how the popcorn stitches make the flowers leap off the fabric! Joining the motifs directly to the body is such a clever technique too—it saves so much sewing time and gives the bag a wonderfully seamless finish that feels incredibly professional.
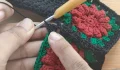
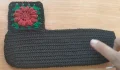
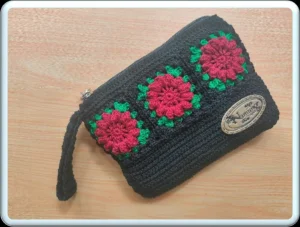
I still remember the first time I tried joining granny squares directly to a solid crochet piece without sewing them first—it felt like absolute magic! This pattern uses that exact method, and honestly, it is a total game-changer for anyone who dreads the assembly phase. The way the textured red blossoms contrast with the crisp green borders and deep black body gives off the most gorgeous retro-modern vibe.
If you want to put your own spin on this design, try playing around with the flower colors! I made a version using sunny yellow for the petals and a soft cream for the main body, and it looked like a field of daisies on a bright spring morning. Another fun tip is to find a quirky, patterned fabric for the lining—like a tiny polka dot or a contrasting floral print. Every time you unzip the pouch, you'll get a little burst of joy from that hidden detail. Don't worry if your popcorn stitches feel a bit stiff at first; they will soften up beautifully once the bag is finished and gets some love.
There is something incredibly satisfying about turning a simple set of granny squares into a functional, gorgeous accessory. This lovely flower pouch combines bold textures with a classic retro vibe, making it the perfect project to show off your stitches. Whether you want a stylish makeup bag or a cute wristlet for quick errands, this design is both fun to craft and super practical for everyday use.
mr, 12sc, sl st in first sc to join (12)
ch4 (counts as dc and ch1), [1dc, ch1] 11 times, sl st into 3rd ch to join (24)
sl st into first ch-space, [1popcorn, 1dc in same space, ch2] 12 times, sl st to join, fasten off (36)
join yarn in any ch-space, [3dc, ch2, 3dc] in same space for corner, [3hdc in next ch2-space] 2 times, repeat this sequence around to complete the square, sl st to join, fasten off (56)
Make 5 more granny squares following the same steps, giving you 6 squares in total.
ch41 (41)
hdc inc in 2nd ch from hook, 39hdc, 5hdc in last ch, turn to work along opposite side of chain, 39hdc, 2hdc in starting ch, sl st to join (88)
[hdc inc] 3 times, 39hdc, [hdc inc] 5 times, 39hdc, [hdc inc] 2 times, sl st to join (98)
[hdc inc, 1hdc] 3 times, 39hdc, [hdc inc, 1hdc] 5 times, 39hdc, [hdc inc, 1hdc] 2 times, sl st to join (108)
108dc, sl st to join (108)
108hdc, sl st to join (108)
108dc, sl st to join (108)
108hdc, sl st to join (108)
108dc, sl st to join (108)
108hdc, sl st to join (108)
108dc, sl st to join (108)
108hdc, sl st to join, fasten off (108)
Join black yarn in the corner of your first granny square, work [3dc, ch2, 3dc] in the corner space.
Work [3dc in the space between stitch groups] 3 times along the side of the square.
Work 3dc in the next corner of the granny square.
ch1, sl st into the corresponding corner of the bag body, ch1.
Work 3dc in the same corner of the granny square, skip 3 stitches on the body, sl st in the 4th stitch.
[3dc in the next space between stitch groups, skip 2 stitches on the body, sl st in the 3rd stitch] 3 times.
Work [3dc, ch1] in the next corner, skip 3 stitches on the body, sl st in the 4th stitch.
Work [ch1, 3dc] in the same corner of the granny square.
[3dc in the next space between stitch groups] 3 times, then [3dc, ch2, 3dc] in the corner, fasten off.
For the next square, join yarn and work [3dc, ch2, 3dc] in the corner.
Work [3dc in the next space between stitch groups] 3 times.
Work [3dc, ch1] in the corner.
sl st in the corner of the first granny square, [ch1, 3dc] in the corner of the second square, sl st in the space of the first square.
[3dc in the next space of the second square, sl st in the corresponding space of the first square] across to the next corner, [3dc, ch1] in the corner of the second square.
sl st in the corner of the first square, sl st in the next body stitch.
Work [ch1, 3dc] in the corner of the second square, skip 3 stitches on the body, sl st in the 4th stitch.
[3dc in the next space, skip 2 stitches on the body, sl st in the 3rd stitch] 3 times.
Work [3dc, ch1] in the corner, skip 3 stitches on the body, sl st in the 4th stitch.
Work [ch1, 3dc] in the same corner.
[3dc in the next space] 3 times, [3dc, ch2, 3dc] in the corner, fasten off. Repeat joining steps until all 6 squares form a band attached to the body.
Join black yarn 3 stitches before any corner of the pouch, work hdc around the entire top edge, sl st in the front loop only of the first stitch to join (102)
Work 6hdc-flo, then work [ch1, turn, 6hdc] 40 times to create the handle strap, then work [ch1, turn, 6hdc-flo], then work hdc around the remaining top edge of the pouch, sl st to first hdc to join.
Work sc around the entire top edge of the pouch and the handle strap (102)
Work sl st around the entire edge, fasten off and weave in all loose ends (102)
I hope you have the absolute best time bringing this gorgeous little pouch to life! It is such a rewarding project to finish, especially once you add that fabric lining and watch it transform into a boutique-quality accessory. Keep your stitches cozy, enjoy every single round, and happy making! 🧶✨
Absolutely! Cotton yarn is actually fantastic for pouches because it provides excellent structure and durability, though you may need to adjust your hook size slightly to meet the gauge.
Measure your finished pouch, cut two pieces of fabric slightly larger than those dimensions, sew them together on three sides, slide the lining inside, and hand-sew it to the top edge along with a zipper.
A little curling is normal before the body rows are worked, but if it's folding completely in half, your stitches might be too tight. Try loosening your tension or switching to a slightly larger hook for the base.
Yes, you can easily customize the length by adjusting the number of rows in the handle section—simply repeat the row pattern more or fewer than the recommended 40 times.
