🧶 Beautiful ✨ Detailed 💝 Adorable

Louisa Llama Amigurumi Pattern

Louisa Llama Amigurumi Pattern
3.9★Rating
5-7 HoursTime Needed
2.2KMade This
✂️

Intermediate Level

Ideal for those with basic crocheting experience, featuring slightly more advanced stitches and techniques to expand your skills.

⏱️

Weekend Treat

Takes 5-7 hours, making it an enjoyable project to finish over a couple of days.

🐥

Charming Critter

Delightful animal designs with sweet details that capture the essence of your favorite woodland and farmyard friends.

About This Louisa Llama Amigurumi Pattern

Louisa Llama Amigurumi Pattern crochet pattern - detailed view

This chic llama makes a sophisticated addition to any nursery or a thoughtful gift for a friend who appreciates handmade style and a touch of French flair. She stands about 9 to 10 inches tall depending on your yarn choice.

Why You'll Love This Louisa Llama Amigurumi Pattern

I honestly couldn't stop smiling while making Louisa's tiny accessories. There is something so satisfying about the way the two pairs of legs join together to form the belly—it feels like magic when the shape suddenly appears! Plus, seeing her all dressed up in her eucalyptus scarf and hazelnut beret just makes the whole process feel like a creative win.

Louisa Llama Amigurumi Pattern step 1 Louisa Llama Amigurumi Pattern step 2 Louisa Llama Amigurumi Pattern step 3 Louisa Llama Amigurumi Pattern step 4

Switch Things Up

I’ve always had a soft spot for llamas, but Louisa is something special. There’s just something about a farm animal in a beret that makes my heart melt every single time. When I was designing her, I really wanted to capture that whimsical, slightly sophisticated vibe. You know, the kind of llama who spends her weekends at a sidewalk cafe in Paris?

The construction of the legs and belly can be a little fiddly at first—I remember my first attempt looked more like a lumpy cloud than a llama—but once you get those two sets of legs joined, it’s so satisfying to see her little body take shape. I highly recommend using a stitch marker for the join points because it’s so easy to lose your place when you’re working across the chains.

For the accessories, don't be afraid to raid your scrap basket! I used a soft eucalyptus green for her scarf, but she looks just as darling in bright pinks or even a mustard yellow. It’s those little personal touches that really bring Louisa to life. I can't wait to see the different personalities you all give her. Happy stitching, friends!

Common Mistakes & How to Fix Them

✗ When joining the four legs to form the belly, it is very easy to twist the chain 4; make sure the stitches are all facing the same way before you work into them.✗ If you don't stuff the legs firmly enough before closing the neck, Louisa might have trouble standing upright or her legs might buckle under the weight of the head.✗ The beret is designed with a specific hole for the ear; if you attach the ear too high or low on the head, the hat won't sit correctly or will look lopsided.✗ While embroidering the 'Y' shape for the nose, pulling the black yarn too tight can cause the muzzle to pucker and lose its rounded, cute shape.

Louisa Llama Amigurumi Pattern

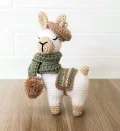
Meet Louisa, the most sophisticated llama you'll ever crochet! She’s got a flair for French fashion with her tiny beret and a cozy pom-pom scarf that makes her stand out from the herd. You'll love the unique way her legs and body come together to create a sturdy, standing plushie. It’s a wonderful project for practicing your shaping and assembly skills while creating a gift that is as stylish as it is snuggly.

Intermediate 5-7 Hours

Materials Needed for Louisa Llama Amigurumi Pattern

— Main Fabric

  • 01
    Medium weight yarn in a soft cream or beige for the feet, muzzle, ears, and tail.
  • 02
    Medium weight yarn in white or a light body color for the main llama form.
  • 03
    Medium weight yarn in magnolia, pale eucalyptus, and hazelnut for the accessories.
  • 04
    A small amount of black embroidery thread or yarn for the facial details.

— Tools Required

  • 01
    3.5mm (US size E) crochet hook for the llama and most accessories.
  • 02
    5.0mm (US size H) crochet hook specifically for the scarf.
  • 03
    Soft polyester fiberfill for stuffing.
  • 04
    Yarn needle, preferably with a bent tip for easier assembly.
  • 05
    Stitch markers to keep track of spiral rounds.
  • 06
    A small piece of cardboard or a pom-pom maker for the scarf details.

Progress Tracker

0% Complete

— 1. Legs (Make 4) :

Info :

Begin with the cream yarn for the feet.

Round 1 :

Start with a MR and work 6 sc into it. (6)

Round 2 :

(2 sc, inc) repeat twice. (8)

Round 3 :

Work 8 sc around. (8)

Round 4 :

(3 sc, inc) repeat twice. (10)

Round 5 :

Work 10 sc around. (10)

Round 6 :

Switch to your main body yarn and work 10 sc around. (10)

Round 7 :

(4 sc, inc) repeat twice. (12)

Round 8-9 :

Work 12 sc in each of the next two rounds. (12)

Info :

For legs 1 and 3: sl st and fasten off. For legs 2 and 4: do not cut the yarn, as you will use them to join the pairs.

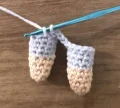
— 2. Joining the Legs & Belly :

Info :

Take leg 2 and ch 4. Join it to leg 1 with a sc. Repeat this process by joining leg 4 to leg 3. You now have two pairs of joined legs.

Round 1 :

Starting from the sc join: 8 sc, 3 inc, 4 sc across the ch, 3 inc, 13 sc to the end of the ch. sl st into the first sc. (38)

Info :

Fasten off and weave in ends for both sets. Now, align the two sets on their flat sides and join them together using 12 sl sts across the middle.
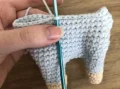
— 3. Body :

Info :

Ch 1 and place a marker here to track your rounds.

Round 1 :

Work 54 sc around the entire perimeter (26 sc on one side, 1 sc in the center gap, 26 sc on the other side, and 1 sc in the marked ch). (54)

Round 2 :

13 sc, dec, 24 sc, dec, 13 sc. (52)

Round 3 :

12 sc, dec, 24 sc, dec, 12 sc. (50)

Round 4-6 :

Work 50 sc in each of these three rounds. (50)

Info :

Crochet 1 or 2 extra sc until you reach the center of the llama's back to reset your starting point.

Round 7 :

4 sc, dec, 38 sc, dec, 4 sc. (48)

Round 8 :

3 sc, dec, 38 sc, dec, 3 sc. (46)

Round 9 :

2 sc, dec, 38 sc, dec, 2 sc. (44)

Round 10 :

1 sc, dec, 38 sc, dec, 1 sc. (42)

Info :

Align the sides of the back and join them with 12 sl sts, leaving one stitch unworked at the very back. This should leave 17 sc open for the neck.
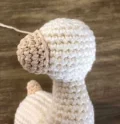
— 4. Neck :

Round 1 :

Work 17 sc around the opening plus 1 sc in the center join line. (18)

Info :

Stuff the legs and the body firmly now. Ensure all four feet sit level on the ground.

Round 2 :

Work 18 sc around. (18)

Round 3 :

(7 sc, dec) repeat twice. (16)

Round 4 :

Work 16 sc around. (16)

Round 5 :

(6 sc, dec) repeat twice. (14)

Round 6 :

Work 14 sc around. (14)

Round 7 :

(5 sc, dec) repeat twice. (12)

Round 8 :

Work 12 sc around. (12)

Info :

Stuff the neck area. Do not fasten off; continue straight into the head.

— 5. Head :

Round 1 :

(sc, inc) repeat 6 times. (18)

Round 2 :

(2 sc, inc) repeat 6 times. (24)

Round 3 :

(3 sc, inc) repeat 6 times. (30)

Round 4-8 :

Work 30 sc in each of these five rounds. (30)

Round 9 :

(3 sc, dec) repeat 6 times. (24)

Round 10 :

(2 sc, dec) repeat 6 times. (18)

Round 11 :

(sc, dec) repeat 6 times. (12)

Info :

Stuff the head thoroughly.

Round 12 :

Work 6 dec. (6)

Info :

Fasten off and sew the remaining hole shut, weaving in the tail.

— 6. Tail :

Round 1 :

Using cream yarn, work 4 sc into a MR. (4)

Round 2 :

Work 4 inc. (8)

Round 3-4 :

Work 8 sc in each round. (8)

Info :

Finish with a sl st and leave a long tail for sewing.

— 7. Muzzle :

Round 1 :

Using cream yarn, work 6 sc into a MR. (6)

Round 2 :

Work 6 inc. (12)

Round 3 :

(sc, inc) repeat 6 times. (18)

Round 4-5 :

Work 18 sc in each round. (18)

Info :

Finish with a sl st and leave a long tail for sewing.

— 8. Ears (Make 2) :

Round 1 :

Using cream yarn, work 4 sc into a MR. (4)

Round 2 :

(sc, inc) repeat twice. (6)

Round 3 :

(2 sc, inc) repeat twice. (8)

Round 4 :

(3 sc, inc) repeat twice. (10)

Round 5-8 :

Work 10 sc in each round. (10)

Info :

Flatten the ear and sl st the top closed. Leave a long tail for sewing.

— 9. Blanket :

Row 1 :

Ch 19, then starting in the 2nd ch from the hook, work 17 sc. (18)

Row 2-5 :

Ch 1, turn, and work 18 sc across. (18)

Info :

Fasten off. For the border, join your border color yarn with a sl st and ch 1. Work sc all the way around the edge, placing 3 sc in every corner. Join with a sl st and fasten off.

— 10. Scarf :

Row 1 :

Using the 5.0mm hook, ch 62. Work 1 hdc into the 3rd ch from the hook, then work 59 hdc. (60)

Row 2 :

Ch 2, turn, and work 60 hdc. (60)

Info :

Fasten off and weave in the ends.

— 11. Beret :

Info :

Work in joined rounds. Leave a long starting tail for the top loop.

Round 1 :

In a MR, ch 3 (counts as a st), then work 10 dc. (11)

Round 2 :

sl st to the 3rd ch, ch 3 (counts as a st), dc in that same st, ch 4, sk 2, then work 8 dc inc. (22)

Round 3 :

sl st to the 3rd ch, ch 3 (counts as a st), dc inc, work 6 dc into the ch-4 space, then repeat (1 dc, dc inc) 8 times. (33)

Round 4 :

sl st to the 3rd ch, ch 3 (counts as a st), then dc in every stitch around. (33)

Round 5 :

sl st to the 3rd ch, ch 1 (counts as a st), inv dec, then repeat (sc, inv dec) 10 times. (22)

Info :

Fasten off. Use the starting tail to create a small loop on top, then weave it in.

Assembly Instructions

  • Sew the tail to the rear of the body, positioning it just above the join line of the back.
  • Attach the muzzle to the lower half of the head, stuffing it firmly before you finish the last few stitches.
  • Pinch the base of each ear and sew them to the top of the head, ensuring they are symmetrical.
  • Using black yarn, embroider a 'Y' shape for the nose and simple curved lines for sleepy eyes.
  • Place the blanket over Louisa's back and secure it by wrapping yarn around her belly several times and tying a knot underneath.
  • Make two pom-poms using the cardboard method and sew one to each end of the scarf.
  • Wrap the scarf around her neck and pop the beret on her head, making sure one ear pokes through the ch-4 opening.

Important Notes

  • 💡This pattern uses standard US crochet terminology throughout.
  • 💡Except for the beret, all pieces are worked in a continuous spiral without joining rounds.
  • 💡Use a stitch marker at the beginning of every round to avoid losing your place in the spiral.
  • 💡Maintain a tight tension while crocheting the body to ensure the fiberfill doesn't peek through the stitches.
  • 💡The final height of your llama will vary based on your yarn weight and personal tension levels.

I truly hope you enjoyed crafting Louisa as much as I did. There’s something so rewarding about seeing those four little legs finally stand up on their own! Whether she’s sitting on your bookshelf or going to a new home as a gift, she’s sure to bring a smile to everyone who sees her. Don’t forget to share your finished photos with the community—I love seeing the different color combinations you choose for her little outfit. Happy crocheting, and may your stitches always be even! ✨

You ask,

we answer.

FAQs

What's the best way to ensure she stands up straight?

The key is even stuffing in all four legs. Make sure you push the fiberfill all the way to the bottom of the feet and check that all four paws touch the table at the same time before you finish the neck.

Can I use safety eyes instead of embroidery?

Absolutely! If you prefer safety eyes, I'd recommend 8mm or 10mm eyes placed around Round 6 of the head. Just remember to install them before you finish stuffing and closing the head.

My llama is much larger than the one in the photos, why?

The finished size depends heavily on yarn weight and tension. If you use a thicker worsted weight yarn or a larger hook, she will naturally turn out bigger. Try a smaller hook if you want a tighter, smaller finish.

The leg joining part is confusing, any tips?

Think of it as creating two pairs of pants first. You join two legs with a chain, work around them, then do it again for the second pair. Finally, you stitch the two pairs together in the middle to create the full belly.

How do I get the beret to stay on?

The beret is designed with a specific chain-4 gap in Round 2. When you put the hat on, slide one of the ears through this gap. This acts as an anchor to keep the hat perfectly in place.