🧢 Beautiful ✨ Detailed πŸ’ Adorable

Bunny Hand Puppet Amigurumi Pattern

Bunny Hand Puppet Amigurumi Pattern
4.0β˜… Rating
4-5 Hours Time Needed
2.8K Made This
βœ‚οΈ

Intermediate Level

Ideal for those with basic knitting experience, featuring slightly more advanced stitches and techniques to expand your skills.

⏱️

Weekend Treat

Takes 5-7 hours, making it an enjoyable project to finish over a couple of days.

🐰

Whimsical Buddy

Playful characters full of personality, designed to spark imagination and become cherished playtime favorites.

About This Bunny Hand Puppet Amigurumi Pattern

Bunny Hand Puppet Amigurumi Pattern crochet pattern - detailed view of completed project

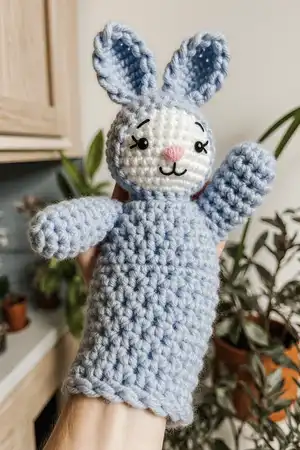
Using super bulky plush yarn, this pattern works up quickly while creating a wonderfully soft texture that kids will love to touch and cuddle. The combination of simple increases and decreases makes it approachable for intermediate crocheters looking to try their hand at puppet-making.

Why You'll Love This Bunny Hand Puppet Amigurumi Pattern

I absolutely love this pattern because it combines the joy of amigurumi with the interactive fun of puppet play! There's something magical about creating a toy that doesn't just sit on a shelf but becomes part of storytelling adventures and imaginative games. The plush yarn gives it such a luxurious, huggable texture, and watching children's faces light up when the bunny 'comes to life' makes every stitch worthwhile. Plus, the hollow body design means you can finish it faster than a fully stuffed amigurumi while still creating something incredibly special and functional.

Bunny Hand Puppet Amigurumi Pattern step 1 - construction progress Bunny Hand Puppet Amigurumi Pattern step 2 - assembly progress Bunny Hand Puppet Amigurumi Pattern step 3 - details and accessories Bunny Hand Puppet Amigurumi Pattern step 4 - final assembly and finishing

Switch Things Up

I love experimenting with this pattern to create different bunny personalities! Try using pastel colors like soft pink, lavender, or mint green for a sweet Easter bunny version. You could even make a whole family of bunnies in different sizes by adjusting your yarn weight and hook size.

For a more realistic look, I sometimes use two-toned ears by switching to white or cream yarn for the inner ear detail. You can also add a little cotton tail to the back of the body for extra cuteness - just make a small pompom and sew it on!

I've created character bunnies by changing the embroidery details - try different eyebrow shapes for various expressions, or add a little embroidered mouth for more personality. Some of my favorites include sleepy bunnies with closed eyes, or surprised bunnies with raised eyebrows.

For a themed puppet show, consider adding accessories like a tiny crocheted carrot, a flower crown, or even a small vest. These can be made separately and attached with snaps or Velcro so they're interchangeable. The possibilities for customization are endless, and each variation brings new storytelling opportunities!

Common Mistakes & How to Fix Them

βœ— Mistake: Not leaving the body hollow enough for hand insertion - Solution: Follow the chain base carefully and avoid over-stuffing the head section βœ— Mistake: Ears standing up too stiff instead of flopping - Solution: Don't stuff the ears and fold them properly before sewing to create natural drape βœ— Mistake: Arms positioned too low on the body - Solution: Attach arms at Round 5 as indicated to ensure proper puppet proportions and movement βœ— Mistake: Eyes placed unevenly or too far apart - Solution: Use stitch markers to count exactly 9 stitches between eyes and position between rounds 10-11

Bunny Hand Puppet Amigurumi Pattern

Create an adorable bunny hand puppet that brings stories to life! This charming pattern combines soft plush yarn with simple amigurumi techniques to craft a 28cm (11 inch) interactive toy that's perfect for playtime, storytelling, or puppet shows. With its long floppy ears, sweet embroidered features, and functional hand puppet design, this bunny friend will delight children and adults alike. The pattern uses bulky yarn for quick stitching and includes detailed instructions for creating expressive eyes, a cute pink nose, and perfectly positioned arms that make this puppet come alive during performances.

Intermediate 4-5 Hours

Materials Needed for Bunny Hand Puppet Amigurumi Pattern

β€” Main Fabric

  • 01
    Super bulky yarn - Himalaya Dolphin Baby (120m - 100g) or equivalent in gray color
  • 02
    Sport cotton yarn - Yarn Art Jeans (160m - 50g) or equivalent in gray for eye indenting
  • 03
    Black color yarn for embroidering eyebrows and eyelashes
  • 04
    Pink color yarn for embroidering nose
  • 05
    Fiber filler for stuffing the head

β€” Tools Required

  • 01
    4.5mm crochet hook
  • 02
    Large needle for sewing and embroidery
  • 03
    Knitting markers
  • 04
    Plastic safety eyes 8mm (1 pair)
  • 05
    Scissors

Progress Tracker

0% Complete

β€” HEAD :

Round 1 :

7 sc in MR (7)

Round 2 :

inc * 7 (14)

Round 3 :

inc * 14 (28)

Round 4 :

(3 sc, inc) * 7 (35)

Round 5 :

(4 sc, inc) * 7 (42)

Round 6 :

(13 sc, inc) * 3 (45)

Round 7-11 :

45 sc (5 rounds)

Round 12 :

(13 sc, dec) * 3 (42)

Round 13 :

(4 sc, dec) * 7 (35)

Round 14 :

(3 sc, dec) * 7 (28)

Infos :

Insert safe plastic eyes. Fix eyes between rounds 10 and 11 from the head's top. The distance between the eyes is 9 sc. Stuff the head with fiber filler.

Round 15 :

(2 sc, dec) * 7 (21)

Round 16 :

(1 sc, dec) * 7 (14)

Round 17 :

dec * 7 (7)

Info :

Draw the yarn through 7 loops and tighten. Cut and secure the yarn.

β€” EARS (2 details) :

Round 1 :

7 sc in MR (7)

Round 2 :

inc * 7 (14)

Round 3 :

sc (14)

Round 4 :

(1 sc, inc) * 7 (21)

Round 5-8 :

21 sc (4 rounds)

Round 9 :

(1 sc, dec) * 7 (14)

Round 10 :

14 sc, sl st

Infos :

Leave the tail for sewing. Cut the yarn. Don't stuff the piece. Make 2 details. Fold in half and then quadruple and sew on top of the head at a distance of 1-2 cm from each other.

β€” EYE INDENTING :

Info :

Use the gray cotton yarn. Take the thread. Pull it through the back of the head and pull it out above the left eye. Leave the tail on back head's part.

Info :

Pass the needle from below under the left eye and pull out under the right eye. Make sure that the yarn falls from the inside of the left eye.

Info :

Next, pass the needle from above the right eye, making sure that the thread lies on the inside of the eye. And pull out the needle in the same place behind the head.

Info :

Tighten both threads so that the eyes are sunken. Tie a knot, hide the tail inside the head.

β€” EMBROIDERY :

Nose :

Use the pink yarn and a large needle. Embroider nose as shown on photos.

Eyelashes :

Use the thin black yarn and a large needle. Embroider eyelashes as shown on photos.

Eyebrows :

Use the thin black yarn and a large needle. Embroider eyebrows as shown on photos.

β€” ARMS :

Round 1 :

6 sc in MR (6)

Round 2 :

inc * 6 (12)

Round 3 :

(2 sc, inc) * 4 (16)

Round 4-5 :

16 sc (2 rounds)

Round 6 :

(2 sc, dec) * 4 (12)

Round 7-9 :

12 sc (3 rounds)

Infos :

Make sl st, cut the yarn. Don't stuff. Make 2 pieces.

β€” BODY :

Info :

Leave the tail for sewing, begin crochet without sl st. Make 24 ch, sl st in the first loop. Make a circle.

Round 1 :

24 sc

Round 2 :

(3 sc, inc) * 6 (30)

Round 3 :

(4 sc, inc) * 6 (36)

Round 4 :

(5 sc, inc) * 6 (42)

Round 5 :

crochet together with arm - 7 sc, 13 sc only on the body, 7 sc together with another arm, 15 sc only on the body (42)

Info :

Crochet sc2tog on both sleeves sides to avoid holes.

Round 6 :

sc2tog, crochet only on the arm - 4 sc, sc2tog, 12 sc only on the body, sc2tog, 4 sc only on the another arm, sc2tog, 14 sc only on the body (38)

Round 7 :

dec, 2 sc, dec, 12 sc, dec, 2 sc, dec, 14 sc (34)

Round 8 :

34 sc, ch

Round 9-14 :

34 dc (6 rounds)

Info :

Sew the body to the head as shown in the photos

Assembly Instructions

  • Sew the completed ears to the top of the head, positioning them 1-2 cm apart and folding them in half then quadruple for proper floppy shape
  • Indent the eyes using gray cotton yarn following the threading technique to create depth and expression in the face
  • Embroider the pink nose in the center below the eyes using the large needle and pink yarn
  • Add black embroidered eyelashes above each eye and eyebrows for character and personality
  • Attach the head to the body opening, ensuring it's securely sewn so the puppet can withstand regular play
  • Test the hand puppet by inserting your hand through the body opening to ensure comfortable fit and movement

Important Notes

  • πŸ’‘Do not stuff the body - it must remain hollow for your hand to fit inside the puppet
  • πŸ’‘Use stitch markers to accurately count the 9 stitches between eyes for symmetrical placement
  • πŸ’‘The arms should not be stuffed either - they need to move freely during puppet performances
  • πŸ’‘Make sure to leave a long tail when starting the body chain for secure sewing to the head later
  • πŸ’‘Follow the eye indenting tutorial carefully to create the characteristic sunken eye look that gives expression
  • πŸ’‘Pin the ears in position before sewing to ensure they're evenly spaced and properly angled

This delightful bunny hand puppet pattern brings the magic of storytelling to life with every stitch! Perfect for creating interactive playtime memories, puppet theater performances, or cozy bedtime story sessions. The combination of super soft plush yarn and thoughtful construction details makes this puppet both beautiful and functional. Whether you're making it for a special child in your life or adding to your puppet collection, this charming bunny friend will bring smiles and spark imagination for years to come. 🐰🧢✨

You ask,

we answer.

FAQs

Can I use regular worsted weight yarn instead of super bulky?

Yes, but you'll need to adjust your hook size (try 3mm or 3.5mm) and the finished puppet will be significantly smaller. The plush bulky yarn creates the soft, cuddly texture that makes this puppet special.

How do I prevent holes where the arms attach to the body?

The pattern includes sc2tog (single crochet 2 together) instructions specifically at the arm attachment points in Round 6. Follow these decreases carefully and use your needle to close any small gaps when sewing.

My ears won't stay floppy - they keep standing up. What am I doing wrong?

Make sure you're not stuffing the ears at all. After completing them, fold them in half and then fold again (quadruple fold) before sewing to the head. This creates the characteristic floppy bunny ear look.

What's the purpose of indenting the eyes with cotton yarn?

Eye indenting creates depth and dimension in the face, making the eyes appear more lifelike and expressive. It's an optional technique but highly recommended for achieving professional-looking results.

Can children use this puppet safely?

Yes! Use safety eyes that lock securely in place, and ensure all embroidery is tightly stitched. For very young children under 3, consider embroidering the eyes instead of using plastic ones.

How do I make the body opening the right size for different hand sizes?

The 24 chain starting circle works for most adult and older child hands. For smaller children, start with 20 chains; for larger adult hands, try 26-28 chains.