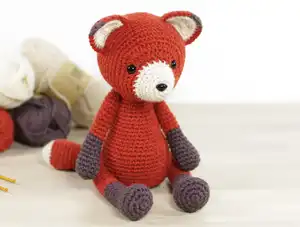
Bring the magic of the forest right into your hands with this charming Red Fox amigurumi pattern by Kristi Tullus! This pattern walks you through every step of crafting an adorable 27cm fox complete with a fluffy tail, expressive safety eyes, and that iconic two-toned snout. You'll work with a beautiful DK weight wool-alpaca blend in warm rust orange, deep taupe brown, and soft off-white to capture every detail of this woodland creature. The pattern includes jointed arms and legs using plastic doll joints or buttons and thread, giving your fox a posable, lifelike quality that makes it truly special. Whether you're making it as a gift or adding it to your own collection, this little fox is guaranteed to steal hearts the moment it's finished.
Progress Tracker
0% Complete
— Head :
Info :
Begin with white yarn.
Round 3 :
(sc 3, inc) x 3 (15)
Round 4 :
sc in each st (15)
Round 5 :
(inc, sc 2) x 5 (20)
Round 6 :
sc in each st (20)
Round 7 :
(sc 3, inc) x 5 (25)
Info :
Switch to orange yarn.
Round 8 :
sc in each st (25)
Round 9 :
(inc, sc) x 3, hdc, hdc-inc x 8, hdc, (sc, inc) x 4, sc (40)
Round 10 :
sc 11, hdc, (hdc-inc, hdc) x 7, sc 14 (47)
Round 11 :
sc 8, inc, (sc 6, inc) x 4, sc 10 (52)
Round 12 :
sc 22, inc, sc 5, inc, sc 23 (54)
Round 13 :
sc, inc, sc 49, inc, sc 2 (56)
Info :
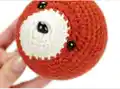
Attach safety eyes between rounds 9 and 10, leaving 13 stitches (count 12 holes) between them, and attach the safety nose between rounds 1 and 2.
Rounds 14-21 :
sc in each st (56)
Round 22 :
sc 5, dec, (sc 12, dec) x 3, sc 7 (52)
Round 23 :
(sc 11, dec) x 4 (48)
Round 24 :
sc 4, dec, (sc 10, dec) x 3, sc 6 (44)
Round 25 :
(sc 9, dec) x 4 (40)
Round 26 :
sc 3, dec, (sc 8, dec) x 3, sc 5 (36)
Info :
Start stuffing the head. Keep adding fiberfill every few rounds, stuffing firmly.
Round 27 :
(sc 7, dec) x 4 (32)
Round 28 :
sc 2, dec, (sc 6, dec) x 3, sc 4 (28)
Round 29 :
(sc 5, dec) x 4 (24)
Round 30 :
(dec, sc 2) x 6 (18)
Round 31 :
(sc, dec) x 6 (12)
Info :
Finish stuffing. Cut yarn leaving a long tail, fasten off and close the opening. Use yarn to shape the head by threading a needle from the bottom of the head between rounds 15 and 18, going around each eye and pulling gently to sink them slightly into the face.
— Ears (Make 2) :
Info :
Make one inner piece with white yarn and one outer piece with orange yarn.
Round 2 :
(sc, inc3) x 3 (12)
Round 3 :
sc 2, inc3, (sc 3, inc3) x 2, sc (18)
Round 4 :
sc 3, inc3, (sc 5, inc3) x 2, sc 2 (24)
Info :
Sl st in next stitch and fasten off. Align a white and orange piece wrong sides facing. Locate the middle stitch of the first inc3 and attach orange yarn with sl st. Starting in the same stitch, crochet over the edge through both layers.
Round 5 :
sc 7, switch to brown yarn, sc, inc3, sc, switch to orange yarn, sc 6, sc + sl st
Info :
Cut yarn leaving a long tail for sewing. Bring all other yarn tails to the wrong side and knot them together inside the ear.
— Left Arm :
Info :
Begin with brown yarn.
Round 2 :
(inc3 x 2, sc) x 2 (14)
Rounds 3-5 :
sc in each st (14)
Round 6 :
sc 3, inc, sc 5, dec x 2, sc (13)
Round 7 :
sc 4, inc, sc 5, dec, sc (13)
Round 8 :
sc 10, dec, sc (12)
Info :
Stuff the hands firmly. Keep adding fiberfill every few rounds, stuffing the arms firmly.
Round 11 :
sc in each st (10)
Info :
Switch to orange yarn.
Rounds 12-23 :
sc in each st (10)
Info :
Attach the disk with stem between rounds 20 and 21, with the stem facing straight toward the body.
Info :
Finish stuffing. Cut yarn leaving a long tail, fasten off and close the opening.
— Right Arm :
Info :
Begin with brown yarn.
Round 2 :
(inc3 x 2, sc) x 2 (14)
Rounds 3-5 :
sc in each st (14)
Round 6 :
sc 2, dec x 2, sc 5, inc, sc 2 (13)
Round 7 :
sc 2, dec, sc 5, inc, sc 3 (13)
Round 8 :
sc 2, dec, sc 9 (12)
Info :
Stuff the hands firmly. Keep adding fiberfill every few rounds, stuffing the arms firmly.
Round 9 :
sc, dec, sc 9 (11)
Round 10 :
sc, dec, sc 8 (10)
Round 11 :
sc in each st (10)
Info :
Switch to orange yarn.
Rounds 12-22 :
sc in each st (10)
Round 23 :
sc 6, dec x 2 (8)
Info :
Attach the disk with stem between rounds 20 and 21, with the stem facing straight toward the body.
Round 24 :
dec x 3, leave remaining stitches unworked (5)
Info :
Finish stuffing. Cut yarn leaving a long tail, fasten off and close the opening.
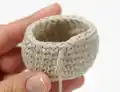
— Legs (Make 2) :
Info :
Begin with brown yarn.
Round 3 :
(sc, inc) x 6 (18)
Round 4 :
(sc 3, inc, sc 4, inc) x 2 (22)
Round 5 :
sc in each st (22)
Round 6 :
sc 7, dec, sc 2, dec, sc 9 (20)
Round 7 :
sc 5, dec, (sc, dec) x 2, sc 7 (17)
Round 8 :
sc 5, dec, sc 2, dec, sc 6 (15)
Round 9 :
sc 6, dec, sc 7 (14)
Info :
Stuff the feet firmly. Keep adding fiberfill every few rounds, stuffing the legs firmly.
Round 10 :
sc in each st (14)
Round 11 :
sc 6, dec, sc 6 (13)
Rounds 12-16 :
sc in each st (13)
Info :
Switch to orange yarn.
Rounds 17-26 :
sc in each st (13)
Info :
On the left leg only, sc in next 6 sts and count the last sc as the end of the round from now on. Attach disk with stem between rounds 25 and 26, stem facing straight toward the body.
Round 27 :
dec, sc 6, dec, sc 3 (11)
Round 28 :
sc, dec x 5 (6)
Info :
Finish stuffing. Cut yarn leaving a long tail, fasten off and close the opening.
— Body :
Info :
Begin with orange yarn.
Round 3 :
(sc, inc) x 6 (18)
Round 4 :
(inc, sc 2) x 6 (24)
Round 5 :
(sc 3, inc) x 6 (30)
Round 6 :
sc, inc, (sc 4, inc) x 5, sc 3 (36)
Round 7 :
sc 3, inc, (sc 8, inc) x 3, sc 5 (40)
Round 8 :
(sc 9, inc) x 4 (44)
Rounds 9-16 :
sc in each st (44)
Info :
Turn the body so the end of the round is at the center of the back. Attach the legs to either side of the body between rounds 9 and 10.
Round 17 :
(sc 9, dec) x 4 (40)
Round 18 :
sc 3, dec, (sc 8, dec) x 3, sc 5 (36)
Round 19 :
(sc 7, dec) x 4 (32)
Round 20 :
sc in each st (32)
Round 21 :
(dec, sc 14) x 2 (30)
Info :
Start stuffing the body. Keep adding fiberfill every few rounds, stuffing firmly.
Round 22 :
sc in each st (30)
Round 23 :
sc 12, dec, sc 4, dec, sc 10 (28)
Round 24 :
sc in each st (28)
Round 25 :
(dec, sc 5) x 4 (24)
Round 26 :
sc in each st (24)
Round 27 :
sc 9, dec, sc 4, dec, sc 7 (22)
Round 28 :
sc in each st (22)
Round 29 :
sc 5, dec, sc 9, dec, sc 4 (20)
Rounds 30-31 :
sc in each st (20)
Round 32 :
sc 5, leave remaining stitches unworked (20)
Info :
Sl st in next stitch. Cut yarn leaving a long tail for sewing and fasten off. Attach the arms to either side of the body between rounds 27 and 28. Finish stuffing the body.
— Tail :
Info :
Begin with white yarn.
Round 2 :
(sc, inc) x 3 (9)
Round 3 :
(inc, sc 2) x 3 (12)
Round 4 :
(sc 2, inc) x 4 (16)
Round 5 :
sc, inc, (sc 3, inc) x 3, sc 2 (20)
Info :
Switch to orange yarn.
Rounds 6-9 :
sc in each st (20)
Round 10 :
(dec, sc 8) x 2 (18)
Info :
Start stuffing the tail. Keep adding fiberfill every few rounds, stuffing firmly.
Round 11 :
sc in each st (18)
Round 12 :
sc 4, dec, sc 7, dec, sc 3 (16)
Round 13 :
sc in each st (16)
Round 14 :
sc 7, dec, sc 7 (15)
Round 15 :
sc in each st (15)
Round 16 :
sc 7, dec, sc 6 (14)
Rounds 17-18 :
sc in each st (14)
Round 19 :
sc 7, dec, sc 5 (13)
Rounds 20-21 :
sc in each st (13)
Round 22 :
sc 7, dec, sc 4 (12)
Rounds 23-24 :
sc in each st (12)
Round 25 :
(sc, dec) x 4 (8)
Info :
Sl st in next stitch. Cut yarn leaving a long tail for sewing and fasten off. Finish stuffing the tail.
This little Red Fox is one of those projects that genuinely makes you fall in love with amigurumi all over again — from the very first magic ring to the moment you sew on that final fluffy tail. Kristi Tullus designed this pattern with so much care and detail, from the two-toned muzzle to the posable jointed limbs, that the finished fox feels less like a craft project and more like a tiny woodland friend you just couldn't resist bringing home. Whether you make it as a gift or keep it for your own shelf, it's the kind of piece that draws a smile from everyone who sees it. 🦊🧶 Happy crocheting! ✨