🧢 Beautiful ✨ Detailed πŸ’ Adorable

BB-8 Droid Amigurumi Pattern

BB-8 Droid Amigurumi Pattern
4.2β˜… Rating
4-5 Hours Time Needed
1.7K Made This
βœ‚οΈ

Intermediate Level

Ideal for those with basic knitting experience, featuring slightly more advanced stitches and techniques to expand your skills.

⏱️

Weekend Treat

Takes 5-7 hours, making it an enjoyable project to finish over a couple of days.

🧸

Cute Companion

An adorable friend to cherish, handcrafted with love to bring comfort and joy for years to come.

About This BB-8 Droid Amigurumi Pattern

This BB-8 pattern is designed for crocheters who want to create their own piece of the Star Wars universe. The pattern includes detailed instructions for crafting both the head and spherical body, complete with the characteristic orange and white striped details. You'll work in continuous spirals to create smooth, rounded shapes, and add decorative circles to capture BB-8's authentic appearance. The finished droid measures approximately 11x8 cm, making it perfect for display or as a thoughtful handmade gift.

BB-8 Droid Amigurumi Pattern crochet pattern - detailed view of completed project

The pattern features color changes that create BB-8's signature look, plus safety eyes for that perfect droid expression. With step-by-step photos included, you'll have visual guidance throughout your creative journey.

Why You'll Love This BB-8 Droid Amigurumi Pattern

I absolutely love this pattern because it brings one of the most beloved droids from Star Wars into tangible form! There's something incredibly satisfying about watching BB-8 take shape as you crochet each round, especially when you add those distinctive orange circles to the white body. I find the color-changing techniques in this pattern both challenging and rewarding - they really teach you how to create clean transitions between colors. The fact that you can hang your finished BB-8 makes it versatile as either a decoration or a charm. Plus, working on something from such an iconic franchise adds an extra layer of joy to every stitch!

BB-8 Droid Amigurumi Pattern step 1 - construction progress BB-8 Droid Amigurumi Pattern step 2 - assembly progress BB-8 Droid Amigurumi Pattern step 3 - details and accessories BB-8 Droid Amigurumi Pattern step 4 - final assembly and finishing

Switch Things Up

I absolutely love customizing patterns to make them uniquely mine, and this BB-8 offers so many fun possibilities! If you want to experiment, try changing the color scheme - imagine a pink and purple BB-8 for a more whimsical look, or use metallic yarn for a shinier, more futuristic droid.

You could also play with the size by using bulkier yarn and a larger hook to create a bigger companion, or go tiny with embroidery thread for a miniature keychain version. I've found that adding small embroidered details like extra panels or weathering marks can give BB-8 even more character and make it look like it's been on adventures.

Another fun modification is to add a small magnet inside the body before closing it up, which would let your BB-8 stick to metal surfaces. You could even create a whole family of differently-sized BB-8s in various color combinations to display together. The decorative circles are also a great place to get creative - try different color combinations or add small beads for extra sparkle. Don't be afraid to make this pattern your own!

Common Mistakes & How to Fix Them

βœ— Forgetting to use a stitch marker at the beginning of rounds can cause you to lose your place in the continuous spiral - always mark your starting point βœ— Stuffing the head and body too firmly can distort the spherical shape and make the piece look lumpy rather than smooth and rounded βœ— Not maintaining consistent tension during color changes can create visible gaps or puckering where the colors meet - practice switching yarns smoothly βœ— Placing the safety eyes incorrectly or at different heights can make BB-8 look unbalanced - measure carefully between rounds before securing them permanently

BB-8 Droid Amigurumi Pattern

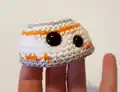
Bring the adorable BB-8 droid from Star Wars to life with this charming crochet pattern! This spherical companion features the iconic white, orange, and grey color scheme that fans know and love. Perfect for Star Wars enthusiasts and amigurumi lovers alike, this pattern creates a delightful decorative piece that can be hung as an ornament or displayed proudly in any space. With detailed instructions for creating the head, body, and decorative circles, you'll craft a recognizable droid friend that captures BB-8's lovable personality in soft, huggable form.

Intermediate 4-5 Hours

Materials Needed for BB-8 Droid Amigurumi Pattern

β€” Main Fabric

  • 01
    Mercerized cotton in White, Orange, and Grey colors
  • 02
    Scheepjes Catona yarn recommended: White #106, Orange #281, Grey #074

β€” Tools Required

  • 01
    2.50 mm crochet hook (or size appropriate for your yarn)
  • 02
    Tapestry needle
  • 03
    Polyester stuffing
  • 04
    9 mm safety eyes
  • 05
    8 mm safety eyes
  • 06
    Black embroidery floss
  • 07
    Locking stitch marker
  • 08
    String or cord for hanging

Progress Tracker

0% Complete

β€” HEAD :

Info :

With White yarn, start with a magic ring

R1 :

6 sc into the magic ring (6)

R2 :

[1 inc] x6 (12)

R3 :

[1 sc, 1 inc] x6 (18)

R4 :

1 sc, 1 inc [2 sc, 1 inc] x5, 1 sc (24)

Info :

Change to grey yarn

R5 :

[3 sc, 1 inc] x6 (30)

Info :

Change to White yarn

R6 :

2 sc, 1 inc [4 sc, 1 inc] x5, 2 sc (36)

Info :

Change to Orange yarn

R7 :

36 sc (36)

Info :

Change to White yarn

R8 :

[5 sc, 1 inc] x6 (42)

R9-11 :

42 sc (3 rounds, 42)

Info :

On round 12 you are going to crochet by switching colours between white and orange

R12 :

orange 1 sc, white 1 sc, orange 3 sc, white 1 sc, orange 1 sc, white 1 sc, orange 3 sc, white 1 sc, orange 1 sc, white 1 sc, orange 3 sc, white 1 sc, orange 1 sc, white 7 sc, orange 3 sc, white 1 sc, orange 1 sc, white 1 sc, orange 3 sc, white 1 sc, orange 1 sc, white 1 sc, orange 3 sc, white 1 sc (42)

R13 :

With grey yarn, 42 sc (42)

Info :

Now it's time to attach the safety eyes. Place the 9 mm eye between rounds 8 and 9 and place the 8 mm eye between rounds 10 and 11

Info :

Change to white yarn

R14 :

In back loops only, [5 sc, 1 dec] x6 (36)

R15 :

[4 sc, 1 dec] x6 (30)

R16 :

[3 sc, 1 dec] x6 (24)

Info :

Start stuffing with polyester stuffing and keep doing that as the hole becomes smaller

R17 :

[2 sc, 1 dec] x6 (18)

R18 :

[1 sc, 1 dec] x6 (12)

R19 :

[1 dec] x6 (6)

Info :

Sew the hole together. Cut yarn but leave a long yarn tail for sewing

β€” BODY :

Info :

With white yarn, start with a magic ring

R1 :

6 sc into the magic ring (6)

R2 :

[1 inc] x6 (12)

R3 :

[1 sc, 1 inc] x6 (18)

R4 :

1 sc, 1 inc [2 sc, 1 inc] x5, 1 sc (24)

R5 :

[3 sc, 1 inc] x6 (30)

R6 :

2 sc, 1 inc [4 sc, 1 inc] x5, 2 sc (36)

R7 :

[5 sc, 1 inc] x6 (42)

R8 :

3 sc, 1 inc [6 sc, 1 inc] x5, 3 sc (48)

R9 :

48 sc (48)

R10 :

[7 sc, 1 inc] x6 (54)

R11-20 :

54 sc (10 rounds, 54)

R21 :

[7 sc, 1 dec] x6 (48)

R22 :

48 sc (48)

R23 :

3 sc, 1 dec [6 sc, 1 dec] x5, 3 sc (42)

R24 :

[5 sc, 1 dec] x6 (36)

R25 :

2 sc, 1 dec [4 sc, 1 dec] x5, 2 sc (30)

R26 :

[3 sc, 1 dec] x6 (24)

Info :

Start stuffing and keep doing that as the hole becomes smaller

R27 :

1 sc, 1 dec [2 sc, 1 dec] x5, 1 sc (18)

R28 :

[1 sc, 1 dec] x6 (12)

R29 :

[1 dec] x6 (6)

Info :

Sew the hole together and cut yarn

β€” CIRCLE type 1 (make 2) :

Info :

With white yarn, start with a magic ring

R1 :

6 sc into the magic ring (6)

R2 :

[1 inc] x6 (12)

R3 :

[1 sc, 1 inc] x6 (18)

R4 :

1 sc, 1 inc [2 sc, 1 inc] x5, 1 sc (24)

Info :

Change to orange

R5 :

[3 sc, 1 inc] x6 (30)

R6 :

2 sc, 1 inc [4 sc, 1 inc] x5, 2 sc (36)

Info :

Finish with 1 sl. Cut yarn but leave a long yarn tail for sewing

β€” CIRCLE type 2 (make 2) :

Info :

With grey yarn, start with a magic ring

R1 :

6 sc into the magic ring (6)

R2 :

[1 inc] x6 (12)

Info :

Change to white yarn

R3 :

[1 sc, 1 inc] x6 (18)

R4 :

1 sc, 1 inc [2 sc, 1 inc] x5, 1 sc (24)

Info :

Change to orange

R5 :

[3 sc, 1 inc] x6 (30)

R6 :

2 sc, 1 inc [4 sc, 1 inc] x5, 2 sc (36)

Info :

Finish with 1 sl. Cut yarn but leave a long yarn tail for sewing

β€” CIRCLE type 3 (make 2) :

Info :

With grey yarn, start with a magic ring

R1 :

6 sc into the magic ring (6)

R2 :

[1 inc] x6 (12)

R3 :

With Grey 1 sc, 1 inc, 1 sc, Change to White 1 inc [1 sc, 1 inc] x5 (18)

R4 :

With Grey 1 sc, 1 inc, 2 sc, 1 inc, Change to White [2 sc, 1 inc] x4, 1 sc (24)

Info :

Change to orange

R5 :

[3 sc, 1 inc] x6 (30)

R6 :

2 sc, 1 inc [4 sc, 1 inc] x5, 2 sc (36)

Info :

Finish with 1 sl. Cut yarn but leave a long yarn tail for sewing

Assembly Instructions

  • On every circle, embroider a few stitches using orange yarn to make it look like a cross inside the circle (refer to step-by-step pictures on pages 8-10)
  • Pin the circles to the body, making sure you place them evenly around the sphere (see pictures on pages 10-12)
  • Sew all 6 circles onto the body one by one, securing them firmly with your yarn tail
  • Take some grey yarn and embroider a few decorative stitches on the body for extra detail (see pictures on pages 12-14)
  • Pin the head to the top of the body and sew it securely in place
  • Take a nice piece of string or braid a long cord and sew it to the top of BB-8's head
  • Adjust the length of the hanging string based on how or where you plan to display your BB-8

Important Notes

  • πŸ’‘Work in a continuous spiral without joining rounds - use a locking stitch marker to mark the beginning of each round
  • πŸ’‘The pattern is provided in both US and UK crochet terms - make sure you're following the correct version for your region
  • πŸ’‘When switching colors, carry the unused yarn inside your work for cleaner color transitions and to avoid loose ends
  • πŸ’‘Place safety eyes carefully before securing them permanently - they should be positioned between the specified rounds for BB-8's characteristic look
  • πŸ’‘Leave long yarn tails when finishing pieces to make assembly easier and more secure
  • πŸ’‘Refer to the step-by-step photos on the last pages of the pattern for visual guidance during assembly
  • πŸ’‘Stuff the head and body gradually as the opening gets smaller to achieve smooth, even shapes

This charming BB-8 pattern brings the beloved Star Wars droid to life in adorable amigurumi form! With its perfect blend of white, orange, and grey colors, plus those expressive safety eyes, your finished BB-8 will capture the droid's endearing personality. The pattern includes detailed instructions for the spherical body, distinctive head, and decorative circles that make BB-8 instantly recognizable. Whether you're creating this for yourself or as a gift for a Star Wars fan, this project combines intermediate techniques with satisfying results. May the Force be with your crochet hook! 🧢✨

You ask,

we answer.

FAQs

What's the difference between the US and UK versions of this pattern?

The main difference is in the stitch terminology. In US terms, 'sc' means single crochet, while in UK terms, 'dc' means double crochet (which is the same stitch). The pattern PDF includes both versions - just make sure you follow the one that matches your crochet terminology.

Can I use different yarn than Scheepjes Catona?

Absolutely! While the pattern recommends Scheepjes Catona mercerized cotton, you can use any yarn as long as it's in the correct colors (white, orange, and grey). Just adjust your hook size accordingly to maintain the proper gauge and finished size.

How do I keep track of my place when working in continuous spirals?

Use a locking stitch marker or a piece of contrasting yarn to mark the first stitch of each round. Move the marker up as you complete each round so you always know where you are in the pattern.

Can I make BB-8 bigger or smaller?

Yes! To make a larger BB-8, use thicker yarn with a correspondingly larger hook. For a smaller version, use thinner yarn with a smaller hook. Keep in mind you'll need to adjust the safety eye sizes as well.

What if I've never done color changes in crochet before?

Color changes might seem tricky at first, but they're straightforward once you practice. Complete the last stitch of the old color until you have two loops on your hook, then pull through with the new color. The pattern's step-by-step photos will guide you through the process.

Do I need to stuff BB-8 very firmly?

Stuff firmly enough to maintain the spherical shape, but not so tight that it distorts the stitches or makes the piece lumpy. You want a smooth, rounded appearance that feels soft but holds its shape well.