🧢 Beautiful ✨ Detailed πŸ’ Adorable

Crochet Market Bag Pattern

Crochet Market Bag Pattern
4.0β˜… Rating
8-10 Hours Time Needed
2.0K Made This
βœ‚οΈ

Intermediate Level

Ideal for those with basic knitting experience, featuring slightly more advanced stitches and techniques to expand your skills.

⏱️

All-Day Adventure

Requires 8-10 hours, ideal for a full day of immersive knitting.

🏑

Cozy Accent

A warm touch for your space that transforms ordinary corners into inviting nooks filled with handmade charm.

About This Crochet Market Bag Pattern

Crochet Market Bag Pattern crochet pattern - detailed view of completed project

The pattern uses approximately 400 grams of cotton cord or cotton yarn with a 4mm hook, making it a substantial project that results in a durable, long-lasting bag. The netted design allows the bag to expand for larger items while maintaining its structure.

Why You'll Love This Crochet Market Bag Pattern

I absolutely love this market bag pattern because it's the perfect blend of function and sustainability. There's something incredibly satisfying about creating something you'll use every single day, and this bag has become my go-to for grocery shopping and farmers market trips. I love how the net pattern creates visual interest while being practical, and the customization options mean you can make it uniquely yours. The fact that it folds down small when empty but expands to hold so much is brilliant design. Plus, every time I use it instead of plastic bags, I feel good about making an eco-friendly choice with something I made with my own hands.

Crochet Market Bag Pattern step 1 - construction progress Crochet Market Bag Pattern step 2 - assembly progress Crochet Market Bag Pattern step 3 - details and accessories Crochet Market Bag Pattern step 4 - final assembly and finishing

Switch Things Up

I love experimenting with different variations of this market bag pattern to create unique pieces for different occasions. One of my favorite modifications is making a smaller version using lighter weight yarn and a 3mm hook - it creates the perfect produce bag for storing fruits and vegetables in the fridge. The net pattern allows air circulation which keeps produce fresh longer.

For a bohemian look, I've added fringe to the bottom of the bag by attaching yarn strands through the magic ring base. You could also embellish the solid top edge rows with surface crochet, embroidery, or even sew on patches or buttons for extra personality. I've made versions with leather handles by crocheting just the bag body and attaching purchased leather straps.

Color blocking is another fun approach - try making the base in one color, switching to a second color for the net pattern middle section, and finishing with a third color for the top edge and handles. Ombre effects work beautifully too if you gradually transition between shades. For summer beach trips, I make these in bright neon colors using quick-dry cotton cord.

You can also adjust the overall size by changing your starting circle - add or remove increase rounds at the beginning to make a wider or narrower base, then adjust your subsequent rows proportionally. I've made tiny versions as gift bags and enormous ones as laundry bags. The possibilities are truly endless with this versatile pattern!

Common Mistakes & How to Fix Them

βœ— Not maintaining consistent tension during the net pattern rows, which can cause uneven spacing and an irregular shape throughout the bag body βœ— Forgetting to place stitch markers at the beginning of rows, making it difficult to track where each row starts and ends especially during spiral working βœ— Pulling the magic ring too tight at the beginning, which can make it difficult to work the first round of stitches into the center βœ— Skipping the recommended yarn type and using lighter weight yarn without adjusting gauge, resulting in a flimsy bag that won't hold weight properly βœ— Not weaving in ends securely on a functional bag like this, which will cause them to work loose with regular use and washing

Crochet Market Bag Pattern

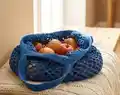
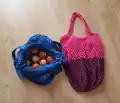
Create your own eco-friendly, reusable shopping companion with this versatile crochet market bag pattern. This sturdy yet flexible design features a beautiful net pattern that stretches to accommodate bulkier items while folding small enough to keep in your purse or car. Perfect for sustainable shopping, this bag combines practicality with handmade charm, and you can customize it in any color combination you love. Make it in classic cotton cord for extra durability, or experiment with variegated yarn for a unique look. With clear step-by-step instructions and helpful photos, you'll have a functional, stylish market bag ready for your next shopping trip.

Intermediate 8-10 Hours

Materials Needed for Crochet Market Bag Pattern

β€” Main Fabric

  • 01
    Cotton crochet cord suitable for 4mm hook (approximately 400 grams total)
  • 02
    Recycled cotton cord in your choice of colors (each roll approximately 200 grams)
  • 03
    Alternative: Cotton yarn suitable for 4mm hook with adjusted yardage

β€” Tools Required

  • 01
    Crochet hook 4mm
  • 02
    Stitch markers
  • 03
    Yarn needle for weaving in ends
  • 04
    Scissors

Progress Tracker

0% Complete

β€” Base of Bag :

Row 1 :

On a magic ring Ch 2 (counts as a double crochet) and then add 11 Dc into the ring (12 stitches in total). Pull the thread to close the ring and join with a Sst.

Row 2 :

Ch 2 (counts as a double crochet) and then add 1 Dc in the same stitch from Row 1. Add two Dc over each of the stitches from Row 1 (24 stitches in total). Join with a Sst.

Row 3 :

Ch 2 (counts as a double crochet), then add two Dc over the next stitch from previous row. Alternated *one Dc in the next stitch, two Dc in the following stitch*. Repeat between * until the end of the row. Join with a Sst (36 stitches in total).

Row 4 :

Ch 2 (counts as a double crochet), one Dc in the next stitch from previous row, two Dc in the following one. *One Dc, one Dc, two Dc in the following stitch*. Repeat between * until the end of the row. Join with a Sst (48 stitches in total).

Row 5 :

Ch 2 (counts as a double crochet), one Dc in each of the next two stitches from previous row, two Dc in the next one. *One Dc, one Dc, one Dc, two Dc in the following stitch*. Repeat between * until the end of the row. Join with a Sst (60 stitches in total).

Row 6 :

Ch 2, *Sc in the next stich from the previous row, Ch 1*. Repeat between * until the end of the row (you will have the same sixty stitches from the previous row, now with a chain space between each of them).

Info :

From this point onwards it's useful to use a crochet marker at the first chain of each row so that you can keep track of the increases. Also, there's no need to slip stitch at the end of each row, you can work in spiral and start the next row chains right after the last stitch from the previous row.

Row 7 :

*Ch 2, Sc over the next chain from the previous row*. Repeat between * until the end of the row. Please note that each Sc goes over the chain space from previous row, not the stitches from previous row.

Info :

The wavy effect is totally normal and will stabilize once the increments are over and enough rows are added to form the body of the bag.

Row 8 :

*Ch 3, Sc over the next chain from the previous row*. Repeat between * until the end of the row.

Row 9 :

*Ch 4, Sc over the next chain from the previous row*. Repeat between * until the end of the row.

Info :

If you're using stitch markers, place one now at the end of this row and leave it there. Since the next rows are a repetition of row 9, it is much easier to keep track of the number of rows you've finished if you know where row 9 ends and row 10 begins.

Rows 10-40 :

Repeat row 9. *Ch 4, Sc over the next chain from the previous row*. Repeat between * until the end of the row.

Info :

You can make your bag all in one color, or change colors any time you want during these rows.

β€” Top Edge of Bag :

Row 41 :

Ch 2. *One Sc over the Sc from previous row, one Sc over the chain from previous row, one Sc over the next Sc from previous row, skip the next chain*. Repeat the pattern between * until the end of the row. Sst over the initial chain to finish the row (90 stitches in total).

Row 42 :

Ch 2. Add one Sc over each of the stitches from previous row. Sst to join at the end of the row (always 90 stitches).

Rows 43-46 :

Repeat row 42. Ch 2. Add one Sc over each of the stitches from previous row. Sst to join at the end of the row (90 stitches).

β€” Bag Handles :

Row 47 :

Ch 2. Add one Sc over each of the next 12 stitches from previous row. Ch 65, skip 20 stitches and then add one Sc over each of the next 25 stitches from previous row. Ch 65, skip 22 stitches, and add one Sc over the next 13 stitches from previous row, to complete the row. Sst over the initial chain to join.

Info :

The handles will have an approximate total length of 47 cm/18.5 inches. If you want your bag handles longer or shorter, increase or decrease the 65 chains in row 47 (make sure the number of chains is the same on both handles).

Row 48 :

Ch 2 and add one Sc over each stitch from previous row, including the chains. Sst to join at the end.

Rows 49-51 :

Repeat row 48. Ch 2 and add one Sc over each stitch from previous row. Sst to join at the end.

Info :

The handles will have an approximate total width of 2.5 cm/1 inch. If you want your bag handles wider or narrower, increase or decrease the number of rows after row 48.

β€” Finishing :

Final Step :

Cut the yarn, weave in ends securely, and your new crochet market bag is ready to be used.

Assembly Instructions

  • Weave in all yarn ends securely using a yarn needle, especially at color change points if you used multiple colors
  • Pay special attention to securing the ends at the base of the handles where they connect to the bag body
  • If desired, block the bag lightly by dampening and shaping it to help even out the net pattern
  • Allow the bag to dry completely before first use to set the shape and ensure all ends are secure

Important Notes

  • πŸ’‘Use stitch markers consistently to track your place, especially during the repetitive rows 10-40 of the net pattern
  • πŸ’‘The bag may look wavy and uneven during construction, but this will even out as you add more rows
  • πŸ’‘Cotton cord creates a sturdier but heavier bag compared to regular cotton yarn, choose based on your preference
  • πŸ’‘You can customize handle length and width by adjusting chains and rows as noted in the pattern
  • πŸ’‘The net pattern allows the bag to stretch significantly, so don't worry if it seems small at first
  • πŸ’‘Consider making the bag in two contrasting colors for a striking visual effect
  • πŸ’‘Wash your finished bag gently by hand and lay flat to dry to maintain its shape

This practical and eco-friendly Crochet Market Bag pattern is perfect for anyone looking to reduce their plastic bag usage while creating something beautiful and functional. The clever net design means your bag can hold surprisingly large loads while still folding down small for storage. Whether you're heading to the farmers market, grocery store, or beach, this versatile bag will become your constant companion. Choose your favorite colors and make it uniquely yours! 🧺🌿 Happy crocheting and happy sustainable shopping! 🧢✨

You ask,

we answer.

FAQs

Can I use regular cotton yarn instead of cotton cord?

Yes, you can use regular cotton yarn, but keep in mind that cotton cord makes the bag sturdier and more durable for carrying heavier items. If using lighter weight yarn, you may need to adjust your yarn amount and the bag may be less sturdy.

How do I make the handles longer or shorter?

To adjust handle length, simply increase or decrease the number of chains in Row 47 (currently 65 chains per handle). Make sure both handles have the same number of chains. To make handles wider or narrower, add or remove rows after Row 48.

Why does my bag look wavy and uneven while I'm making it?

This is completely normal! The wavy effect happens during the increase rows at the base. It will stabilize and even out once you complete the increases and add enough rows to form the body of the bag.

How much weight can this market bag hold?

When made with cotton cord as recommended, this bag is quite sturdy and can hold a significant amount of weight (similar to canvas shopping bags). The net pattern allows it to stretch and accommodate bulky items. However, avoid overloading it beyond reasonable grocery shopping limits.

Can I make this bag in multiple colors?

Absolutely! You can change colors at any point during rows 10-40, or create color-blocked sections. Variegated yarn also works beautifully for this pattern and creates interesting visual effects with the net design.

How do I keep track of which row I'm on during rows 10-40?

Place a stitch marker at the end of Row 9 and leave it there. Since rows 10-40 are all repetitions of row 9, this marker helps you know where your repeating pattern began so you can count how many rows you've completed.