🧶 Beautiful ✨ Detailed 💝 Adorable

Proud Peacock Amigurumi Pattern

Proud Peacock Amigurumi Pattern
4.9★Rating
10-12 HoursTime Needed
2.2KMade This
✂️

Advanced Level

Designed for experienced crocheters, these patterns involve intricate designs and complex techniques to challenge and inspire.

⏱️

Slow & Steady

A 10-12 hour project—great for savoring the process over several sessions.

🐰

Whimsical Buddy

Playful characters full of personality, designed to spark imagination and become cherished playtime favorites.

About This Proud Peacock Amigurumi Pattern

Proud Peacock Amigurumi Pattern crochet pattern - detailed view

This heirloom-quality piece makes a show-stopping addition to a nursery shelf or a bookshelf. It is the perfect gift for someone who appreciates the intricate details of handmade art and the vibrant colors of nature.

Why You'll Love This Proud Peacock Amigurumi Pattern

I honestly fell in love with the loop stitch while making this; there is something so meditative about creating that dense, shaggy texture. Seeing the tail feathers come together after all that color switching is a total 'aha' moment that makes every stitch worth it. Plus, the wire in the neck means you can give your peacock a different personality every day just by tilting its head!

Proud Peacock Amigurumi Pattern step 1 Proud Peacock Amigurumi Pattern step 2 Proud Peacock Amigurumi Pattern step 3 Proud Peacock Amigurumi Pattern step 4

Switch Things Up

When I first sat down to design this peacock, I knew I wanted something that felt 'extra.' You know those projects that just make you stop and stare at your shelf? That is this bird. The loop stitch is definitely the star of the show here. It takes a bit of patience—okay, maybe a lot of patience—but when you see that mossy, ruffled body against the smooth, sharp colors of the tail, it is just chef's kiss perfect.

One thing I discovered while making mine is that the stuffing really matters. If you stuff the neck too lightly, the wire will rattle around inside, but if you stuff it too firmly, it becomes hard to bend. Aim for that 'firm marshmallow' feel. And for the tail, don't be afraid to overlap those feathers quite a bit! Peacocks are all about drama and volume, so the tighter the fan, the better it looks. I actually ended up using a slightly darker green for my join just to give it some extra depth. It’s a long project, but seeing him finally 'show his feathers' on my desk made me so proud. I can't wait for you to feel that same spark of joy!

Common Mistakes & How to Fix Them

✗ If your loop stitches are uneven, the body will look patchy; try to wrap the yarn around your finger with consistent tension for every single stitch.✗ The wire in the neck can poke through the fabric if the ends aren't looped and taped properly, so double-check your masking tape coverage before sliding it in.✗ When joining the feathers in Round 18, it's easy to lose track of the front loops; use a stitch marker to highlight the start of that specific ridge.✗ The head can become top-heavy and floppy if the neck isn't stuffed firmly enough around the wire, so add small bits of fiberfill as you go to ensure stability.

Proud Peacock Amigurumi Pattern

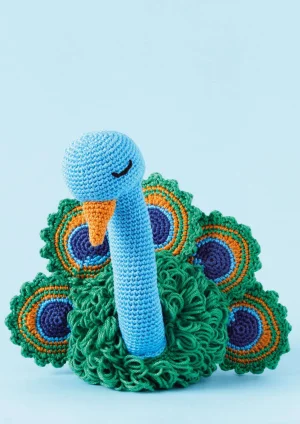
There is something truly magical about watching a peacock fan out its feathers, and now you can capture 그 elegance in yarn. This project is a wonderful exploration of texture, combining a fluffy loop-stitch body with sleek, vibrant feathers. You will love how the deep greens and blues come together to create a centerpiece that feels substantial and sophisticated. It is a rewarding challenge for any crafter looking to move beyond basic shapes and try something with a bit more structural flair.

Advanced 10-12 Hours

Materials Needed for Proud Peacock Amigurumi Pattern

— Main Fabric

  • 01
    Scheepjes Catona cotton yarn in Forest Green (100g)
  • 02
    Scheepjes Catona cotton yarn in Deep Blue (50g)
  • 03
    Scheepjes Catona cotton yarn in Sky Blue (50g)
  • 04
    Scheepjes Catona cotton yarn in Golden Brown (50g)

— Tools Required

  • 01
    2.5 mm crochet hook
  • 02
    High-quality fiberfill for stuffing
  • 03
    Large-eye bodkin or tapestry needle
  • 04
    18 cm of sturdy craft wire
  • 05
    Masking tape for securing wire ends
  • 06
    Stitch markers
  • 07
    Black embroidery thread for the eyes

Progress Tracker

0% Complete

— 1. The Body :

Start :

Using green yarn, begin with a MR and place 6 sc inside.

Round 1 :

Work 2 sc into every st (12)

Round 2 :

Work 2 sc into every 2nd st (18)

Round 3 :

Working in BLO: repeat (1 sc, 2 sc in next st, 1 sc) 6 times (24)

Info :

Cut the yarn and turn your work. Reattach the yarn to begin working with the ls technique. To make a ls: insert hook, yarn over, wrap yarn around your middle finger to create a loop, pull the yarn through the st, then finish like a standard sc.

Round 4 :

Work 2 ls into every 4th st (30)

Round 5 :

Repeat (2 ls, 2 ls in next st, 2 ls) 6 times (36)

Round 6 :

Work 2 ls into every 6th st (42)

Round 7 :

Work 1 ls in every st around (42)

Round 8 :

Repeat (3 ls, 2 ls in next st, 3 ls) 6 times (48)

Round 9 :

Work 1 ls in every st around (48)

Round 10 :

Work 2 ls into every 8th st (54)

Round 11-17 :

Work 1 ls in every st around (54)

Round 18 :

Working in FLO: work 1 sc in every st (54)

Round 19-20 :

Work 1 ls in every st around (54)

Info :

To work a ls2tog: start a ls but keep 2 loops on the hook, start a second ls in the next st, then pull the yarn through all 3 loops on the hook.

Round 21 :

Work a ls2tog across every 8th and 9th st (48)

Round 22 :

Work 1 ls in every st around (48)

Round 23 :

Repeat (3 ls, ls2tog, 3 ls) 6 times (42)

Round 24 :

Work 1 ls in every st around (42)

Round 25 :

Work a ls2tog across every 6th and 7th st (36)

Round 26 :

Work 1 ls in every st around (36)

Round 27 :

Repeat (2 ls, ls2tog, 2 ls) 6 times (30)

Round 28 :

Work 1 ls in every st around (30)

Round 29 :

Work a ls2tog across every 4th and 5th st, then join with 1 sl st (24)

Info :

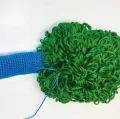
The project has been inside out. Flip it so the loops are on the outside and stuff the body firmly. You will now work on the right side.

Round 30 :

Repeat (1 sc, sc2tog, 1 sc) 6 times (18)

Round 31 :

Work sc2tog across every 2nd and 3rd st (12)

Finish :

Cut yarn. Use a needle to weave through the remaining 12 loops and pull tight to close.

— 2. Head and Neck :

Start :

Using sky blue yarn, make a MR and place 6 sc inside.

Round 1 :

Work 2 sc in each st (12)

Round 2 :

Work 2 sc in every 2nd st (18)

Round 3 :

Repeat (1 sc, 2 sc in next st, 1 sc) 6 times (24)

Round 4 :

Work 2 sc in every 4th st (30)

Round 5 :

Repeat (2 sc, 2 sc in next st, 2 sc) 6 times (36)

Round 6 :

Work 2 sc in every 6th st (42)

Round 7 :

Repeat (3 sc, 2 sc in next st, 3 sc) 6 times (48)

Round 8-15 :

Work 1 sc in every st around (48)

Round 16 :

17 sc, sc2tog 3 times, 2 sc, sc2tog 3 times, 17 sc (42)

Round 17 :

Work sc2tog across every 6th and 7th st (36)

Round 18 :

11 sc, sc2tog 3 times, 2 sc, sc2tog 3 times, 11 sc (30)

Round 19 :

Work sc2tog across every 4th and 5th st (24)

Info :

Stuff the head section firmly. Prepare an 18cm wire by bending the tips and wrapping them in masking tape. Insert the wire into the neck.

Round 20-29 :

Work 1 sc in every st, stuffing the neck around the wire as you go (24)

Round 30-39 :

Work 1 sc in every st (24)

— 3. The Beak :

Start :

Using golden brown yarn, make a MR and place 6 sc inside.

Round 1 :

Work 1 sc in every st (6)

Round 2 :

Work 2 sc in every 2nd st (9)

Round 3 :

Work 1 sc in every st (9)

Round 4 :

Repeat (1 sc, 2 sc in next st, 1 sc) 3 times (12)

Round 5 :

Work 1 sc in every st (12)

Round 6 :

Work 2 sc in every 4th st (15)

Round 7 :

Work 1 sc in every st (15)

Round 8 :

Repeat (2 sc, 2 sc in next st, 2 sc) 3 times (18)

Round 9 :

Work 1 sc in every st (18)

Note :

The source pattern misnumbered Round 4 as Round 7; instructions have been corrected here for logical flow.

— 4. Feathers (Make 10) :

Start :

Using deep blue yarn, make a MR and place 6 sc inside.

Round 1 :

Work 2 sc in every st (12)

Round 2 :

1 sc, switch to sky blue, 1 sc, switch to deep blue, 2 sc in next st, then repeat (1 sc, 2 sc in next st) 5 times (18)

Round 3 :

Switch to sky blue, 1 sc, 2 sc in next st, 1 sc, switch to deep blue, then repeat (1 sc, 2 sc in next st, 1 sc) 5 times (24)

Round 4 :

Switch to sky blue, repeat (3 sc, 2 sc in next st) 6 times, switching to golden brown on the very last st (30)

Round 5 :

Repeat (2 sc, 2 sc in next st, 2 sc) 3 times, 2 hdc, 1 dc, 2 dc in next st, 1 dc, 2 hdc, 2 sc in next st, 4 sc, 2 sc in next st, 2 sc. Switch to forest green (36)

Round 6 :

Work 2 sc into every 6th st, then switch to golden brown (42)

Round 7 :

Repeat (3 sc, 2 sc in next st, 3 sc) 6 times, then join with 1 sl st (48)

— 5. Finishing the Feathers :

Info :

Take two completed feathers and hold them with wrong sides facing each other. You will now crochet them together to make one thick feather.

Joining :

Attach green yarn at the bottom center. Work 6 sc through both layers. *1 sc, then in the next st work (1 dc, 1 tr, 1 dc), then 1 sc. Repeat from * 11 times. Work 1 sc in the remaining 6 stitches at the bottom. Join with sl st and leave a long tail for sewing.

Assembly Instructions

  • Position the neck over the body and join them by crocheting through the neck stitches and the remaining outer loops from Round 3 of the body using single crochets.
  • Pull the neck into a graceful curve by threading the yarn tail through the back of the neck at Round 29 and down through the body, pulling tight before securing.
  • Stuff the beak lightly and sew it onto the face between Rounds 16 and 23 of the head.
  • Using black embroidery thread, stitch sleepy, curved eyes onto either side of the head for a peaceful expression.
  • Arrange your five double-layered feathers. Sew the first feather to the right side of the body using 6 stitches from the ridge created at Round 18.
  • Continue attaching the remaining feathers across the Round 18 ridge, overlapping them slightly so they fan out beautifully.
  • Once all feathers are attached to the body, add a small hidden stitch between the backs of adjacent feathers to keep the fan shape stable and upright.

Important Notes

  • 💡Always use a stitch marker at the beginning of your rounds, especially on the loop-stitch body where it is very hard to see individual stitches.
  • 💡When working the loop stitches, keep your 'finger loop' on the back side of the work so the shaggy texture stays on the outside of the bird.
  • 💡The wire should be stiff enough to hold the head up but flexible enough to bend; if your wire is very thin, consider doubling it up.
  • 💡For the feathers, make sure your color changes happen on the last pull-through of the previous stitch to keep the color lines crisp and clean.
  • 💡Don't overstuff the very bottom of the body or it might become rounded and wobble; you want it slightly flat so the peacock sits nicely.

I hope you enjoy creating this Proud Peacock as much as I did! It’s one of those projects that really shows off what crochet can do—from the intricate colorwork in the tail to that amazing shaggy texture on the body. Once you finish, you’ll have a truly majestic friend that looks like it stepped right out of a fairy tale. Don't forget to give his neck a little jaunty tilt once you're done! Happy crafting, and I can't wait to see your vibrant birds! 🧶 ✨ 🦚

You ask,

we answer.

FAQs

Is the loop stitch difficult for a beginner?

It can be a bit fiddly at first because you're managing an extra loop of yarn on your finger. I recommend practicing on a small swatch before starting the body to get your tension consistent.

What kind of wire is best for the neck?

A galvanized craft wire or a thick aluminum wire works best. It needs to be strong enough to support the weight of the stuffed head without sagging over time.

Can I make the feathers in different colors?

Absolutely! While these blues and greens are traditional, a 'fantasy' peacock in purples, pinks, or even all-white would look stunning with this pattern.

Why do I have to make 10 feathers if he only has 5?

We crochet them in pairs and join them back-to-back. This makes the feathers sturdy enough to stand up in a fan shape without flopping over or needing extra wire.