๐Ÿงถ Beautiful โœจ Detailed ๐Ÿ’ Adorable

Prince Charming Amigurumi Pattern

Prince Charming Amigurumi Pattern
4.7โ˜… Rating
4-5 Hours Time Needed
4.0K Made This
โœ‚๏ธ

Intermediate Level

Ideal for those with basic knitting experience, featuring slightly more advanced stitches and techniques to expand your skills.

โฑ๏ธ

Weekend Treat

Takes 5-7 hours, making it an enjoyable project to finish over a couple of days.

๐Ÿ‘‘

Charming Critter

Delightful animal designs with sweet details that capture the essence of your favorite woodland and farmyard friends.

About This Prince Charming Amigurumi Pattern

This Prince Charming amigurumi pattern brings the classic fairy tale hero to life with elegant royal details. The pattern features a handsome blue tunic with distinctive golden trim that wraps around the chest, a flowing red cape with ribbed texture construction, and carefully styled dark brown hair with dimensional front details. The sophisticated collar with golden edging adds an authentic royal touch, while the overall construction maintains the charming proportions that make these characters so appealing. You'll work with color changes, decorative trim application, and cape construction techniques that create a truly regal finished piece.

Prince Charming Amigurumi Pattern crochet pattern - detailed view of completed project

The pattern uses the Master Head and Master Body construction with specialized additions for the Prince's royal appearance. The distinctive golden trim is created by working single crochet rounds directly onto the completed blue tunic, and the cape features alternating textured rows for visual interest and proper drape.

Why You'll Love This Prince Charming Amigurumi Pattern

I absolutely love how this pattern creates such a handsome, heroic character with surprisingly straightforward techniques! What really excites me is the golden trim detail - the way it's crocheted directly onto the blue tunic creates this beautiful dimensional effect that looks incredibly polished and professional. It's one of those clever construction methods that makes you feel like a crochet genius! The cape is another highlight; working those alternating rows of back loop only slip stitches creates wonderful texture and just the right amount of drape for a princely garment. I find the hair construction particularly satisfying too - round 20 creates these lovely dimensional curls at the front that give him such character and charm. The color combination of royal blue, gold, and red is timelessly elegant and screams 'fairy tale prince.' This pattern teaches great skills in surface decoration, creating masculine amigurumi features, and working with multiple colors harmoniously. Whether you're pairing him with Snow White for the complete love story or creating him as a standalone piece, this Prince has such presence and charm. He's the perfect complement to any fairy tale collection!

Prince Charming Amigurumi Pattern step 1 - construction progress Prince Charming Amigurumi Pattern step 2 - assembly progress Prince Charming Amigurumi Pattern step 3 - details and accessories Prince Charming Amigurumi Pattern step 4 - final assembly and finishing

Switch Things Up

I love experimenting with different color schemes to create various fairy tale princes! Instead of the classic blue and red combination, try making him in deep purple and gold for a more regal, wealthy kingdom aesthetic. Green and silver creates a forest prince vibe, while burgundy and black makes for a more dramatic, mysterious character. The basic pattern works beautifully with any royal color palette.

The hair offers wonderful opportunities for personalization too. You could make it lighter brown, blonde, or even black to represent different characters. Some makers extend the hair slightly longer in back or add a small ponytail for variation. The dimensional curl section at the front can be emphasized more or kept subtle depending on how styled you want his hair to appear.

For the cape, consider using variegated yarn to create a rich, textured appearance, or add a contrasting color stripe near the bottom edge for extra visual interest. I've also made versions where the cape has a golden chain clasp embroidered at the neck for added detail. Some makers even line the cape with a different color by crocheting two thin pieces and sewing them together.

The golden trim can be widened by working two rows instead of one, or you could add metallic thread carried alongside the yellow yarn for actual shimmer. Consider adding tiny embroidered buttons down the center front or decorative embroidery on the collar for extra royal details. These small touches really make each Prince unique!

Common Mistakes & How to Fix Them

โœ— Missing the golden trim application on the tunic leaves the Prince looking plain and loses the distinctive royal uniform detail that defines his character โœ— Not using pins to locate the four points for the golden trim results in uneven placement that looks crooked and unprofessional โœ— Forgetting to work the cape in back loops only creates a stiff, bulky cape without the proper ribbed texture and drape โœ— Placing the collar incorrectly or skewing it to one side disrupts the symmetry and makes the entire outfit look unbalanced โœ— Rushing through round 20 of the hair without proper stitch placement creates lumpy, uneven dimensional details instead of smooth styled curls โœ— Not stuffing the head firmly enough before attaching the hair causes the head to collapse and lose its handsome princely shape

Prince Charming Amigurumi Pattern

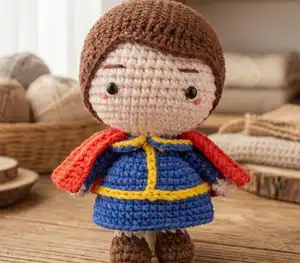
Create the handsome hero of the Snow White fairy tale with this charming Prince amigurumi crochet pattern! This dashing design captures the classic Disney prince with his royal blue tunic adorned with golden trim, elegant red cape, and styled dark brown hair. Perfect for completing your Snow White collection or creating romantic fairy tale displays, this pattern guides you through making a regal character with sophisticated details including a decorative collar with golden border and a flowing cape with textured construction. Whether you're making him as a finger puppet for interactive storytelling or a complete display doll, this Prince brings heroic charm and royal elegance to any handmade collection.

Intermediate 4-5 Hours

Materials Needed for Prince Charming Amigurumi Pattern

โ€” Main Fabric

  • 01
    Dark brown yarn (YarnArt Jeans 70, 50g, 160m) for hair
  • 02
    Skin color yarn (Susan Cotton 07, 50g, 120m) for head and arms
  • 03
    Blue yarn (YarnArt Jeans 17, 50g, 160m) for tunic and collar
  • 04
    Yellow yarn (YarnArt Jeans 35, 50g, 160m) for golden trim and decorative details
  • 05
    Red yarn (YarnArt Jeans 26, 50g, 160m) for cape

โ€” Tools Required

  • 01
    Crochet hook size 2.5mm
  • 02
    1 pair of safety eyes size 6mm
  • 03
    Tapestry needles
  • 04
    Brown thread for embroidering eyebrows
  • 05
    Pink thread for embroidering cheeks
  • 06
    Pins for marking trim placement
  • 07
    Stitch markers
  • 08
    Scissors
  • 09
    Polyester fiberfill stuffing

Progress Tracker

0% Complete

โ€” Head:

Info:

See Master Head from main pattern. Insert the 6mm eyes between rnd 19&20, 8 sts apart. Use brown thread to embroider eyebrows, white yarn to make the eyes bigger, pink thread to embroider the cheeks
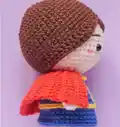
โ€” Prince's Hair (yarn A):

Round 1:

sc 6 into a magic loop (6)

Round 2:

inc 6 (12)

Round 3:

[sc 1, inc] 6x (18)

Round 4:

[sc 1, inc, sc 1] 6x (24)

Round 5:

[sc 3, inc] 6x (30)

Round 6:

[sc 2, inc, sc 2] 6x (36)

Round 7:

[sc 5, inc] 6x (42)

Round 8:

[sc 3, inc, sc 3] 6x (48)

Round 9-18:

sc 48 (10 rnds) (48)

Round 19:

sc 13, hdc 2, dc 5, hdc 2, sc 1, slst 1, sc 1, hdc 2, dc 5, hdc 2, sc 14 (48)

Round 20:

sc 14, hdc 6, sc 1, slst 1, sc 2, hdc 2, [(dc 2) on the same st] 3x, (hdc 2) on the same st, hdc 1, sc 17 (52)

Info:

Break the yarn, wear the hair on the head
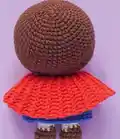
โ€” Prince's Dress (yarn C):

Round 1:

[sc 3, inc] 3x (15)

Round 2:

[sc 1, inc, sc 1] 5x (20)

Round 3:

[sc 3, inc] 5x (25)

Round 4:

[sc 2, inc, sc 2] 5x (30)

Round 5:

[sc 5, inc] 5x (35)

Round 6:

[sc 3, inc, sc 3] 5x (40)

Round 7-12:

sc 40 (6 rnds) (40)

Info:

Break the yarn, hide the remaining yarn. Use pins to locate 4 points, join yarn D on the middle points of the head, crochet 8 sc, then continue to crochet on the left, sc 40, break the yarn, hide the remaining yarn

โ€” Arms:

Info:

See 7 Dwarfs's Arms from pattern

โ€” Collar (yarn C):

Round 1:

ch 20, start on the 3rd st from the hook, [(hdc 2) on the same st, hdc 1] 9x (27)

Info:

Break the yarn, join yarn D on the 1st ch, slst across the border. Sew the collar on the body

โ€” Prince's Cape (yarn E):

Round 1:

ch 14, start on the 2nd st from the hook, sc 4, hdc 4, dc 5, ch 1, turn (13)

Round 2:

(blo) slst 13, ch 1, turn (13)

Round 3:

(blo) sc 4, hdc 4, dc 5, ch 1, turn (13)

Round 4-27:

Repeat [rnd 2-3] 12 more times (24 rnds) (13)

Round 28:

slst 13 (13)

Info:

Break the yarn with a long rest to sew later. Sew the cape on the body

โ€” Body:

Info:

See Master Body from main pattern. If you just make the finger puppet, your Prince is ready to play with. Put the body inside the head, you have the Prince Doll

Assembly Instructions

  • Insert 6mm safety eyes between rounds 19 and 20 of the head, spacing them 8 stitches apart for balanced proportions
  • Embroider eyebrows using brown thread with a gentle arch to create a kind, heroic expression - avoid making them too severe
  • Add white yarn highlights to the eyes for a bright, alert look and pink embroidered cheeks for warmth
  • Wear the completed dark brown hair piece onto the head, ensuring the dimensional curls at the front sit centered
  • Use pins to mark four key points on the blue tunic where the golden trim will be attached - two at the front shoulders and two marking the diagonal line
  • Join yellow yarn at the marked center point and crochet 8 sc across the chest, then continue around to create the golden trim detail
  • Create the collar by working the half double crochet increases, then edge it with yellow slip stitches for the golden border
  • Sew the collar to the neckline of the tunic, ensuring it sits flat and centered
  • Attach the red cape to the back shoulders, positioning it to drape elegantly behind the body
  • Sew both arms to the sides of the tunic at appropriate positions for a natural stance
  • For full doll version, insert the completed Master Body into the head opening and secure firmly

Important Notes

  • ๐Ÿ’กThe golden trim application is crucial - use pins to mark the placement before joining the yarn to ensure symmetry
  • ๐Ÿ’กWhen adding the golden trim, maintain even tension to prevent puckering or pulling on the blue tunic fabric
  • ๐Ÿ’กThe cape alternates between textured slip stitch rows and varied stitch height rows - this creates visual interest and proper drape
  • ๐Ÿ’กAlways work cape rounds in back loops only (BLO) to achieve the ribbed texture that allows flexibility
  • ๐Ÿ’กRound 20 of the hair creates dimensional curls using multiple dc worked in the same stitch - take your time with this section
  • ๐Ÿ’กThe collar edging with yellow slip stitches should be worked evenly to create a clean golden border all around
  • ๐Ÿ’กStuff the head firmly before adding the hair to maintain good shape and structure
  • ๐Ÿ’กThe arms use the same pattern as the Seven Dwarfs - make them in skin color changing to blue for the sleeves

This handsome Prince Charming amigurumi pattern brings fairy tale romance to life with regal elegance and heroic charm! The sophisticated design features a royal blue tunic with golden trim, a flowing red cape, and styled hair with dimensional details. Perfect for pairing with Snow White to complete the love story or displaying as a standalone character, this pattern teaches valuable techniques in surface decoration and creating masculine amigurumi features. Whether for Disney collectors or fairy tale enthusiasts, this Prince is the perfect complement to any magical collection. ๐Ÿงถ Every fairy tale needs its hero! ๐Ÿ‘‘โœจ

You ask,

we answer.

FAQs

How do I add the golden trim to the tunic correctly?

The pattern instructs you to use pins to locate 4 points on the completed blue tunic - essentially marking where the diagonal golden trim will cross the chest. Join yellow yarn at the center point between the shoulders, work 8 sc across, then continue crocheting 40 sc around to create the decorative golden band. The pins help ensure your placement is symmetrical before you commit to stitching.

Can I make this Prince to match with Snow White?

Absolutely! This Prince is designed using the same Master Head and Master Body construction as Snow White and the other characters, so they're perfectly proportioned to display together. They make a beautiful romantic pair for fairy tale scenes or as cake toppers for Disney-themed celebrations.

Is the cape difficult to construct?

The cape is moderately challenging but very manageable for intermediate crocheters. It uses an alternating pattern of textured slip stitch rows (worked in BLO) and varied stitch height rows (sc, hdc, dc). This creates visual interest and helps the cape drape naturally. Just follow the repeat pattern carefully and you'll create a beautiful flowing cape!

Why does the hair pattern create dimensional curls at the front?

Round 20 of the hair uses a technique where multiple double crochets are worked into the same stitch, creating raised, clustered sections that mimic styled hair curls or waves. This gives the Prince a more sophisticated, groomed appearance that's appropriate for a royal character, rather than flat hair.

What makes this pattern different from making female characters?

This pattern creates more masculine features through several design choices: straighter, less arched eyebrows; shorter, more structured hair without flowing curls; a tunic-style outfit rather than a dress; and a cape that suggests strength and heroism. These subtle differences help create distinctly male characters while using the same basic construction methods.

Do I need to embroider the eyebrows or can I use yarn?

While embroidery thread creates the finest, most precise eyebrows, you can absolutely use brown yarn if you prefer. Just use a single strand and keep your stitches small and controlled. Embroidery thread gives slightly more definition and is easier to work with for facial details, but yarn works too!