🧢 Beautiful ✨ Detailed πŸ’ Adorable

Gnome Organizer Amigurumi Pattern

Gnome Organizer Amigurumi Pattern
4.6β˜… Rating
8-10 Hours Time Needed
2.4K Made This
βœ‚οΈ

Intermediate Level

Ideal for those with basic knitting experience, featuring slightly more advanced stitches and techniques to expand your skills.

⏱️

All-Day Adventure

Requires 8-10 hours, ideal for a full day of immersive knitting.

🏑

Cozy Accent

A warm touch for your space that transforms ordinary corners into inviting nooks filled with handmade charm.

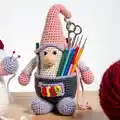
About This Gnome Organizer Amigurumi Pattern

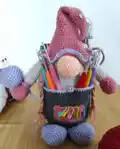
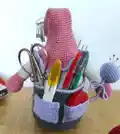
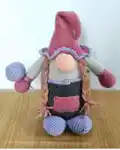
This gnome organizer pattern creates a functional and decorative piece that stands beautifully on any surface. With its weighted base featuring cardboard reinforcement and glass balls for stability, your gnome will stand proudly while holding your crafting essentials. The design includes a full-sized body with detailed clothing, hands that can hold accessories, and three strategically placed pockets for maximum utility. The combination of grey, white, pink, purple, and beige yarns creates a harmonious color palette that's both cheerful and versatile.

Gnome Organizer Amigurumi Pattern crochet pattern - detailed view of completed project

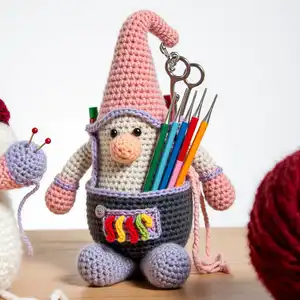
What makes this pattern special is the attention to both form and function. The gnome's structure provides ample storage while maintaining an adorable appearance that brightens any crafting space.

Why You'll Love This Gnome Organizer Amigurumi Pattern

I absolutely love how this pattern combines practicality with personality! There's something so satisfying about creating a piece that's not just cute to look at but actually helps organize your crafting area. I find the weighted base technique particularly cleverβ€”it ensures your gnome stands stable no matter how many supplies you tuck into those pockets. The way the pattern builds from a sturdy foundation to the whimsical pointed hat creates such a delightful silhouette. Plus, customizing the details like the pigtails and needle ball accessory makes each gnome uniquely yours. It's the perfect project when you want something both useful and smile-inducing!

Gnome Organizer Amigurumi Pattern step 1 - construction progress Gnome Organizer Amigurumi Pattern step 2 - assembly progress Gnome Organizer Amigurumi Pattern step 3 - details and accessories Gnome Organizer Amigurumi Pattern step 4 - final assembly and finishing

Switch Things Up

I love experimenting with color combinations for this gnome organizer! While the pattern suggests pink and purple, you could create a completely different mood with earthy browns and forest greens for a woodland vibe, or go bold with bright rainbow colors for a playful craft room companion.

I've also tried varying the pocket sizes to accommodate different tools. Making the back pockets slightly deeper works wonderfully for holding scissors or larger crochet hooks, while keeping the front pocket shallow is perfect for stitch markers and needles.

Another fun modification I enjoy is adding embroidered details to the face - simple French knot eyes and a curved line for a smile bring so much personality! You could even add rosy cheeks with a bit of pink yarn or fabric paint.

I sometimes attach small loops to the sides of the gnome's body so I can hang measuring tapes or thread snips within easy reach. It transforms the organizer into an even more functional workspace tool.

For gifting, I've personalized gnomes by changing the pigtail style - try curly yarn for a whimsical look or use embroidery floss for finer, more delicate braids. You could even skip pigtails entirely and create a beard instead for a more traditional gnome appearance!

Common Mistakes & How to Fix Them

βœ— Forgetting to add the cardboard circle and glass balls before closing the base can make your gnome unstable and prone to tipping over βœ— Skipping the BLO instruction in round thirteen prevents proper pants attachment and creates gaps between the body and pants sections βœ— Overstuffing the hands and legs makes them too rigid and difficult to position naturally when attaching to the body βœ— Sewing pockets to both pants and body instead of just the pants creates stiffness and prevents the fabric from draping properly

Gnome Organizer Amigurumi Pattern

Create this charming 25cm gnome organizer that's both adorable and functional! This delightful crochet project features a sturdy standing gnome with a weighted base, complete with a whimsical pink hat, cozy pants with pockets, and sweet details like pigtails and a needle ball accessory. Perfect for organizing your crafting supplies, this gnome includes three practical pockets to hold needles, threads, and small tools. The pattern combines simple construction techniques with thoughtful design elements to create a helpful crafting companion that brings personality to your workspace.

Intermediate 8-10 Hours

Materials Needed for Gnome Organizer Amigurumi Pattern

β€” Main Fabric

  • 01
    Grey acrylic yarn (50g/125m)
  • 02
    White acrylic yarn (50g/125m)
  • 03
    Pink acrylic yarn (50g/125m)
  • 04
    Purple acrylic yarn (50g/125m)
  • 05
    Beige acrylic yarn (50g/125m)
  • 06
    Brown yarn for pigtails

β€” Tools Required

  • 01
    Crochet hook 2.5mm
  • 02
    Fiberfill stuffing
  • 03
    Tapestry needle
  • 04
    Embroidery thread
  • 05
    Hard cardboard for base circle
  • 06
    5-10 glass balls for weight
  • 07
    Scissors
  • 08
    Button for decoration

Progress Tracker

0% Complete

β€” Body

Info :

Use grey yarn

Round 1 :

(6 sc) into MR

Round 2 :

(inc) x 6 = 12 sc

Round 3 :

(1sc, inc) x 6 = 18

Round 4 :

(2sc, inc) x 6 = 24

Round 5 :

(3sc, inc) x 6 = 30

Round 6 :

(4sc, inc) x 6 = 36

Round 7 :

(5sc, inc) x 6 = 42

Round 8 :

(6sc, inc) x 6 = 48

Round 9 :

(7sc, inc) x 6 = 54

Round 10 :

(8sc, inc) x 6 = 60

Round 11 :

(9sc, inc) x 6 = 66

Round 12 :

(10sc, inc) x 6 = 72

Round 13 :

BLO = 72 sc

Round 14-15 :

= 72 sc (2 rounds)

Info :

Cut a circle out of hard cardboard or plastic. The size of the circle should be the same size as the crocheted circle. Also put 5 to 10 glass balls inside. This is necessary for the doll to stand well. In the process of crocheting, put filler inside the body.

Info :

Switch to white yarn

Round 16-42 :

= 72 sc (27 rounds)

Round 43 :

(10sc, dec) x 6 = 66

Round 44-45 :

= 66 sc (2 rounds)

Round 46 :

(9sc, dec) x 6 = 60

Round 47-48 :

= 60 sc (2 rounds)

Round 49 :

(8sc, dec) x 6 = 54

Round 50-51 :

= 54 sc (2 rounds)

Round 52 :

(7sc, dec) x 6 = 48

Round 53 :

(6sc, dec) x 6 = 42

Round 54 :

(5sc, dec) x 6 = 36

Round 55 :

(4sc, dec) x 6 = 30

Round 56 :

(3sc, dec) x 6 = 24

Round 57 :

(2sc, dec) x 6 = 18

Round 58 :

(1sc, dec) x 6 = 12

Round 59 :

(6 dec) = 6

Info :

Break yarn

β€” Pants

Info :

Use grey yarn. Attach yarn in round 13

Round 1 :

FLO (5sc, inc) x 12 = 84

Round 2-27 :

= 84 sc (26 rounds)

Info :

Switch to purple yarn

Round 28 :

= 84 sc

Info :

Break yarn

β€” Hat

Info :

Use pink yarn

Round 1 :

(3 sc) into MR

Round 2 :

= 3 sc

Round 3 :

(inc) x 3 = 6 sc

Round 4-5 :

= 6 sc (2 rounds)

Round 6 :

(1sc, inc) x 3 = 9

Round 7-8 :

= 9 sc (2 rounds)

Round 9 :

(2sc, inc) x 3 = 12

Round 10-11 :

= 12 sc (2 rounds)

Round 12 :

(3sc, inc) x 3 = 15

Round 13-14 :

= 15 sc (2 rounds)

Round 15 :

(4sc, inc) x 3 = 18

Round 16-17 :

= 18 sc (2 rounds)

Round 18 :

(5sc, inc) x 3 = 21

Round 19-20 :

= 21 sc (2 rounds)

Round 21 :

(6sc, inc) x 3 = 24

Round 22-23 :

= 24 sc (2 rounds)

Round 24 :

(7sc, inc) x 3 = 27

Round 25-26 :

= 27 sc (2 rounds)

Round 27 :

(8sc, inc) x 3 = 30

Round 28-29 :

= 30 sc (2 rounds)

Round 30 :

(9sc, inc) x 3 = 33

Round 31-32 :

= 33 sc (2 rounds)

Round 33 :

(10sc, inc) x 3 = 36

Round 34-35 :

= 36 sc (2 rounds)

Round 36 :

(5sc, inc) x 6 = 42

Round 37-38 :

= 42 sc (2 rounds)

Round 39 :

(6sc, inc) x 6 = 48

Round 40-41 :

= 48 sc (2 rounds)

Round 42 :

(7sc, inc) x 6 = 54

Round 43 :

= 54 sc

Round 44 :

(8sc, inc) x 6 = 60

Round 45 :

= 60 sc

Round 46 :

(9sc, inc) x 6 = 66

Round 47 :

= 66 sc

Round 48 :

(5sc, inc) x 11 = 77

Round 49 :

(6sc, inc) x 11 = 88

Info :

Switch to purple yarn

Round 50 :

(1 sc, 1inc) x 44 = 132

Info :

Break yarn. Weave in ends

β€” Hands

Info :

Make 2 parts. Use pink yarn

Round 1 :

(6 sc) into MR

Round 2 :

(inc) x 6 = 12 sc

Round 3 :

(1sc, inc) x 6 = 18

Round 4 :

(2sc, inc) x 6 = 24

Round 5-9 :

= 24 sc (5 rounds)

Round 10 :

(2sc, dec) x 6 = 18

Round 11 :

(1sc, dec) x 6 = 12

Round 12 :

(1sc, inc) x 6 = 18

Round 13 :

= 18 sc

Info :

Switch to white yarn

Round 14 :

= BLO 18 sc

Round 15-31 :

= 18 sc (17 rounds)

Info :

Put the filler inside not completely. Fold the part in half. Crochet 9 sc. Break yarn. Weave in ends. Attach hands to the body

β€” Legs

Info :

Make 2 parts. Use purple yarn

Round 1 :

(6 sc) into MR

Round 2 :

(inc) x 6 = 12 sc

Round 3 :

(1sc, inc) x 6 = 18

Round 4 :

(2sc, inc) x 6 = 24

Round 5 :

(3sc, inc) x 6 = 30

Round 6-10 :

= 30 sc (5 rounds)

Round 11 :

(3sc, dec) x 6 = 24

Round 12 :

= 24 sc

Round 13 :

(2sc, dec) x 6 = 18

Round 14 :

= 18 sc

Info :

Put the filler inside not completely. Fold the part in half. Crochet 9 sc. Break yarn. Weave in ends. Attach legs to the body

β€” Nose

Info :

Use beige yarn

Round 1 :

(6 sc) into MR

Round 2 :

(inc) x 6 = 12 sc

Round 3 :

(1sc, inc) x 6 = 18

Round 4 :

(2sc, inc) x 6 = 24

Round 5 :

(3sc, inc) x 6 = 30

Round 6-9 :

= 30 sc (4 rounds)

Round 10 :

(3sc, dec) x 6 = 24

Round 11 :

(2sc, dec) x 6 = 18

Info :

In the process of crocheting, put filler inside the nose. Fold the part in half. Crochet 9 sc. Break yarn. Weave in ends. Attach nose to the body

β€” Needle Ball

Info :

Use purple yarn

Round 1 :

(6 sc) into MR

Round 2 :

(inc) x 6 = 12 sc

Round 3 :

(1sc, inc) x 6 = 18

Round 4 :

(2sc, inc) x 6 = 24

Round 5 :

(3sc, inc) x 6 = 30

Round 6-9 :

= 30 sc (4 rounds)

Round 10 :

(3sc, dec) x 6 = 24

Round 11 :

(2sc, dec) x 6 = 18

Round 12 :

(1sc, dec) x 6 = 12

Round 13 :

(6 dec) = 6

Info :

In the process of crocheting, put filler inside. Break yarn. Weave in ends. Attach thread to tie to hand

β€” Pigtails

Info :

Use brown yarn. Yarn length for a 3-ply braid 15 cm / 6 in

β€” Pockets

Info :

Make 3 parts

Front Pocket (1 part) :

Use pink yarn. R1: 13 ch, crochet into the 2nd ch from the hook 12 sc, turn knit. R2-R8: 12 sc, turn knit (7 rounds). Break yarn

Back Pockets (2 parts) :

Use purple yarn. R1: 14 ch, crochet into the 2nd ch from the hook 13 sc, turn knit. R2-R10: 13 sc, turn knit (9 rounds). Break yarn. Attach pockets to the pants

Info :

Attention, pockets are sewn only to the pants. Not to pants and body! Attach the button to the front of the pants and body

Assembly Instructions

  • Attach the hat to the top of the body, centering it carefully so it sits evenly on the head
  • Sew the nose to the front of the body approximately where the face would be, stuffing it firmly before closing
  • Position and attach the hands to the sides of the body at an appropriate height for holding accessories
  • Attach the legs to the bottom front of the body, ensuring they're evenly spaced for stability
  • Create brown pigtails using 15cm yarn lengths braided in three-ply style and attach to sides of head under hat
  • Sew the three pockets to the pants only (not through to the body): one pink front pocket and two purple back pockets
  • Attach the needle ball accessory to one hand using thread so it can hang decoratively

Important Notes

  • πŸ’‘The cardboard circle and glass balls must be inserted before completing round 15 of the body for proper stability
  • πŸ’‘Pay careful attention to BLO and FLO instructions as they create the structure for attaching pants to the body
  • πŸ’‘Do not overstuff the hands and legs - they should be pliable enough to fold in half for closing
  • πŸ’‘Pockets should only be sewn to the pants fabric, not stitched through to the body underneath to maintain flexibility
  • πŸ’‘Use stitch markers to track your rounds especially during the long hat construction with frequent increases
  • πŸ’‘The button attachment goes through both pants and body to secure them together decoratively

This charming Gnome Organizer pattern brings together whimsy and practicality in one delightful project! The weighted base ensures your gnome stands proudly while the multiple pockets keep your crafting essentials organized and within reach. The combination of soft colors and sweet details like pigtails and a pointed hat creates a character full of personality that you'll love having on your crafting table. Whether you're making it for yourself or as a thoughtful gift for a fellow crafter, this gnome organizer is sure to become a beloved workspace companion. 🧢 Happy crocheting and organizing! ✨

You ask,

we answer.

FAQs

What size should I cut the cardboard circle for the base?

The cardboard circle should match the diameter of your crocheted base after round 12, which will be approximately 10-12cm depending on your yarn and tension. Measure your crocheted circle before cutting the cardboard to ensure a perfect fit.

Can I make the gnome smaller or larger?

Yes! You can adjust the size by using thinner or thicker yarn with an appropriate hook size. Keep in mind that changing yarn weight will affect the final measurements and you may need to adjust the number of glass balls for stability.

Why do the pockets need to be sewn only to the pants and not the body?

Sewing the pockets only to the pants layer allows the fabric to maintain its flexibility and drape naturally. If you sew through to the body, it creates stiffness and the pockets won't function as well for holding items.

What type of glass balls should I use for the weighted base?

Small glass marbles or decorative glass beads work perfectly. They should be small enough to fit through the opening as you work but heavy enough to provide stability. You can also use plastic pellets or poly pellets as an alternative.

How do I attach the pigtails securely?

After braiding the brown yarn into three-ply braids about 15cm long, use a tapestry needle to stitch them firmly to the sides of the head underneath the hat brim. Stitch through several times to ensure they're secure.