🧢 Beautiful ✨ Detailed πŸ’ Adorable

Powerpuff Girls Crochet Hook Case Pattern

Powerpuff Girls Crochet Hook Case Pattern
4.1β˜… Rating
8-10 Hours Time Needed
1.2K Made This
βœ‚οΈ

Advanced Level

Designed for experienced knitters, these patterns involve intricate designs and complex techniques to challenge and inspire.

⏱️

All-Day Adventure

Requires 8-10 hours, ideal for a full day of immersive knitting.

🧢

Stylish Touch

An elegant detail to elevate any look, combining traditional techniques with contemporary design sensibilities.

About This Powerpuff Girls Crochet Hook Case Pattern

This crochet hook case pattern combines functionality with adorable design elements featuring heart motifs in a pink and beige color palette. The pattern uses the intarsia technique for clean color changes, creating a professional-looking case that keeps your hooks organized and protected. With customizable sizing options, you can adjust the case to accommodate hooks from 3mm all the way up to ergonomic handles, making it perfect for any collection.

Powerpuff Girls Crochet Hook Case Pattern crochet pattern - detailed view of completed project

The case includes multiple pockets for different hook sizes, plus additional compartments for scissors, measuring tape, stitch markers, and needles. A cute heart-shaped lock closure adds the perfect finishing touch to this practical accessory.

Why You'll Love This Powerpuff Girls Crochet Hook Case Pattern

I absolutely love this pattern because it transforms a practical necessity into something beautiful and personalized! The intarsia technique creates such clean, professional-looking color changes that make the finished case look store-bought. I appreciate how the pattern includes detailed customization options, so you can make it work for your exact collection of hooks and tools. The multiple pockets keep everything organized and easy to find, which saves so much time during projects. Plus, that adorable heart closure is just the sweetest finishing touch that makes this case feel extra special every time you use it!

Powerpuff Girls Crochet Hook Case Pattern step 1 - construction progress Powerpuff Girls Crochet Hook Case Pattern step 2 - assembly progress Powerpuff Girls Crochet Hook Case Pattern step 3 - details and accessories Powerpuff Girls Crochet Hook Case Pattern step 4 - final assembly and finishing

Switch Things Up

I love how versatile this pattern is for personalization! While the original design features those adorable Powerpuff Girls-inspired hearts in pink and beige, you could easily adapt the color scheme to match your personal style or craft room aesthetic. Try using bold jewel tones for a luxurious look, or pastel rainbow colors for something extra cheerful.

I've also experimented with adding embroidered details or appliquΓ©s to the patches for extra flair. You could stitch your initials on the front panel, add small crocheted flowers, or even work in a different character or motif that speaks to you. The intarsia technique is perfect for incorporating any design you can chart out on graph paper.

Another modification I recommend is adjusting the pocket sizes based on your specific tool collection. If you have lots of small hooks, you might want more 2-row pockets. If you prefer ergonomic handles, definitely go with 4-row pockets throughout. You can even add a zippered pouch or button closure instead of the heart lock if that suits your style better. The beauty of this pattern is that once you understand the construction method, you can truly make it your own!

Common Mistakes & How to Fix Them

βœ— Not using the intarsia method correctly can cause yarn to peek through from the wrong side, making the case look messy and unprofessional inside βœ— Forgetting to leave long tails for sewing can make assembly frustrating and require you to add new yarn mid-seaming which creates visible joins βœ— Skipping the gauge swatch results in a case that's either too tight for your hooks or too loose to hold them securely in place βœ— Sewing patches with visible stitches on the outside ruins the clean look so always separate yarn plies for thinner invisible seaming threads βœ— Making pockets too small for thicker hooks above 5mm means they won't fit properly so always allocate three rows instead of two for larger hooks

Powerpuff Girls Crochet Hook Case Pattern

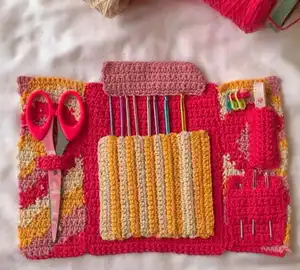
Create your own adorable and functional crochet hook organizer with this charming Powerpuff Girls-inspired case! This pattern features a beautifully designed case with intarsia colorwork that showcases cute heart motifs in pink and beige tones. Perfect for keeping all your hooks, scissors, measuring tape, and other crochet essentials organized in one place, this case is both practical and stylish. The pattern includes detailed instructions for customizing the size to fit your specific hook collection, making it a truly personalized accessory for any crochet enthusiast.

Advanced 8-10 Hours

Materials Needed for Powerpuff Girls Crochet Hook Case Pattern

β€” Main Fabric

  • 01
    Light/DK weight yarn (yarn weight 3) - approximately 74g total or 163m
  • 02
    Dark pink yarn for first color
  • 03
    Light pink yarn for second color
  • 04
    Beige yarn for third color
  • 05
    Yellow yarn for fourth color

β€” Tools Required

  • 01
    3.5mm crochet hook
  • 02
    Scissors
  • 03
    Yarn needle
  • 04
    Measuring tape
  • 05
    Stitch markers

Progress Tracker

0% Complete

β€” Step 1: Middle Portion

Info :

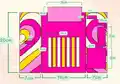
The height should be about 4cm longer than your crochet hook. If it doesn't fit, add more rows.

Step a :

Grab the 1st color (dark pink). CH27. In the 2nd CH from hook, make 1 SC.

Step b :

Make 1SC in each st until the last st. CH1, turn. Repeat until you have 37 rows.

Step c :

CH1, leave a long tail (worth the height of the middle portion) for sewing.

β€” Step 2: Right Portion

Info :

The foundation CH does NOT count as a row. Follow the graph for the right portion.

Step a :

Grab the 1st color, CH14.

Step b :

Start row 1 by following the graph. When you reach the last ST of the 37th row, FO.

β€” Step 3: Left Portion

Info :

The foundation CH does NOT count as a row. Do not CH14, only do CH 13 with 1st color, then do one more chain with 2nd color. Follow the graph for the left portion.

Step a :

Grab the 1st color, CH13.

Step b :

Grab the 2nd color and CH1 more.

Step c :

Start row 1 by following the left graph. When you reach the last ST of the 37th row, FO.

β€” Step 4: Hook Pockets

Info :

2 rows of SC are allocated for 1 crochet hook. However, for crochet hooks 5mm, 5.5mm, 6mm and above, 3 rows will be allocated for each hook. For ergonomic crochet hooks, you may want to have 4 or more rows for 1 crochet hook.

Step a :

Grab 3rd color, CH22, or when it reaches 11cm. In the 2nd ch from hook, 1SC.

Step b :

Make 1SC in each ST until the last ST. CH1, turn. Repeat for another row. When you reach the last ST, grab the opposite color and pull through.

Step c :

Repeat Step 4b, changing colors for 7 times.

Step d :

When you reach the last ST, grab the opposite color, and pull through. SC for 3 rows with CH1 for turning CH.

Step e :

After 3 rows, cut yarn, and repeat Step 4d for 2 more sets - you should have 3 sets total of 3 rows. FO.

β€” Step 5: Other Patches

Info :

Make patches for the stitch markers, needles, measuring tape, scissors, and a cover for the hooks. CH1 more for the foundation CH. CH1 for turning CH for every row. FO after reaching the last row, leaving enough tail for sewing.

Patch 1 :

2SC each row, 4 rows total.

Patch 2 :

6SC each row, 10 rows total.

Patch 3 :

10SC each row, 14 rows total.

Patch 4 :

23SC each row, 7 rows total.

Patch 5 :

1SC each row, 7 rows total.

β€” Step 6: Sewing

Info :

The sewing part will take most of your time, so be very patient in this step. Sew the patches in your preferred way. Use mattress stitch to sew the panels and running stitch for the patches.

Sewing Tip 1 :

Separate the ply of the yarn to create a thinner thread.

Sewing Tip 2 :

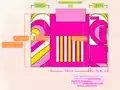
For the sewing parts going up/down, sew through the highlighted stitches.

Sewing Tip 3 :

For the sewing parts going right/left, sew like you're weaving ends.

Important :

Do not let the sewing thread be visible on the outside, especially when you are using a thread color that is different to the other patch.

β€” Step 7: Lock

Heart :

Grab the 3rd color yarn, make a magic ring. CH2, make 3 TC into the ring, then 3 DC, then CH 1. 1TC into the ring. CH1, 3DC into the ring, then 3TC. CH2, SLST into the ring.

String :

Make 1SLST each in the 2CHs, then another 1SLST each in the next 4STs. Then, CH enough for the string (about 13 inches). FO.

Attachment :

Attach yarn at the indicated point. 1SLST each in the next 4STs. Then, CH enough for the string. FO.

Assembly Instructions

  • Sew the middle portion to the right portion using mattress stitch, ensuring edges align perfectly for a seamless join.
  • Attach the left portion to the opposite side of the middle portion using the same mattress stitch technique.
  • Position and sew the hook pocket strip to the left portion, making sure it's centered and aligned properly.
  • Attach the small patches for stitch markers, needles, and other tools to your preferred locations on the case.
  • Sew the scissors patch and measuring tape patch to the right portion according to your layout preference.
  • Attach the hook cover patch over the hook pockets to keep them secure when the case is rolled.
  • Sew the heart lock strings to the designated points on the case edges for closure functionality.

Important Notes

  • πŸ’‘Always check your gauge before starting to ensure the case will be the correct size for your hooks
  • πŸ’‘When using the intarsia method, drop yarn to the back on right side rows and to the front on wrong side rows
  • πŸ’‘Leave long tails when fastening off each section as these will be used for sewing assembly
  • πŸ’‘Separate yarn plies to create thinner sewing thread that won't be visible from the outside
  • πŸ’‘Allocate 3 rows instead of 2 for hooks larger than 5mm to ensure they fit comfortably
  • πŸ’‘Pin all patches in place before sewing to ensure proper positioning and spacing
  • πŸ’‘The foundation chain does not count as a row when working the left and right portions

This charming crochet hook case pattern combines beautiful intarsia colorwork with practical organization to create the perfect storage solution for your crochet tools! With its adorable heart motifs and customizable sizing, you can create a case that's uniquely yours while keeping all your hooks, scissors, and accessories neatly organized. The detailed instructions guide you through the intarsia technique for professional-looking results, and the multiple pockets ensure everything has its place. Whether you're treating yourself or making a thoughtful gift for a fellow crocheter, this case is sure to bring joy every time it's used. 🧢 Happy crocheting! πŸ’—βœ¨

You ask,

we answer.

FAQs

What is the intarsia method and why is it important for this pattern?

The intarsia method is a color-changing technique where you drop one color and pick up another without carrying yarn across the back. This is crucial for this pattern because it keeps the inside of the case neat and prevents colors from showing through on the wrong side, giving your case a professional finish.

Can I adjust the size of the case to fit longer or shorter hooks?

Yes! The pattern includes detailed instructions for customizing the case size. You can add more rows to increase the height and more stitches to increase the width. Just remember to maintain the rule that the middle portion should be twice as wide as the right portion, and all portions should have the same number of rows.

How many crochet hooks will this case hold?

The pattern allocates 2 rows per hook for hooks under 5mm, and 3 rows for hooks 5mm and larger. Based on the standard pattern with 7 color changes creating pockets, you can fit approximately 14-21 hooks depending on their sizes. You can adjust this by adding more pocket rows.

What if I want to use different colors than the pink and beige shown?

Absolutely! You can use any color combination you prefer. The pattern uses 4 colors total, so choose your favorites and follow the same color placement instructions. The planning chart in the pattern helps you visualize your color choices before starting.

Do I need special skills to complete this pattern?

This pattern is rated for advanced beginners. You should be comfortable with basic single crochet, reading graphs, and color changes. The intarsia technique might be new, but the pattern includes a detailed tutorial and video link to help you master it.