🧢 Beautiful ✨ Detailed πŸ’ Adorable

Potter Head Beanies Crochet Pattern

Potter Head Beanies Crochet Pattern
4.3β˜… Rating
8-10 Hours Time Needed
3.1K Made This
βœ‚οΈ

Intermediate Level

Ideal for those with basic knitting experience, featuring slightly more advanced stitches and techniques to expand your skills.

⏱️

All-Day Adventure

Requires 8-10 hours, ideal for a full day of immersive knitting.

❄️

Winter Warmth

Cozy layers for chilly nights that combine practical warmth with beautiful, intricate stitch patterns.

About This Potter Head Beanies Crochet Pattern

Potter Head Beanies Crochet Pattern crochet pattern - detailed view of completed project

Each beanie features customizable brim options and finishing details that add personality to your creation. The backwards join technique ensures seamless construction while color-carrying methods create clean transitions between magical design elements.

Why You'll Love This Potter Head Beanies Crochet Pattern

I absolutely love how these Potter Head Beanies combine technical skill-building with pure fan joy. The waistcoat stitch might seem intimidating at first, but once you get into the rhythm, it becomes meditative and creates such a beautiful knit-like texture. What really makes my heart happy is watching these characters emerge row by row as you follow the graphβ€”there's something magical about seeing those iconic glasses and lightning scars take shape under your hook. The pattern respects your time with clear instructions and helpful bobbin placement diagrams, plus the ability to customize sizing means you can make matching hats for your whole wizarding crew. I particularly appreciate how the backwards join creates such a professional finish, and adding that faux fur pompom at the end feels like the perfect spell to complete your creation.

Potter Head Beanies Crochet Pattern step 1 - construction progress Potter Head Beanies Crochet Pattern step 2 - assembly progress Potter Head Beanies Crochet Pattern step 3 - details and accessories Potter Head Beanies Crochet Pattern step 4 - final assembly and finishing

Switch Things Up

I love experimenting with these Potter Head Beanies to make each one uniquely magical. Instead of the striped brim shown in the cover photo, I sometimes work a solid color ribbed brim for a cleaner, more classic look that really makes the character designs pop. You could even try adding metallic gold or silver threads carried along with your main colors to give the beanie a subtle sparkle that catches the light beautifully.

For a truly personalized touch, consider changing the house colors to represent different wizarding housesβ€”deep greens and silvers, blues and bronzes, or yellows and blacks would all create stunning variations. I've also experimented with pompom sizes, using everything from tiny subtle poms to absolutely massive fluffy ones depending on the recipient's personality.

If you're feeling adventurous, you could modify the graphs to include initials or add extra embroidered details like stars, moons, or other magical symbols around the character elements. Some crocheters I know have even added small crocheted appliques like tiny broomsticks or house crests sewn onto the sides.

The waistcoat stitch itself offers opportunities for creativity tooβ€”try working some rounds in back loop only for textural interest, or alternate the direction of your continuous rounds for subtle striping effects. You could make the beanie slightly slouchy by adding extra rounds before the decreases begin, or make it more fitted by starting decreases a round or two earlier.

Common Mistakes & How to Fix Them

βœ— Pulling carried yarn too tightly will eliminate stretch and cause the hat to pucker, always leave slack when carrying colors across βœ— Working waistcoat stitch with tight tension makes it nearly impossible to insert hook properly, use loose tension and larger hook size βœ— Forgetting to move stitch marker up each round leads to losing your place in the pattern and misaligned design elements βœ— Not stuffing enough decreases into later rounds creates gaps in the crown, keep tension loose even while decreasing for smooth shaping

Potter Head Beanies Crochet Pattern

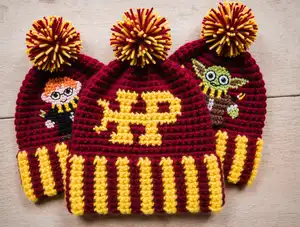
Transform your crochet skills with these enchanting Potter-themed beanies featuring the waistcoat stitch technique. Create three magical character-inspired designs that capture iconic wizarding world elements through colorwork and graph patterns. These cozy hats combine technical precision with playful details like embroidered glasses, lightning bolt scars, and wands, making them perfect gifts for fans of all ages. Whether you're crafting for a child or adult, these beanies offer adjustable sizing and customizable pompom toppers for a personal touch.

Intermediate 8-10 Hours

Materials Needed for Potter Head Beanies Crochet Pattern

β€” Main Fabric

  • 01
    Worsted medium weight yarn (#4) in Sungold (15 yards), Aubergine (106 yards), Mid Green (17 yards), Pink (2 yards), Black (14 yards), Light Peach (12 yards), Greybeard (2 yards)
  • 02
    Total of 145-160 yards of yarn needed for complete beanie

β€” Tools Required

  • 01
    Crochet hook 7 (4.5mm) for brim
  • 02
    Crochet hook I/9 (5.5mm) for child size
  • 03
    Crochet hook J/10 (6mm) for teen-adult size
  • 04
    Crochet hook K/10.5 (6.5mm) for large adult size
  • 05
    Yarn needle for hiding threads and embroidery
  • 06
    Scissors
  • 07
    Bobbins for color management
  • 08
    Faux fur pompom for hat top
  • 09
    Stitch marker
  • 10
    Worsted or sport weight yarn for embroidery details

Progress Tracker

0% Complete

β€” Striped Brim (Cover Photo Style) :

Setup :

With brim color and 4.5mm hook ch 9

Row 1 :

sc in 2nd ch from the hook and in each ch across, ch1, turn (8)

Row 2 :

sc, sc in BLO next 6, sc ending with a color change, with alternate color ch1, turn (8)

Row 3 :

sc, sc in BLO next 6, sc (8)

Row 4 :

sc, sc in BLO next 6, sc ending with a color change, with alternate color ch1, turn (8)

Rows 5-60 :

Repeat rows 3 and 4

Info :

Align the brim and slst into both back loops only from each brim side to seam shut, try brim on to check fit, adjust rows if needed

Row 61 :

Switch to hook size needed for hat (5.5mm child, 6mm teen-adult, 6.5mm large adult), sc next 9, scinc around the brim (66), backwards join

β€” Ribbed Brim Alternative :

Setup :

With brim color and 4.5mm hook ch 9

Row 1 :

slst in bb of 2nd ch from the hook and in each ch across, ch1, turn (8)

Row 2 :

slst blo across, ch1, turn each row to desired length (8), work 13 inches for child, 14 inches for teen-adult, 15 inches for large adult

Row 3 :

Align the brim and slst into both back loops only from each brim side

Row 4 :

Switch to hook size needed for hat, sc around the brim attempting to get to 66sts before starting the graph, usually sc next 2, scinc, backwards join, ch1 (66)
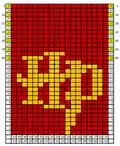
β€” Hat Body :

Info :

Continue with hook needed for hat size, make color changes along with the graph, crochet the wcs using loose tension throughout, work continuously without joining, use a stitch marker to keep your place
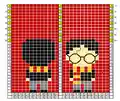
Rounds 1-17 :

With all colors, follow along with the graph using the bobbin directions (66)

Info :

Start of decreasing rounds, keep the decreases loose to avoid tightening tension while decreasing

Round 18 :

wcs next 9, wcsdec around (60)

Round 19 :

wcs around (60)

Round 20 :

wcs next 4, wcsdec around (50)

Round 21 :

wcs around (50)

Round 22 :

wcs next 3, wcsdec around (40)

Round 23 :

wcs around (40)

Round 24 :

wcs next 2, wcsdec around (30)

Round 25 :

wcs around (30)

Round 26 :

wcs, wcsdec around (20), for child size only FO leaving a tail, cinch and sew closed

Round 27 :

wcs around (20), for teen-adult and large adult only

Round 28 :

wcsdec around (10)

Round 29 :

wcs around (10)

Round 30 :

wcsdec around (5), FO, leave a long tail for cinching then sew closed

β€” Embroidery Details :

Glasses :

Using the graph for placement, split a piece of black worsted or use sport weight, using only 3 strands of the worsted and a yarn needle sew on the glasses

Scar :

Do the same with the scar in red

Wand :

Then black or brown for the wand on both front and back sides

Wand Spark :

With gold add a spark onto the wand tip on both front and back sides

Assembly Instructions

  • After completing the brim, align the two sides and slip stitch through both back loops only to seam shut before beginning the hat body.
  • When switching from brim to hat body, change to the appropriate hook size for your desired hat size and work increases evenly around to reach 66 stitches.
  • Use bobbins for color changes by picking up each bobbin when needed, dropping after use, and pulling across stitches when needed again in following rounds.
  • After completing all decrease rounds and cinching the top closed, use the graph as your guide for embroidery placement on both front and back.
  • Split black worsted yarn into 3 strands and carefully embroider glasses between the indicated rounds using a yarn needle.
  • Embroider the lightning scar using red yarn following the graph placement for authentic character details.
  • Add the wand detail in black or brown on both front and back sides, then finish with a gold spark at the tip for magical flair.
  • Attach your faux fur pompom securely to the top center of the completed beanie to finish your Potter Head creation.

Important Notes

  • πŸ’‘Read through the entirety of this pattern before starting to familiarize yourself with the waistcoat stitch technique and color changing methods
  • πŸ’‘Use loose tension when making the waistcoat stitch to help with ease of insertion into the v of the stitch, tight tension makes it nearly impossible
  • πŸ’‘Using a pointed style crochet hook will help you grab the bar of the v portion of the stitch more easily than rounded hooks
  • πŸ’‘Do not pull carried yarn at a tight tension as this will cause the hat to lose stretch, try the hat on periodically to check
  • πŸ’‘Use the backwards join technique for the most professional looking finish with waistcoat stitch, though you can work continuously with a stitch marker
  • πŸ’‘Various yarns even though worsted and varied tensions can change the measurements of this pattern, gauge swatch if possible
  • πŸ’‘When picking up bobbins and pulling them back across stitches make sure to leave some slack to prevent puckering
  • πŸ’‘Place approximately 20 inch pieces of scarf colors in the first stitch added using the tail and work upwards to complete each stripe

These Potter Head Beanies are designed to celebrate your love for the wizarding world while building your waistcoat stitch skills. The three character designs feature iconic elements that any fan will recognize instantly, from round glasses to lightning scars and magical wands. With clear graphs, helpful bobbin placement diagrams, and adjustable sizing options, this pattern makes creating magical headwear accessible and enjoyable. The waistcoat stitch creates a dense, warm fabric with a beautiful knit-like appearance that's perfect for cold weather adventures. Top it off with a fluffy pompom and you've got a beanie worthy of the Great Hall! 🧢 Happy crocheting! 🧡✨

You ask,

we answer.

FAQs

What is the waistcoat stitch and why does it look like knitting?

The waistcoat stitch (also called center post stitch or knit stitch) is worked by inserting your hook into the center of the V-shaped post of the stitch below rather than the top loops. This creates a fabric that closely mimics the stockinette stitch in knitting with a smooth, dense texture perfect for structured projects like hats.

How do I know which hook size to use for my beanie?

Always use a 4.5mm hook for the brim regardless of size. For the hat body, use 5.5mm (I/9) for child ages 6-10, 6mm (J/10) for ages 11+ to adult, or 6.5mm (K/10.5) for large adult sizes with head circumferences of 23-24 inches.

What are bobbins and how do I use them for color changes?

Bobbins are small holders for yarn that help manage multiple colors in your project. Pick up each bobbin when needed for a color, drop it after use, then pick it back up in the following round by pulling it across the stitches you just made. Always leave slack when pulling across to prevent puckering.

Can I make this beanie without the backwards join technique?

Yes, you can work continuously in a spiral using a stitch marker to track your rounds instead of joining each round. The backwards join creates the cleanest look with waistcoat stitch, but continuous rounds work well too and create a seamless appearance.

How do I adjust the pattern if my brim doesn't fit correctly?

Try the brim on before starting the hat body. You can add or remove rows from the brim to adjust fit, then make sure to reach 66 stitches when you begin the hat body by adjusting your increases accordingly in the first round after the brim.

Why is my waistcoat stitch so tight and hard to work into?

This is the most common issue with waistcoat stitch. You need to use very loose tension and consider going up a hook size or two from what you normally use. Using a pointed hook also helps insert into the V-shaped post more easily.

How do I add the embroidered details without them looking messy?

Split your worsted weight yarn into just 3 strands or use sport weight yarn for finer details. Follow the graph carefully for placement and use small, even stitches. The glasses go between rounds 13-14 based on the graph positioning.

Can I make these beanies in different color schemes?

Absolutely! While the pattern uses specific wizarding world colors, you can substitute any color combination you prefer. Just make sure to maintain contrast between colors so the graph design elements remain visible.