🧢 Beautiful ✨ Detailed πŸ’ Adorable

Dog Phone Pouch Amigurumi Pattern

Dog Phone Pouch Amigurumi Pattern
4.2β˜… Rating
6-8 Hours Time Needed
1.6K Made This
βœ‚οΈ

Intermediate Level

Ideal for those with basic knitting experience, featuring slightly more advanced stitches and techniques to expand your skills.

⏱️

All-Day Adventure

Requires 8-10 hours, ideal for a full day of immersive knitting.

🐾

Pocket Pal

A mini friend to carry anywhere, providing comfort and companionship in a perfectly portable size.

About This Dog Phone Pouch Amigurumi Pattern

This Dog Phone Pouch pattern combines practicality with pure adorable charm. The pouch is worked in spirals using x-stitch technique, creating a sturdy yet flexible fabric perfect for protecting your phone. The dog's head is carefully crafted with safety eyes and detailed features including a muzzle, tongue, and floppy ears. The pattern includes complete instructions for creating a functional shoulder strap and assembling all the cute components including little legs, arms, and even a tiny bone accessory.

Dog Phone Pouch Amigurumi Pattern crochet pattern - detailed view of completed project

The finished pouch measures approximately 17cm in length and 10cm in width, making it perfect for most standard smartphones. The pattern uses sport weight yarn and requires basic amigurumi techniques along with functional crochet construction skills.

Why You'll Love This Dog Phone Pouch Amigurumi Pattern

I absolutely love this pattern because it perfectly blends functionality with creativity! There's something incredibly satisfying about making something that's both useful and adorable. I love how the dog's personality shines through with those sweet safety eyes and floppy ears. The shoulder strap makes it practical for everyday use, and every time I see that little bone detail, it makes me smile. This pattern lets you create something truly unique that nobody else will have, and it's such a conversation starter. Plus, the sense of accomplishment when you finish assembling all the pieces and see that cute puppy face looking back at you is absolutely priceless!

Dog Phone Pouch Amigurumi Pattern step 1 - construction progress Dog Phone Pouch Amigurumi Pattern step 2 - assembly progress Dog Phone Pouch Amigurumi Pattern step 3 - details and accessories Dog Phone Pouch Amigurumi Pattern step 4 - final assembly and finishing

Switch Things Up

I love experimenting with different color combinations for this adorable dog pouch! Instead of the classic brown, try making a golden retriever version with golden yellow yarn, or go bold with a spotted dalmatian look using white yarn and black embroidered spots. You could even create a husky version with gray and white color blocking.

For added personality, I sometimes swap the simple button closure for a decorative wooden button shaped like a paw print or bone. You can also customize the size by adjusting your hook size – I've made mini versions using fingering weight yarn and a smaller hook for key chain pouches that hold earbuds or small accessories.

If you want to make it extra special, consider adding embroidered details like eyebrows, freckles, or even a little collar around the neck area using contrasting yarn. I've also experimented with adding a small pocket on the back for cards or cash by working a few additional rounds before finishing.

For gift-giving, I love personalizing these pouches with the recipient's favorite dog breed characteristics. Change the ear shape to pointy triangles for a German Shepherd, make them super long for a Basset Hound, or keep them small and rounded for a Pug. The possibilities are endless and each variation creates a completely unique piece!

Common Mistakes & How to Fix Them

βœ— Not maintaining consistent tension throughout the pouch base can result in an uneven shape that won't hold its form properly βœ— Forgetting to place stitch markers for eye placement in round eleven can lead to misaligned facial features and asymmetrical appearance βœ— Overstuffing the head makes it difficult to attach securely to the pouch and can distort the dog's facial proportions βœ— Skipping the x-stitch technique and using regular single crochet creates a looser fabric that won't protect your phone adequately βœ— Not leaving long enough tails when fastening off ears and limbs makes sewing and assembly frustrating and weak

Dog Phone Pouch Amigurumi Pattern

Create this adorable dog phone pouch that combines functionality with cuteness! This charming crochet pattern features a sweet puppy design complete with floppy ears, a muzzle, and playful details like a little bone accessory. Perfect for keeping your phone safe while adding a handmade touch to your daily essentials. The pouch includes a shoulder strap for easy carrying and a secure button closure. This delightful project makes a wonderful gift for dog lovers or anyone who appreciates unique, handcrafted accessories.

Intermediate 6-8 Hours

Materials Needed for Dog Phone Pouch Amigurumi Pattern

β€” Main Fabric

  • 01
    Sport weight yarn in brown (main color for dog body)
  • 02
    Sport weight yarn in dark brown (for ears and muzzle)
  • 03
    Sport weight yarn in white (for bone accessory)
  • 04
    Sport weight yarn in pink (for tongue detail)
  • 05
    YarnArt Jeans brand recommended or similar sport weight yarn
  • 06
    Polyester fiberfill for stuffing

β€” Tools Required

  • 01
    Crochet hook size 2.3mm
  • 02
    Safety eyes 6mm (2 pieces)
  • 03
    Buttons 15mm (2 pieces)
  • 04
    Stitch markers
  • 05
    Yarn needle for sewing
  • 06
    Scissors
  • 07
    Fabric glue
  • 08
    Polyester fiberfill

Progress Tracker

0% Complete

β€” BAG :

Info :

Work in spirals using x-stitch (yarn under single crochet)

Info :

Make 24 ch, start in the second ch from hook

Round 1 :

22 sc, 3 sc in the last stitch, continue on the other side of the foundation chain, 21 sc, inc (48)

Round 2 :

inc, 21 sc, 3 inc, 21 sc, 2 inc (54)

Round 3 :

inc, 24 sc, 3 inc, 24 sc, 2 inc (60)

Round 4 :

60 sc (60)

Round 5 :

(1 ch, skip 1 stitch, 1 sc in the next stitch) x 30 (60)

Round 6 :

(1 sc in the space of 1 ch, 1 sc in the next stitch) x 30 (60)

Info :

Odd rounds (7, 9, 11, 13, 15...) will be made same as round 5, even rounds (8, 10, 12, 14, 16...) will be made same as round 6. Stop after finishing the 48th round
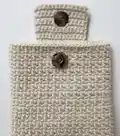
β€” Lid of Pouch :

Info :

Identify the 14 stitches in the middle of the 46th round

Round 1 :

14 sc, turn

Round 2-13 :

14 sc

Info :

Cut and weave the yarn. Sew the button into the lid of pouch
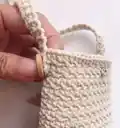
β€” Shoulder Strap :

Info :

Make 3 ch, start in the second ch from hook

Round 1 :

2 sc, turn

Round 2 :

2 sc, turn

Info :

Crochet repeat 2 sc until the shoulder-strap is about 113 cm. Fasten off and weave the yarn. Sew the shoulder-strap and button into the pouch

β€” DOG HEAD :

Info :

Start in brown

Round 1 :

6 sc in the magic ring (6)

Round 2 :

6 inc (12)

Round 3 :

(1 sc, inc) x 6 (18)

Round 4 :

(inc, 2 sc) x 6 (24)

Round 5 :

(3 sc, inc) x 6 (30)

Round 6 :

1 sc, inc, (4 sc, inc) x 5, 3 sc (36)

Round 7-10 :

36 sc (36)

Round 11 :

9 sc, 6 inc, (use marker for the first eye), 5 sc, (use marker for the second eye), 1 sc, 6 inc, 9 sc (48)

Round 12-15 :

48 sc (48)

Round 16 :

9 sc, dec, 8 sc, dec, 6 sc, dec, 8 sc, dec, 9 sc (44)

Round 17 :

9 sc, (dec, 6 sc) x 3, dec, 9 sc (40)

Round 18 :

(dec, 3 sc) x 8 (32)

Round 19 :

(2 sc, dec) x 8 (24)

Info :

Stuff the head

Round 20 :

(dec, 1 sc) x 8 (16)

Round 21 :

8 dec (8)

Info :

Slip stitch and stuff the head, then fasten off and weave the yarn

Info :

Put in the eyes between rows 11-12, leaving 5 stitches space between them

Info :

Use fabric glue to pin the head into the pouch

β€” EAR (make 2) :

Info :

Start in dark brown

Round 1 :

6 sc in the magic ring (6)

Round 2 :

6 inc (12)

Round 3 :

(2 sc, inc) x 4 (16)

Round 4-6 :

16 sc (16)

Round 7 :

(dec, 6 sc) x 2 (14)

Round 8 :

(dec, 5 sc) x 2 (12)

Round 9 :

(2 sc, dec) x 3, slst (9)

Info :

Fasten off the yarn, leaving a long tail for sewing. Don't stuff the ear, flatten and fold the top of the ear. Put in the ears between rows 3-7

β€” MUZZLE :

Info :

Start in dark brown

Round 1 :

Make 4 ch, start in the second ch from hook: inc in the first stitch, 3 sc in the same next stitch, inc in the last stitch (7)

Info :

Fasten off and weave the yarn. Use fabric glue to pin the muzzle into the head between rows 10-14. Sew the tongue with pink yarn

β€” LEG (make 2) :

Info :

Start in brown

Round 1 :

6 sc in the magic ring (6)

Round 2 :

6 inc (12)

Round 3 :

(2 sc, inc) x 4 (16)

Round 4-5 :

16 sc (16)

Round 6 :

(2 sc, dec) x 4 (12)

Round 7 :

(2 sc, dec) x 3 (9)

Round 8-9 :

9 sc (9)

Info :

Slip stitch and fasten the yarn, leaving a long tail for sewing. Stuff up to the 5th row of the leg. Sew the legs at row 4

β€” ARM (make 2) :

Info :

Start in brown

Round 1 :

7 sc in the magic ring (7)

Round 2-7 :

7 sc (7)

Info :

Slip stitch and fasten off the yarn, leaving a long tail for sewing. Don't stuff the arm

β€” BONE :

Info :

Start in white. Make the first side of the bone

Round 1 :

6 sc in the magic ring (6)

Round 2 :

5 sc, inc (7)

Info :

Slip stitch and fasten off the yarn. Make 2 pieces, from the second one don't cut the yarn, join to the first one and continue

Round 3 :

7 sc on the first one, 7 sc on the second one (14)

Round 4 :

(5 sc, dec) x 2 (12)

Round 5 :

(2 sc, dec) x 3 (9)

Round 6-7 :

9 sc (9)

Info :

Slip stitch and fasten off the yarn. Repeat from the beginning to 5th round to make the second side of the bone. Slip stitch and fasten off the yarn, leaving a long tail for sewing. Stuff each side of the bone and sew the two sides together

Assembly Instructions

  • Sew the legs at row 4 of the pouch using the long tails left from fastening off
  • Use fabric glue to paste the bone accessory into the front of the pouch where desired
  • Sew the arms into the pouch and position them to hold or touch the bone for a playful look
  • Use fabric glue to paste the head securely into the top of the pouch, ensuring proper alignment
  • Attach the ears between rows 3-7 of the head by sewing them securely with the long tails
  • Position and glue the muzzle between rows 10-14 of the head, then embroider or sew a small pink tongue
  • Sew the shoulder strap securely to both sides of the pouch and attach the button closure to the lid

Important Notes

  • πŸ’‘Use stitch markers during round 11 to mark exact eye placement for symmetrical facial features
  • πŸ’‘The x-stitch technique creates a tighter, more durable fabric perfect for functional items like phone pouches
  • πŸ’‘Work in continuous spirals without joining for a seamless appearance on the pouch body
  • πŸ’‘Don't overstuff the head or it will be difficult to attach and may look distorted
  • πŸ’‘Use fabric glue sparingly but effectively for attaching the head, muzzle, and bone accessories
  • πŸ’‘Leave long tails when fastening off all pieces to make sewing and assembly easier
  • πŸ’‘The shoulder strap needs to be approximately 113 cm long for comfortable wear

This charming Dog Phone Pouch pattern brings together functionality and adorable design in one delightful project! Perfect for dog lovers and anyone who appreciates unique handmade accessories, this pattern creates a practical pouch with personality. The sweet puppy design features floppy ears, an endearing muzzle, and even a tiny bone accessory that adds extra charm. Whether you're making it for yourself or as a thoughtful gift, this pouch will protect your phone while bringing smiles wherever it goes. 🐾 Happy crocheting! 🧢✨

You ask,

we answer.

FAQs

What size phone will fit in this pouch?

The finished pouch measures 17cm in length and 10cm in width, which fits most standard smartphones. If you need a larger or smaller size, you can adjust by using a different hook size or adding/reducing rounds in the base.

What is x-stitch and why is it used for this pattern?

X-stitch (yarn under single crochet) creates a tighter, more durable fabric compared to regular single crochet. This makes the pouch sturdier and better at protecting your phone while maintaining flexibility.

Can I use a different yarn weight?

Yes, but your finished size will vary. If using worsted weight yarn with a larger hook, your pouch will be bigger. Make sure to adjust your phone size expectations accordingly and test the fit as you work.

Do I need to stuff all the pieces?

No, only the head and legs need stuffing. The arms should remain flat and unstuffed for easier sewing and a more natural look. The ears are also left unstuffed and flattened.

Can I make the shoulder strap adjustable?

Absolutely! Instead of crocheting a fixed-length strap, you can purchase an adjustable bag strap from a craft store and attach it to the pouch for customizable length.

Is fabric glue necessary or can I sew everything?

Fabric glue is recommended for attaching the head, muzzle, and bone as it provides a secure hold on flat surfaces. However, you can sew these pieces if you prefer, just make sure to use small, tight stitches for security.