About This Wallace and Wanda Whale Amigurumi Pattern
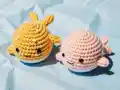
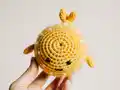
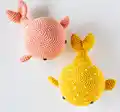
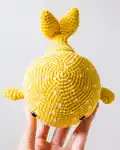
This Wallace and Wanda Whale pattern showcases beautiful amigurumi construction techniques with the body worked from top to bottom in continuous rounds. The pattern offers flexibility with two whale variations - Wallace features an optional fair isle color dot pattern that creates visual interest, while Wanda can be made in solid colors for a cleaner, simpler look. The tail is constructed uniquely by creating two separate fins that are joined together, then shaped to create the distinctive whale tail fluke. Side fins are made separately and attached during assembly for dimensional appeal.

What sets this pattern apart is the detailed fair isle colorwork option and the innovative tail construction method. The pattern includes comprehensive notes on carrying yarn for color changes and achieving professional-looking results with invisible decreases and proper stuffing techniques.
Why You'll Love This Wallace and Wanda Whale Amigurumi Pattern
I absolutely adore this whale pattern because it brings the majesty of ocean life into cuddly, huggable form. There's something incredibly peaceful about working the continuous rounds and watching the whale's body take shape beneath your fingers. The fair isle color dot option for Wallace adds just enough challenge to keep things interesting without being overwhelming, and the sense of accomplishment when you nail those color changes is amazing. I love how the tail construction creates such a realistic whale fluke - that moment when you join the two fins together and see it transform into an actual whale tail is pure magic. The finished whales have such personality with their gentle expressions and graceful proportions. They're the perfect size for display, gifting, or cuddling, and using cotton yarn means they're durable enough to become treasured companions. Plus, once you make one whale, you'll want to create the whole pod in different color combinations.
Switch Things Up
I absolutely love experimenting with different color combinations for these whales beyond the classic tangerine and white. For a more realistic ocean look, I've created whales using deep navy blue or charcoal gray as the main color with light gray or white bellies - they look just like the majestic creatures you'd see breaching in the wild. Pastel versions in soft baby blue, mint green, or lavender with white bellies make the sweetest nursery decorations or baby shower gifts.
The fair isle color dot pattern opens up endless creative possibilities too. Instead of the single-color dots, I've tried using multiple coordinating colors for the dots - imagine rainbow dots on a white whale, or ocean-themed blues and greens on a teal body. You can also modify the dot pattern to create stripes by working entire rounds in alternating colors, or even try your hand at more complex fair isle patterns if you're feeling adventurous.
Size variations are another fun way to customize these whales. I've made tiny keychain versions using sport weight yarn and a 2mm hook (they turn out about 3 inches long), and giant floor pillow whales using super bulky yarn and a 10mm hook that end up around 20 inches long. A family of whales in graduated sizes makes an adorable display. You could also add embellishments like embroidered water spouts coming from the top of the head, tiny crocheted barnacles attached to the body, or even give your whale a little sailor hat for a nautical theme. The possibilities are as endless as the ocean itself!
Common Mistakes & How to Fix Them
✗ Not using a stitch marker to track round beginnings, leading to confusion especially during the extensive body rounds fourteen through twenty-four
✗ Understuffing the body which causes the whale to look deflated and lose its distinctive rounded shape and ocean creature appeal
✗ Forgetting to carry the unused yarn color on the wrong side during fair isle sections, resulting in loose strands and gaps
✗ Placing the safety eyes incorrectly between rounds instead of the specified rounds seventeen and eighteen with thirteen stitches apart spacing
✗ Not stuffing the front portion of the tail adequately while leaving the fins unstuffed, creating an unbalanced tail appearance
✗ Pulling too tightly when working back loop only in round twenty-six, which can create an unintended ridge or puckering effect