🧢 Beautiful ✨ Detailed πŸ’ Adorable

Enchanting Flower Blossom in Pot Amigurumi Pattern

Enchanting Flower Blossom in Pot Amigurumi Pattern
4.5β˜… Rating
6-8 Hours Time Needed
2.7K Made This
βœ‚οΈ

Intermediate Level

Ideal for those with basic knitting experience, featuring slightly more advanced stitches and techniques to expand your skills.

⏱️

Weekend Treat

Takes 5-7 hours, making it an enjoyable project to finish over a couple of days.

🌸

Spring Bloom

Light and fresh designs for warmer days, capturing the renewal and brightness of the season.

About This Enchanting Flower Blossom in Pot Amigurumi Pattern

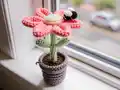
This Flower Blossom pattern is a stunning intermediate project that teaches you multiple amigurumi techniques in one beautiful creation. You'll learn how to craft individual petals that attach seamlessly to form a realistic flower, create a sturdy stem with optional wire reinforcement, and construct a dimensional pot with decorative edging. The pattern includes clever construction methods like working in back loops only and front loops only to create texture and shape, plus the adorable addition of a tiny bumblebee companion with delicate wings.

Enchanting Flower Blossom in Pot Amigurumi Pattern crochet pattern - detailed view of completed project

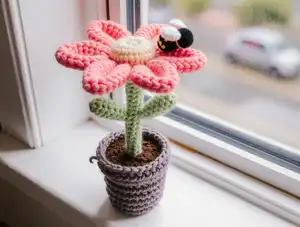
Using sport weight cotton yarn in vibrant spring colors, this project creates a lasting botanical display that's perfect for desks, shelves, or as a thoughtful gift. The detailed assembly instructions with photo references ensure your flower stands beautifully upright.

Why You'll Love This Enchanting Flower Blossom in Pot Amigurumi Pattern

I absolutely adore this pattern because it's like capturing a perfect moment of spring forever! There's something magical about creating a flower that will never wilt, never need watering, and will brighten up any space year-round. I love how this pattern challenges you just enough with the multiple components – six petals, two leaves, the stem, pot, and even a sweet little bumblebee – but each piece is manageable and fun to make. The sense of accomplishment when you assemble everything and watch your flower come to life is incredible! I especially appreciate the attention to detail, like the optional wire reinforcement for the stem and the cardboard base for stability, which shows the designer really thought about functionality. Plus, working with sport weight yarn means you get beautiful stitch definition that makes your flower look professionally crafted. It's the perfect project for rainy weekends when you're craving a touch of sunshine and nature!

Enchanting Flower Blossom in Pot Amigurumi Pattern step 1 - construction progress Enchanting Flower Blossom in Pot Amigurumi Pattern step 2 - assembly progress Enchanting Flower Blossom in Pot Amigurumi Pattern step 3 - details and accessories Enchanting Flower Blossom in Pot Amigurumi Pattern step 4 - final assembly and finishing

Switch Things Up

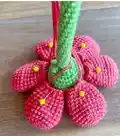
I love experimenting with different color combinations for this flower pattern to match various seasons and decor styles! While the original uses soft pink petals, you could create a vibrant red rose, sunny yellow sunflower, or elegant purple iris by simply changing the petal color. For a romantic garden feel, try making multiple flowers in different shades of pink, lavender, and white to create an entire crochet flower arrangement.

The pot offers wonderful customization opportunities too. Instead of light brown, consider a terracotta orange for a traditional look, or go modern with gray, white, or even pastels. You could even add decorative details by surface crocheting patterns or stripes onto the pot, or embroidering small designs like hearts, stars, or initials.

For seasonal variations, create autumn flowers using burnt orange, deep red, and golden yellow, or make winter versions with white and silver yarn, perhaps adding tiny beads or sequins to the petals for a frost-like sparkle. Spring gardens could feature multiple flowers in Easter pastels, while summer bouquets might use bright, bold colors.

I also love making variations of the bumblebee by creating different insects – try a ladybug with red wings and black spots, a butterfly with colorful patterned wings, or even a tiny dragonfly with elongated wings. You could make several different pollinators to create a whole garden ecosystem!

For gift-giving, personalize the flower by matching the recipient's favorite color or birth month flower. You could create a whole bouquet of different flowers using the same base pattern but varying the petal shapes and numbers. The possibilities truly are endless, and each variation tells its own unique story!

Common Mistakes & How to Fix Them

βœ— Not stuffing the stem firmly enough causes the flower to droop or fall over instead of standing upright beautifully βœ— Forgetting to mark the beginning of rounds leads to confusion during assembly and misaligned petals around the center piece βœ— Skipping the cardboard base in the pot bottom results in an unstable flower that tips over easily when displayed βœ— Not centering the dirt hole properly in the pot makes it difficult to insert the stem and achieve a balanced standing flower βœ— Rushing through the sepal picot stitches creates uneven decorative elements around the stem that look messy instead of delicate βœ— Adding stuffing to petals and leaves when the pattern says not to creates bulky, unrealistic flower parts that don't drape naturally

Enchanting Flower Blossom in Pot Amigurumi Pattern

Bring the beauty of spring into your home year-round with this charming flower blossom amigurumi pattern! This delightful project features a fully bloomed flower with six delicate pink petals, a cheerful yellow center, and realistic green leaves, all nestled in an adorable brown pot with decorative dirt. Standing at 12cm tall by 8.5cm wide, this finished piece includes an optional adorable bumblebee with white wings that can perch on your flower. The stem can be reinforced with wire for added stability, making this both a beautiful decorative piece and a wonderful gift for plant lovers, nature enthusiasts, or anyone who appreciates handmade botanical decor that never needs watering.

Intermediate 6-8 Hours

Materials Needed for Enchanting Flower Blossom in Pot Amigurumi Pattern

β€” Main Fabric

  • 01
    Schachenmayr Catania sport weight cotton yarn in pink (Kamelie 00252)
  • 02
    Schachenmayr Catania sport weight cotton yarn in light yellow (Honig 00206)
  • 03
    Schachenmayr Catania sport weight cotton yarn in green (Greenery 00418)
  • 04
    Schachenmayr Catania sport weight cotton yarn in light brown (Teddy 00161)
  • 05
    Schachenmayr Catania sport weight cotton yarn in brown (Marone 00157)
  • 06
    Schachenmayr Catania sport weight cotton yarn in yellow (Sonne 00208)
  • 07
    Schachenmayr Catania sport weight cotton yarn in black (Schwarz 00110)
  • 08
    Schachenmayr Catania sport weight cotton yarn in white (Weiss 00106)

β€” Tools Required

  • 01
    Crochet hook 2mm
  • 02
    Sewing needle
  • 03
    Stitch marker
  • 04
    Stuffing material
  • 05
    Cardboard for pot base
  • 06
    Optional wire for stem reinforcement
  • 07
    Scissors

Progress Tracker

0% Complete

β€” Petals (Make 6) :

Info :

Using pink yarn

Round 1 :

6 sc in mr (6)

Round 2 :

6 inc (12)

Round 3 :

(1 sc, 1 inc) x 6 (18)

Round 4 :

(2 sc, 1 inc) x 6 (24)

Round 5-7 :

24 sc (24) (3 rounds)

Round 8 :

(2 sc, 1 dec) x 6 (18)

Round 9-11 :

18 sc (18) (3 rounds)

Round 12 :

(1 sc, 1 dec) x 6 (12)

Round 13 :

12 sc (12)

Info :

Cut the yarn and fasten off, leaving a long tail for sewing. Do not add stuffing.

β€” Stem (Make 1) :

Info :

Using green yarn

Round 1 :

8 sc in mr (8)

Round 2-30 :

8 sc (8) (29 rounds)

Infos :

Add stuffing material to the stem as you go along. It is important to stuff the stem very firmly to make sure the finished project stands up. Adding wire is encouraged to help the flower stand up, especially if your stitches tend to be looser.

Round 31 :

BLO (1 sc, 1 inc) x 4 (12)

Round 32 :

12 inc (24)

Round 33 :

(3 sc, 1 inc) x 6 (30)

Round 34 :

(9 sc, 1 inc) x 3 (33)

Round 35 :

33 sc (33)

Info :

Cut the yarn and fasten off invisibly.

β€” Sepal :

Infos :

Add the sepal to the stem. Holding the flower with the stem facing up, insert the hook into the last stitch of the remaining loops of round 31 and attach green yarn. Ch 4, 3-ch picot, ch 1, slst into the next loop in the row. Repeat 7 more times in the remaining loops for a total of 8 sepal. Cut yarn and fasten off invisibly.

β€” Flower Center (Make 1) :

Info :

Using light yellow yarn

Round 1 :

6 sc in mr (6)

Round 2 :

6 inc (12)

Round 3 :

(1 sc, 1 inc) x 6 (18)

Round 4 :

(2 sc, 1 inc) x 6 (24)

Round 5 :

(3 sc, 1 inc) x 6 (30)

Round 6 :

(9 sc, 1 inc) x 3 (33)

Round 7-8 :

33 sc (33) (2 rounds)

Info :

Cut the yarn and fasten off, leaving a long tail for sewing.

β€” Leaves (Make 2) :

Info :

Using green yarn

Round 1 :

5 sc in mr (5)

Round 2 :

(1 sc, 1 inc) x 2, 1 sc (7)

Round 3 :

(2 sc, 1 inc) x 2, 1 sc (9)

Round 4 :

(2 sc, 1 inc) x 3 (12)

Round 5-7 :

12 sc (12) (3 rounds)

Round 8 :

(2 sc, 1 dec) x 3 (9)

Round 9 :

(1 sc, 1 dec) x 3 (6)

Info :

Cut the yarn and fasten off, leaving a long tail for sewing. Do not add stuffing.

β€” Pot (Make 1) :

Info :

Using light brown yarn

Round 1 :

6 sc in mr (6)

Round 2 :

6 inc (12)

Round 3 :

(1 sc, 1 inc) x 6 (18)

Round 4 :

(2 sc, 1 inc) x 6 (24)

Round 5 :

(3 sc, 1 inc) x 6 (30)

Round 6 :

(4 sc, 1 inc) x 6 (36)

Round 7 :

(5 sc, 1 inc) x 6 (42)

Round 8 :

BLO 42 sc (42)

Round 9-11 :

42 sc (42) (3 rounds)

Round 12 :

(13 sc, 1 inc) x 3 (45)

Round 13-15 :

45 sc (45) (3 rounds)

Round 16 :

(14 sc, 1 inc) x 3 (48)

Round 17-19 :

48 sc (48) (3 rounds)

Round 20 :

FLO (7 dc, 1 dcinc) x 6 (54)

Round 21 :

54 sc (54)

Info :

Cut the yarn and fasten off invisibly.

β€” Dirt (Make 1) :

Infos :

Using brown yarn. The dirt will go inside the pot and is created in two parts: the hole in which the flower will be inserted and the top of the dirt. Begin by crocheting the hole.

Round 1 :

6 sc in mr (6)

Round 2 :

6 inc (12)

Round 3-14 :

12 sc (12) (12 rounds)

Info :

Cut the yarn and fasten off invisibly.

Infos :

Begin to crochet the top of the dirt. Holding the hole with the opening facing up, insert the hook from the inside of the hole going out. Re-attach the yarn and continue to crochet the dirt top. The wrong side of the stitches should be on the bottom of the dirt when you are finished. Make sure to insert your hook correctly when re-attaching your yarn!

Round 15 :

(1 sc, 1 inc) x 6 (18)

Round 16 :

(2 sc, 1 inc) x 6 (24)

Round 17 :

(3 sc, 1 inc) x 6 (30)

Round 18 :

(4 sc, 1 inc) x 6 (36)

Round 19 :

(5 sc, 1 inc) x 6 (42)

Round 20 :

(6 sc, 1 inc) x 6 (48)

Info :

Cut the yarn and fasten off, leaving a long tail for sewing.

β€” Bumblebee Wing (Make 2) :

Info :

Using white yarn, ch 4. Starting in the 2nd chain from the hook and working into both sides of the chain.

Round 1 :

1 sc, 1 hdc, 5 dc in the same stitch, 1 hdc, 1 sc (9)

Info :

Cut the yarn and fasten off, leaving a long tail for sewing.

β€” Bumblebee Body (Make 1) :

Info :

Starting with black yarn

Round 1 :

6 sc in mr (6)

Round 2 :

6 inc (12)

Round 3 :

12 sc (12)

Info :

Switch to yellow yarn

Round 4-5 :

12 sc (12) (2 rounds)

Info :

Switch to black yarn

Round 6-7 :

12 sc (12) (2 rounds)

Info :

Switch to yellow yarn

Round 8 :

6 dec (6)

Infos :

Cut the yarn and use the yarn tail to close the remaining stitches. Begin to add stuffing material, adding more as you go along if needed.

Assembly Instructions

  • Attach the stem to the flower center piece by placing the center on top of the stem and sewing them together using the yarn tail, adding stuffing before closing the last stitches
  • Sew all six petals around the connection point where the stem and center meet, positioning them closely next to each other with minimal space between petals
  • Position the two leaves on either side of the stem and sew them in place using the long yarn tails left from crocheting
  • Cut a piece of cardboard to fit the bottom of the pot and insert it for added stability before continuing assembly
  • Attach the dirt piece to the pot by sewing into the remaining loops of round 20, adding stuffing carefully while centering the hole properly before closing
  • Insert the stem through the centered hole in the dirt and adjust positioning so the flower stands upright without tipping over
  • Sew the bumblebee wings to the body between rounds 4 and 5 using the long yarn tails, then position the bee on the flower as desired

Important Notes

  • πŸ’‘Work stitches tightly throughout the pattern to achieve the proper shape and structure for all components
  • πŸ’‘Each round is worked in a spiral and does not need to be joined unless the pattern specifically indicates otherwise
  • πŸ’‘Adding wire reinforcement to the stem is especially important if your stitches tend to be looser to ensure the flower stands upright
  • πŸ’‘Take your time when stuffing the pot and dirt assembly to ensure the hole stays centered for proper stem insertion
  • πŸ’‘Do not add stuffing to the petals or leaves as this will prevent them from having a natural, realistic draping appearance
  • πŸ’‘Use stitch markers to track the beginning of rounds, particularly when working on the larger pieces like the pot and dirt

This enchanting Flower Blossom pattern brings the joy of gardening indoors without any of the maintenance! Perfect for plant lovers who want everlasting beauty or anyone seeking a cheerful handmade decoration, this pattern combines multiple intermediate techniques into one stunning botanical display. The optional bumblebee adds an extra touch of whimsy that makes this piece truly special. Whether displayed on your desk, gifted to a friend, or used to brighten up a child's room, this flower will bloom forever and bring smiles for years to come. 🌸🐝 Happy crocheting! 🧢✨

You ask,

we answer.

FAQs

Do I need to use wire reinforcement in the stem?

Wire reinforcement is optional but highly recommended, especially if your stitches tend to be looser. The wire helps the flower stand upright and maintain its shape. If you crochet tightly and stuff the stem very firmly, you may not need wire, but it provides extra stability.

Can I use a different yarn weight for this pattern?

Yes, but the finished size will change significantly. The pattern is designed for sport weight yarn with a 2mm hook resulting in a 12cm tall flower. Using thicker yarn and a larger hook will create a bigger flower, while thinner yarn will make it smaller. Adjust your expectations for the final dimensions accordingly.

Why shouldn't I stuff the petals and leaves?

Leaving the petals and leaves unstuffed allows them to have a natural, realistic appearance with gentle draping and movement. Stuffing them would make them bulky and stiff, losing the delicate flower-like quality that makes this project so charming.

How do I make sure my flower stands up properly in the pot?

The key is firmly stuffing the stem, adding the cardboard base to the pot bottom, and carefully centering the dirt hole during assembly. Take your time when attaching the dirt to the pot, adjusting as needed to keep the hole centered before closing all stitches.

What's the best way to create the picot stitches for the sepal?

Work slowly and count your chains carefully for each picot. Chain 4, then work 3 chains and slip stitch back into the first of those 3 chains to create the picot bump, then chain 1 more and slip stitch into the next available loop. Practice on a sample piece first if you're new to picot stitches.