🧶 Beautiful ✨ Detailed 💝 Adorable

Christmas Bunny Amigurumi Pattern

Christmas Bunny Amigurumi Pattern
4.5★ Rating
8-10 Hours Time Needed
1.2K Made This
✂️

Intermediate Level

Ideal for those with basic knitting experience, featuring slightly more advanced stitches and techniques to expand your skills.

⏱️

All-Day Adventure

Requires 8-10 hours, ideal for a full day of immersive knitting.

🎄

Holiday Cheer

Festive fun for the season, bringing handmade magic to celebrations and creating new family traditions.

About This Christmas Bunny Amigurumi Pattern

This Christmas Bunny pattern brings together classic amigurumi construction with festive holiday details. The bunny features a gray and white color-blocked body created using the jacquard technique, giving it a unique coat pattern. Button-jointed limbs allow for poseable positioning, while the striped stockings and matching cap add that perfect Christmas touch. The pattern includes detailed instructions for creating perfectly shaped ears, an adorable fluffy tail, and delicate embroidered facial features that bring personality to your bunny.

Christmas Bunny Amigurumi Pattern crochet pattern - detailed view of completed project

Working with sport weight yarn and a small hook creates a tight, professional finish that's perfect for gift-giving. The combination of different yarn textures, including fluffy yarn for the cap's pom-pom, adds visual interest and makes this bunny truly special.

Why You'll Love This Christmas Bunny Amigurumi Pattern

I absolutely love how this pattern combines technical skill-building with pure holiday joy! The jacquard technique sections teach you color-working skills while creating that beautiful coat pattern, and the button joints make the bunny poseable so you can adjust their stance for different displays. The striped accessories are surprisingly fun to make with their color-changing rounds, and seeing those festive stripes come together is so satisfying. What really makes this pattern special is the attention to detail in the finishing touches—the embroidered nose, the tinted cheeks, and those sweet eyelids give the bunny such a gentle, loving expression. Plus, at 8-9 inches tall, it's the perfect size for holiday decorating without taking up too much space. I find myself making multiples because they're just too cute to stop at one!

Christmas Bunny Amigurumi Pattern step 1 - construction progress Christmas Bunny Amigurumi Pattern step 2 - assembly progress Christmas Bunny Amigurumi Pattern step 3 - details and accessories Christmas Bunny Amigurumi Pattern step 4 - final assembly and finishing

Switch Things Up

I love how versatile this Christmas Bunny pattern is for creative customization! While the traditional red, green, and minty color scheme is absolutely festive, I've experimented with so many fun variations that gave each bunny its own personality.

For a winter wonderland version, I swapped the red and green stripes for icy blues, silver grays, and pristine whites, creating a bunny that looks like it just hopped out of a snowy forest. The effect was magical, especially when I used sparkly yarn for the cap!

I've also made Valentine's Day versions using pink and red color combinations, and an autumn bunny with burnt orange, deep burgundy, and golden yellow stripes that looked perfect for Thanksgiving decorating. The pattern works beautifully with any color palette you choose.

One of my favorite modifications was making the bunny entirely in natural, undyed yarn colors - creamy whites, soft tans, and warm browns - for a rustic, farmhouse aesthetic. I added a small fabric bow around the neck instead of the striped accessories for a simpler, everyday look.

You can also adjust the size by using different yarn weights! I've made a tiny version with fingering weight yarn and a 1.5mm hook that turned out to be the perfect tree ornament at just 4 inches tall. On the flip side, using worsted weight yarn and a larger hook creates a substantial 12-inch bunny that makes an impressive statement piece.

For kids' rooms, I've experimented with bright, bold colors like hot pink, electric blue, and lime green for a modern, playful vibe. The button joints mean little ones can pose their bunny however they like, which adds an interactive play element.

Don't be afraid to mix yarn textures either - I once used a fuzzy eyelash yarn for the entire body instead of just the cap, creating an ultra-soft, cuddly version that became an instant favorite. The embroidered facial features take on different personalities depending on how you position them, so play around with eye placement and expression until you find the look you love!

Common Mistakes & How to Fix Them

✗ Forgetting to place stitch markers when working in continuous rounds can cause you to lose track of your starting point, especially during the body's jacquard sections—always mark your first stitch ✗ Not stuffing firmly enough as you go, particularly in the legs and body, results in a floppy bunny that won't stand properly—stuff progressively and firmly for best structure ✗ Pulling too tightly when sewing on button joints can create puckering or uneven limb attachment—secure buttons firmly but allow slight movement for natural posing ✗ Rushing through the color changes in the striped stockings and cap can create messy transitions—always carry yarn loosely on the inside and weave in ends carefully for clean stripes ✗ Skipping the facial embroidery details or placing safety eyes incorrectly changes the bunny's expression dramatically—follow the placement guide carefully between rounds 7-8 with proper spacing for the sweetest look

Christmas Bunny Amigurumi Pattern

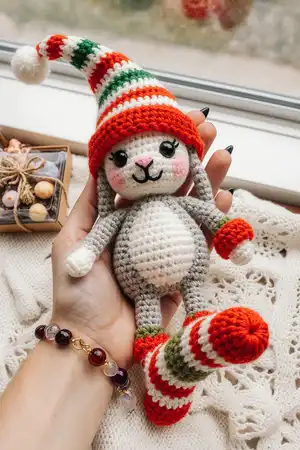
Create an adorable festive friend with this delightful Christmas Bunny pattern! Standing at 8-9 inches tall, this charming bunny comes dressed in colorful striped stockings and a matching striped cap, perfect for holiday decorating or gift-giving. The pattern features detailed instructions for creating a sweet gray and white bunny with poseable arms and legs attached with button joints. Complete with embroidered facial features and festive accessories, this project combines traditional amigurumi techniques with cheerful Christmas colors to bring holiday magic to your crochet collection.

Intermediate 8-10 Hours

Materials Needed for Christmas Bunny Amigurumi Pattern

— Main Fabric

  • 01
    Sport weight 4ply yarn YarnArt Jeans (50g/160m) in red (N56), black (N53), white (N62), minty (N79), gray (N80), and green (N82)
  • 02
    DK light worsted fluffy yarn Alize Softy (50g/115m) in white (N55)

— Tools Required

  • 01
    1.75mm crochet hook
  • 02
    Stuffing material (fiberfill)
  • 03
    Safety eyes 12mm
  • 04
    Pink pastel for toning cheeks
  • 05
    Needle for sewing pieces
  • 06
    4 buttons for limb attachment
  • 07
    Stitch markers
  • 08
    Scissors
  • 09
    Embroidery needle for facial details

Progress Tracker

0% Complete

— Arms (make 2) :

Round 1 :

With White yarn. 6 sc in MR. Place row marker here. Stuff with fiberfill in the process.

Round 2 :

(1 sc, inc) x 3 (9)

Round 3 :

(2 sc, inc) x 3 (12)

Round 4 :

12 sc (12)

Round 5 :

Change color to Gray. BLO (2 sc, dec) x 3 (9)

Rounds 6-11 :

9 sc (6 rounds)

Round 12 :

3 sc, 3 inc, 3 sc (12)

Rounds 13-19 :

12 sc (7 rounds)

Round 20 :

6 dec. Fasten off, cut the yarn, weave in the yarn ends.

— Tail :

Round 1 :

With White yarn. 6 sc in MR. Place row marker here.

Round 2 :

6 inc (12)

Round 3 :

(1 sc, inc) x 6 (18)

Round 4 :

18 sc (18)

Round 5 :

(1 sc, dec) x 6 (12)

Round 6 :

6 dec (6). Stuff with fiberfill. Leave a long tail for sewing.

— Legs (make 2) :

Round 1 :

With White yarn. 6 sc in MR. Place row marker here.

Round 2 :

6 inc (12)

Round 3 :

12 sc (12)

Round 4 :

Change color to Gray. 12 sc (12)

Rounds 5-9 :

12 sc (5 rounds). Stuff with fiberfill in the process.

Info :

Crochet the heel in rows with Gray yarn: Row 1: 5 sc, turn (5). Row 2: ch1, 5 sc, turn (5). Row 3: ch1, 5 sc, turn (5). Row 4: ch1, 5 sc, turn (5).

Round 10 :

Return to crochet the legs. Work in a spiral: dec, sc, 3 dec, 5 sc, 2 dec (12)

Round 11 :

12 sc (12)

Round 12 :

(2 sc, dec) x 3 (9)

Rounds 13-14 :

9 sc (2 rounds)

Round 15 :

(2 sc, inc) x 3 (12)

Round 16 :

12 sc (12)

Round 17 :

(3 sc, inc) x 3 (15)

Rounds 18-20 :

15 sc (3 rounds)

Round 21 :

(4 sc, inc) x 3 (18)

Rounds 22-27 :

18 sc (6 rounds)

Round 28 :

(1 sc, dec) x 6 (12)

Round 29 :

6 dec. Stuff the legs with fiberfill. Fasten off, cut the yarn, weave in the ends.

— Body :

Round 1 :

With Gray yarn. 6 sc in MR. Place row marker here.

Round 2 :

6 inc (12)

Round 3 :

(1 sc, inc) x 6 (18)

Round 4 :

(2 sc, inc) x 6 (24)

Round 5 :

(3 sc, inc) x 6 (30)

Round 6 :

(4 sc, inc) x 6 (36)

Round 7 :

(5 sc, inc) x 6 (42)

Round 8 :

(6 sc, inc) x 6 (48)

Round 9 :

(7 sc, inc) x 6 (54)

Round 10 :

54 sc (54)

Info :

Attention! Crochet in jacquard technique from Round 11 to 27. Add White yarn (these stitches are highlighted in red in pattern).

Round 11 :

10 sc Gray, 8 sc White, 36 sc Gray (54)

Round 12 :

9 sc Gray, 10 sc White, 35 sc Gray (54)

Round 13 :

8 sc Gray, 12 sc White, 34 sc Gray (54)

Round 14 :

8 sc Gray, 12 sc White, 34 sc Gray (54)

Round 15 :

8 sc Gray, 12 sc White, 9 sc Gray, (2 sc, dec) x 6, 1 sc Gray (48)

Round 16 :

9 sc Gray, 10 sc White, 29 sc Gray (48)

Round 17 :

9 sc Gray, 10 sc White, 29 sc Gray (48)

Round 18 :

9 sc Gray, 10 sc White, 29 sc Gray (48)

Round 19 :

6 sc Gray, dec, 2 sc Gray, 8 sc White, 1 sc Gray, dec, 1 sc, dec, (6 sc, dec) x 3 (42)

Round 20 :

9 sc Gray, 8 sc White, 25 sc Gray (42)

Round 21 :

9 sc Gray, 8 sc White, 25 sc Gray (42)

Round 22 :

9 sc Gray, 8 sc White, 25 sc Gray (42)

Round 23 :

5 sc Gray, dec, 3 sc Gray, 6 sc White, dec, 1 sc, dec, (5 sc, dec) x 3 (36)

Round 24 :

9 sc Gray, 6 sc White, 21 sc Gray (36)

Round 25 :

9 sc Gray, 6 sc White, 21 sc Gray (36)

Round 26 :

4 sc Gray, dec, 4 sc Gray, 2 dec, (dec, 4 sc) x 3, 4 sc Gray (30)

Round 27 :

9 sc Gray, 2 sc White, 19 sc Gray (30). Stuff the body with fiberfill. Leave a long tail for sewing.

— Head :

Round 1 :

With White yarn. 6 sc in MR. Place row marker here.

Round 2 :

6 inc (12)

Round 3 :

3 inc, 3 sc, 3 inc, 3 sc (18)

Round 4 :

(2 sc, inc) x 6 (24)

Round 5 :

(3 sc, inc) x 6 (30)

Round 6 :

(4 sc, inc) x 6 (36)

Rounds 7-9 :

36 sc (3 rounds)

Round 10 :

Change color to Gray. Attention! Crochet in jacquard technique from Round 10 to 13. Add white yarn. (5 sc, inc) x 2, 1 sc, inc, 8 sc, inc, 1 sc, (5 sc, inc) x 2 (42)

Info :

Insert the eyes between rounds 7-8 at a distance of 10-12 stitches.

Round 11 :

(6 sc, inc) x 2, 3 sc, inc, 6 sc, inc, 3 sc, (6 sc, inc) x 2 (48)

Round 12 :

(7 sc, inc) x 2, 5 sc, inc, 4 sc, inc, 5 sc, (7 sc, inc) x 2 (54)

Round 13 :

(8 sc, inc) x 2, 7 sc, inc, 2 sc, inc, 7 sc, (8 sc, inc) x 2 (60)

Rounds 14-21 :

With Gray yarn. 60 sc (8 rounds)

Round 22 :

(8 sc, dec) x 6 (54)

Round 23 :

(7 sc, dec) x 6 (48)

Round 24 :

(6 sc, dec) x 6 (42)

Round 25 :

(5 sc, dec) x 6 (36)

Round 26 :

(4 sc, dec) x 6 (30)

Round 27 :

(3 sc, dec) x 6 (24). Stuff the head with fiberfill.

Round 28 :

(2 sc, dec) x 6 (18)

Round 29 :

(1 sc, dec) x 6 (12)

Round 30 :

6 dec (6). Fasten off, cut the yarn, weave in the ends.

— Ears (make 2) :

Round 1 :

With Gray yarn. 6 sc in MR. Place row marker here.

Round 2 :

6 inc (12)

Round 3 :

12 sc (12)

Round 4 :

(1 sc, inc) x 6 (18)

Round 5 :

18 sc (18)

Round 6 :

(2 sc, inc) x 6 (24)

Round 7 :

24 sc (24)

Round 8 :

(3 sc, inc) x 6 (30)

Rounds 9-18 :

30 sc (10 rounds)

Round 19 :

(3 sc, dec) x 6 (24)

Rounds 20-26 :

24 sc (7 rounds)

Round 27 :

(2 sc, dec) x 6 (18)

Rounds 28-31 :

18 sc (4 rounds)

Round 32 :

(1 sc, dec) x 6 (12)

Rounds 33-34 :

12 sc (2 rounds). Do not stuff. Leave a long tail for sewing.

— Right Stocking :

Round 1 :

With Red yarn. 6 sc in MR. Place row marker here.

Round 2 :

6 inc (12)

Round 3 :

(1 sc, inc) x 6 (18)

Round 4 :

18 sc (18)

Round 5 :

Change color to Minty. 18 sc (18)

Round 6 :

Change color to Green. 18 sc (18)

Round 7 :

Change color to Red. 18 sc (18)

Round 8 :

Change color to Minty. 18 sc (18)

Round 9 :

Change color to Green. 18 sc (18)

Round 10 :

Change color to Red. 18 sc (18)

Round 11 :

Change color to Minty. 18 sc (18)

Info :

Change color to Red. Crochet the heel in rows with Red yarn: Row 1: (do not turn) 8 sc, turn (8). Row 2: ch1, 8 sc, turn (8). Row 3: ch1, 8 sc, turn (8). Row 4: ch1, 8 sc, turn (8).

Round 12 :

Change color to Green. Return to crochet the stocking. Work in a spiral: dec, 4 sc, 4 dec, 6 sc, 3 dec (18)

Round 13 :

Change color to Red. 18 sc (18)

Round 14 :

Change color to Minty. 18 sc (18)

Round 15 :

Change color to Green. 18 sc (18)

Round 16 :

Change color to Red. 18 sc (18)

Round 17 :

Change color to Minty. 18 sc (18)

Round 18 :

Change color to Green. 18 sc (18)

Round 19 :

Change color to Red. 18 dc, sl st (18)

Round 20 :

ch2, (FPdc, BPdc) x 9, sl st. Fasten off, cut the yarn, weave in the yarn ends.

— Left Stocking :

Round 1 :

With Green yarn. 6 sc in MR. Place row marker here.

Round 2 :

6 inc (12)

Round 3 :

(1 sc, inc) x 6 (18)

Round 4 :

18 sc (18)

Round 5 :

Change color to Red. 18 sc (18)

Round 6 :

Change color to Minty. 18 sc (18)

Round 7 :

Change color to Green. 18 sc (18)

Round 8 :

Change color to Red. 18 sc (18)

Round 9 :

Change color to Minty. 18 sc (18)

Round 10 :

Change color to Green. 18 sc (18)

Round 11 :

Change color to Red. 18 sc (18)

Info :

Change color to Green. Crochet the heel in rows with Green yarn: Row 1: (do not turn) 8 sc, turn (8). Row 2: ch1, 8 sc, turn (8). Row 3: ch1, 8 sc, turn (8). Row 4: ch1, 8 sc, turn (8).

Round 12 :

Change color to Minty. Return to crochet the stocking. Work in a spiral: dec, 4 sc, 4 dec, 6 sc, 3 dec (18)

Round 13 :

Change color to Green. 18 sc (18)

Round 14 :

Change color to Red. 18 sc (18)

Round 15 :

Change color to Minty. 18 sc (18)

Round 16 :

Change color to Green. 18 sc (18)

Round 17 :

Change color to Red. 18 sc (18)

Round 18 :

Change color to Minty. 18 sc (18)

Round 19 :

Change color to Green. 18 dc, sl st (18)

Round 20 :

ch2, (FPdc, BPdc) x 9, sl st. Fasten off, cut the yarn, weave in the yarn ends.

— Cap :

Round 1 :

With White yarn (Alize Softy). 6 sc in MR. Place row marker here.

Round 2 :

6 inc (12)

Round 3 :

(1 sc, inc) x 6 (18)

Rounds 4-5 :

18 sc (2 rounds)

Round 6 :

(1 sc, dec) x 6 (12)

Round 7 :

6 dec (6)

Round 8 :

Change color to Green. 6 sc (6)

Round 9 :

Change color to Red. 6 sc (6)

Round 10 :

Change color to Minty. (1 sc, inc) x 3 (9)

Round 11 :

Change color to Green. 9 sc (9)

Round 12 :

Change color to Red. (2 sc, inc) x 3 (12)

Round 13 :

Change color to Minty. 12 sc (12)

Round 14 :

Change color to Green. (3 sc, inc) x 3 (15)

Round 15 :

Change color to Red. 15 sc (15)

Round 16 :

Change color to Minty. (4 sc, inc) x 3 (18)

Round 17 :

Change color to Green. 18 sc (18)

Round 18 :

Change color to Red. (5 sc, inc) x 3 (21)

Round 19 :

Change color to Minty. 21 sc (21)

Round 20 :

Change color to Green. (6 sc, inc) x 3 (24)

Round 21 :

Change color to Red. 24 sc (24)

Round 22 :

Change color to Minty. (7 sc, inc) x 3 (27)

Round 23 :

Change color to Green. 27 sc (27)

Round 24 :

Change color to Red. (8 sc, inc) x 3 (30)

Round 25 :

Change color to Minty. 30 sc (30)

Round 26 :

Change color to Green. (9 sc, inc) x 3 (33)

Round 27 :

Change color to Red. 33 sc (33)

Round 28 :

Change color to Minty. (10 sc, inc) x 3 (36)

Round 29 :

Change color to Green. 36 sc (36)

Round 30 :

Change color to Red. (11 sc, inc) x 3 (39)

Round 31 :

Change color to Minty. 39 sc (39)

Round 32 :

Change color to Green. (12 sc, inc) x 3 (42)

Round 33 :

Change color to Red. 42 sc (42)

Round 34 :

Change color to Minty. (13 sc, inc) x 3 (45)

Round 35 :

Change color to Green. 45 sc (45)

Round 36 :

Change color to Red. (14 sc, inc) x 3 (48)

Round 37 :

Change color to Minty. 48 sc (48)

Round 38 :

Change color to Green. (15 sc, inc) x 3 (51)

Round 39 :

Change color to Red. 51 sc (51)

Round 40 :

Change color to Minty. (16 sc, inc) x 3 (54)

Round 41 :

Change color to Green. 54 sc (54)

Round 42 :

Change color to Red. 54 sc (54)

Round 43 :

Change color to Minty. (17 sc, inc) x 3 (57)

Round 44 :

Change color to Green. 57 sc (57)

Round 45 :

Change color to Red. 57 sc (57)

Round 46 :

Change color to Minty. (18 sc, inc) x 3 (60)

Round 47 :

Change color to Green. 60 sc (60)

Round 48 :

Change color to Red. 60 sc (60)

Round 49 :

Change color to Minty. 60 sc (60)

Round 50 :

Change color to Green. (19 sc, inc) x 3 (63)

Round 51 :

Change color to Red. 63 sc (63)

Round 52 :

Change color to Minty. 63 sc (63)

Round 53 :

Change color to Red. 63 sc (63)

Round 54 :

ch2, 62 dc, sl st, turn (63)

Round 55 :

ch2, (FPdc, BPdc, FPdc) x 21. Fasten off, cut the yarn, weave in the yarn ends.

Assembly Instructions

  • Sew the head to the body using the long tail left from the body, ensuring it sits centered and securely attached.
  • Tighten the cheeks by following the pictures in the pattern to create that adorable bunny expression with defined cheek areas.
  • Fasten the legs to the body using button mount technique, positioning them evenly on either side for proper balance and poseability.
  • Attach the arms to the body with button joints, allowing them to move and pose naturally for different displays.
  • Sew the ears to the top of the head, spacing them evenly and angling them slightly outward for a realistic bunny appearance.
  • Attach the fluffy tail to the back of the body at the appropriate height, ensuring it's secure and properly positioned.
  • Embroider facial features: pink nose, black eyelids, nose outline, and mouth following the pattern's detailed instructions for the sweetest expression.
  • Tone the inside of the ears and cheeks with pink pastel for a natural, rosy finish, and embroider claws on the feet with black thread for added detail.

Important Notes

  • 💡Use stitch markers consistently throughout the project, especially during the jacquard sections where color changes make it easy to lose your place in the round
  • 💡When working the jacquard technique on the body and head, carry the unused yarn loosely on the inside to prevent puckering and maintain proper tension
  • 💡The button joint attachment for arms and legs requires sewing through the body completely, so use strong thread and secure buttons tightly for durability and poseability
  • 💡Stuff each piece firmly as you work rather than waiting until the end, paying special attention to the legs which need firm stuffing to support the bunny in a standing position
  • 💡Safety eyes must be inserted between rounds 7-8 of the head before completing the decreases, as they cannot be added later once the opening is too small
  • 💡When changing colors for the striped stockings and cap, cut yarn and weave in ends as you go to avoid bulk and ensure clean stripe transitions
  • 💡The fluffy white yarn (Alize Softy) used for the cap's pom-pom section works differently than regular yarn, so adjust tension slightly looser to accommodate its thickness

This enchanting Christmas Bunny pattern combines traditional amigurumi techniques with festive holiday flair to create a truly special seasonal companion. The careful attention to detail in the jacquard coloring, the charming striped accessories, and those sweet embroidered features make this bunny a standout holiday decoration or gift. Whether you're an experienced crocheter looking for a satisfying project or someone ready to expand their color-working skills, this pattern offers the perfect blend of technique and creativity. Your finished bunny will stand proudly at 8-9 inches tall, ready to bring Christmas magic to your home for years to come. 🎄🐰✨

You ask,

we answer.

FAQs

What is the jacquard technique mentioned in the pattern, and is it difficult?

The jacquard technique involves working with two colors in the same round to create a color-blocked design on the body and head. You'll carry the unused yarn along the inside of your work while crocheting with the active color. It's not difficult once you get the rhythm, but it does require attention to tension to avoid puckering. The pattern clearly marks which stitches should be which color, making it easier to follow.

Can I use different yarn weights or colors than specified?

Yes, you can substitute yarns, but keep in mind that using different weights will change the final size of your bunny. If you use the same weight yarn (sport weight 4ply), your bunny should still measure close to 8-9 inches. Feel free to customize the colors to create your own unique Christmas bunny - perhaps traditional red and green, or even a winter wonderland theme with blues and silvers!

How do I attach the limbs with button joints, and why use this method?

Button joints involve sewing through the body with strong thread, attaching a button on each side where the limb connects. Thread through one limb, through the body, through the opposite limb, and secure with buttons on both sides. This method creates moveable, poseable limbs that allow you to adjust your bunny's stance. The pattern requires 4 buttons total - 2 for arms and 2 for legs.

Do I need to stuff the ears, and how do I make them stand up properly?

No, the pattern specifically states not to stuff the ears. Unstuffed ears have a more natural, flexible appearance and will naturally fold or stand based on how you position and sew them to the head. When attaching, you can add a few stitches at the base to help them stand upright, or allow them to flop naturally for a relaxed look.

The striped stockings and cap have many color changes - is there an easier way to manage this?

The frequent color changes create those beautiful stripes, and while they require some patience, there are tips to make it easier. Cut your yarn after each color change rather than carrying it up, as this prevents bulk. Keep your yarn ends organized by color, and consider weaving in ends as you complete each section rather than saving them all for the end. The rhythm of the color changes becomes meditative once you get started!

What's the best way to embroider the facial features to achieve that sweet expression?

For the nose, use pink embroidery thread or yarn and create a small triangle shape. For the eyelids, mouth, and nose outline, use black thread and make small straight stitches following the natural curves suggested by eye placement. Work slowly and refer to the pattern photos for guidance. You can always remove and redo embroidery stitches until you're happy with the expression. The pink pastel toning on the cheeks adds the final touch of sweetness!