🧶 Beautiful ✨ Detailed 💝 Adorable

Potion Bottle Amigurumi Pattern

Potion Bottle Amigurumi Pattern
4.1★ Rating
4-5 Hours Time Needed
2.5K Made This
✂️

Intermediate Level

Ideal for those with basic knitting experience, featuring slightly more advanced stitches and techniques to expand your skills.

⏱️

Weekend Treat

Takes 5-7 hours, making it an enjoyable project to finish over a couple of days.

🧸

Whimsical Buddy

Playful characters full of personality, designed to spark imagination and become cherished playtime favorites.

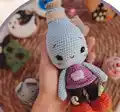
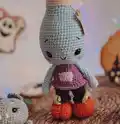
About This Potion Bottle Amigurumi Pattern

Potion Bottle Amigurumi Pattern crochet pattern - detailed view of completed project

The finished toy measures about 19cm tall using recommended materials, though size may vary based on your tension and yarn choice. This delightful pattern includes detailed instructions for creating connected legs, arms, and all the charming details that bring this magical companion to life.

Why You'll Love This Potion Bottle Amigurumi Pattern

I absolutely love how this pattern transforms simple yarn into a character bursting with personality! The combination of the cork-topped head and potion bottle body creates such a unique and whimsical design that stands out from typical amigurumi. I'm particularly fond of the little details like the belly pocket and boot veins that add so much charm without being overwhelming. The color-changing technique keeps the project engaging throughout, and watching the character take shape as you work through each section is incredibly satisfying. Plus, the needle sculpting for the face lets you customize the expression to make each potion truly one-of-a-kind!

Potion Bottle Amigurumi Pattern step 1 - construction progress Potion Bottle Amigurumi Pattern step 2 - assembly progress Potion Bottle Amigurumi Pattern step 3 - details and accessories Potion Bottle Amigurumi Pattern step 4 - final assembly and finishing

Switch Things Up

I love experimenting with this potion bottle pattern to create different magical varieties! Instead of the classic blue potion, I've made a sparkly purple healing potion using metallic yarn, and it looked absolutely magical. You could also try adding small embroidered details like stars or swirls on the bottle body to give it an enchanted appearance.

For a more personalized touch, I sometimes create themed potions based on popular fantasy games or stories—a bright red health potion, a shimmering mana potion in iridescent blue, or even a mysterious black poison bottle. The cork top could be customized too; try using brown or tan yarn for a more natural cork look, or even add a tiny yarn label wrapped around the bottle.

If you're making this as a gift, consider creating a whole collection of different colored potions in various sizes by adjusting your hook size. A display of rainbow potions on a shelf looks incredibly charming! You could also add small accessories like a tiny yarn tag with the 'potion name' or a miniature ribbon bow around the neck. The possibilities are truly endless with this versatile pattern!

Common Mistakes & How to Fix Them

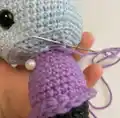
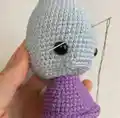
✗ Forgetting to stuff the head before closing it completely, which makes it difficult to achieve proper shaping and firmness ✗ Not using stitch markers when switching colors between grey and blue, leading to uneven color transitions on the head ✗ Placing safety eyes too close together or at wrong rounds, resulting in an unbalanced facial expression ✗ Skipping the back-loop-only rounds which create important texture changes and definition between body sections ✗ Over-stuffing the legs and body which distorts the potion bottle shape and makes limbs too rigid ✗ Not securing the pocket properly to the belly before final assembly, causing it to sag or become detached

Potion Bottle Amigurumi Pattern

Bring magical charm to life with this adorable Potion Bottle amigurumi pattern! Standing approximately 19cm tall, this whimsical character features a grey cork-topped head with sparkling eyes and a blue potion-filled body complete with tiny boots and a belly pocket. Perfect for fantasy lovers and potion enthusiasts, this intermediate-level pattern combines color changes, shaping techniques, and sweet details like embroidered facial features and decorative boot veins. Create your own mystical companion that looks like it stepped right out of an enchanted apothecary!

Intermediate 4-5 Hours

Materials Needed for Potion Bottle Amigurumi Pattern

— Main Fabric

  • 01
    Yarn Art Jeans in colors: 75 (grey), 72 (blue), 85, 19, 05
  • 02
    Black fine yarn for eyelashes embroidery
  • 03
    Polyester toy stuffing

— Tools Required

  • 01
    1.75mm crochet hook
  • 02
    10-12mm black plastic safety eyes (2 pieces)
  • 03
    Needle for joining pieces and embroidering
  • 04
    Scissors
  • 05
    Pins
  • 06
    Stitch marker
  • 07
    Chopstick for stuffing

Progress Tracker

0% Complete

— Head :

Info :

Begin crocheting in grey

Round 1 :

6 sc into MR (6)

Round 2 :

6 inc (12)

Round 3 :

(1 sc, inc) x 6 (18)

Info :

Work into back loops only

Round 4 :

18 sc (18)

Rounds 5-7 :

18 sc (18)

Infos :

Switch to blue yarn and work into back loops only

Round 8 :

(2 sc, inc) x 6 (24)

Rounds 9-12 :

24 sc (24)

Round 13 :

(3 sc, inc) x 6 (30)

Rounds 14-15 :

30 sc (30)

Round 16 :

(4 sc, inc) x 6 (36)

Round 17 :

(5 sc, inc) x 6 (42)

Round 18 :

42 sc (42)

Round 19 :

(6 sc, inc) x 6 (48)

Rounds 20-21 :

48 sc (48)

Round 22 :

(7 sc, inc) x 6 (54)

Rounds 23-34 :

54 sc (54)

Round 35 :

(7 sc, dec) x 6 (48)

Round 36 :

BLO (6 sc, dec) x 6 (42)

Round 37 :

(5 sc, dec) x 6 (36)

Round 38 :

(4 sc, dec) x 6 (30)

Round 39 :

(3 sc, dec) x 6 (24)

Infos :

Return to round 8, work across the front loops. Install eyes between rounds 30-31, 13 sc apart

— Legs and Body :

Round 1 :

Chain 7, starting to the 2nd st from hook work 5 sc, 4 sc to 1 st, 4 sc, inc (13)

Round 2 :

inc, 4 sc, 4 inc, 4 sc, 2 inc (22)

Round 3 :

1 sc, inc, 4 sc, (1 sc, inc) x 4, 4 sc, (1 sc, inc) x 2 (29)

Round 4 :

2 sc, inc, 4 sc, (2 sc, inc) x 4, 4 sc, (2 sc, inc) x 2 (36)

Rounds 5-7 :

36 sc (36)

Round 8 :

12 sc, 6 dec hdc, 12 sc (30)

Round 9 :

(3 sc, dec) x 6 (24)

Round 10 :

3 sc, dec, (1 sc, dec) x 5, 4 sc (18)

Round 11 :

2 sc, dec, (4 sc, dec) x 2, 2 sc (15)

Info :

Change yarn color

Round 12 :

15 sc (15)

Info :

Work into back loops only

Round 13 :

15 sc (15)

Rounds 14-17 :

15 sc (15)

Infos :

Return to round 13 and work 15 dc. Work 5 sc additionally across the second leg. Cut yarn on the second leg, but do not break yarn on the second one

Round 18 :

Go on working across leg #1: 15 sc and then across leg #2: 15 sc (30)

Round 19 :

(4 sc, inc) x 6 (36)

Round 20 :

36 sc (36)

Info :

Change yarn color

Round 21 :

36 sc (36)

Info :

Work into back loops only

Round 22 :

36 sc (36)

Rounds 23-25 :

36 sc (36)

Round 26 :

(4 sc, dec) x 6 (30)

Round 27 :

30 sc (30)

Round 28 :

(3 sc, dec) x 6 (24)

Rounds 29-31 :

24 sc (24)

Info :

Return to round 22, work 36 dc

— Arms :

Round 1 :

6 sc into MR (6)

Round 2 :

6 inc (12)

Round 3 :

12 sc (12)

Round 4 :

10 sc, dec (11)

Round 5 :

9 sc, dec (10)

Rounds 6-14 :

10 sc (10)

Info :

Work a row through both edges

— Veins on the Boots :

Instructions :

10 ch, turn and starting to the 2nd st from hook work 9 sl st

— Pocket :

Row 1 :

5 ch, turn your work

Row 2 :

inc, 2 sc, inc (6 sc) turn your work

Row 3 :

6 sc (6)

Info :

Sew it on the belly

— Face Finishing :

Instructions :

Make face needle sculpting, send your needle from below the neck to the place under one of the eyes, and go back down 1 st away, pull. Repeat the steps above for the second eye. Pull and tie knots. Embroider brows and a smile.

Assembly Instructions

  • Attach the completed head to the body by aligning the neck opening with the body's top rounds and sewing securely all around.
  • Position and sew the arms to both sides of the body between rounds 26-28, ensuring they are symmetrically placed.
  • Create decorative veins on the boots by working the chain and slip stitch pattern, then securing them to the front of each boot.
  • Sew the small belly pocket centered on the front of the body at an appropriate height for visual balance.
  • Stuff all pieces firmly but not overly tight to maintain the potion bottle shape and allow proper positioning.
  • Use pins to test arm and head placement before final sewing to ensure the character has good posture and balance.

Important Notes

  • 💡Use stitch markers consistently throughout the pattern, especially when working color changes from grey to blue on the head
  • 💡Pay careful attention to back-loop-only (BLO) instructions as they create important texture definition and ribbing effects
  • 💡Install safety eyes at the specified rounds (30-31) before closing the head completely, as insertion becomes difficult later
  • 💡Stuff the head gradually as you decrease, ensuring even filling and smooth shaping without lumps or gaps
  • 💡When joining the two legs to form the body, make sure yarn tension remains consistent to avoid gaps at the joining point
  • 💡The recommended 1.75mm hook creates a tight fabric that prevents stuffing from showing through the stitches

This whimsical Potion Bottle amigurumi pattern brings fantasy charm to your crochet collection! Designed with intermediate crafters in mind, this pattern combines practical techniques like color changes, BLO stitching, and needle sculpting to create a character brimming with magical personality. The adorable details—from the cork-topped head to the tiny boots with decorative veins—make this potion bottle truly enchanting. Perfect as a gift for fantasy lovers or a delightful addition to your handmade collection! 🧶✨🧪

You ask,

we answer.

FAQs

What yarn weight works best for this potion bottle amigurumi?

The pattern recommends Yarn Art Jeans, which is a DK/light worsted weight yarn. This weight paired with a 1.75mm hook creates a tight fabric perfect for amigurumi that prevents stuffing from showing through.

Can I use different colors than those specified in the pattern?

Absolutely! While the pattern suggests grey for the cork and blue for the potion liquid, you can customize the colors to create different potion varieties—purple for a magic potion, green for a health elixir, or red for a strength brew!

What size will my finished potion bottle be?

Using the recommended materials and hook size, the finished toy measures approximately 19cm (about 7.5 inches) tall. Your final size may vary slightly depending on your personal crochet tension and yarn thickness.

Do I need experience with color changes for this pattern?

Yes, this intermediate pattern includes several color changes, particularly transitioning from grey to blue on the head and between different colors on the body and boots. Basic color-changing skills will help you achieve clean transitions.

When should I insert the safety eyes?

Install the safety eyes between rounds 30-31, spacing them 13 single crochets apart. It's crucial to do this before you close the head completely, as insertion becomes nearly impossible afterward.

What does 'work into back loops only' mean?

Back loops only (BLO) means you insert your hook under only the back loop of each stitch instead of under both loops. This technique creates a ridge effect and texture change, which is essential for defining different sections of the potion bottle.