🧢 Beautiful ✨ Detailed πŸ’ Adorable

Garden Path Throw Knitting Pattern

Garden Path Throw Knitting Pattern
4.0β˜… Rating
25-30 Hours Time Needed
2.8K Made This
βœ‚οΈ

Intermediate Level

Ideal for those with basic knitting experience, featuring slightly more advanced stitches and techniques to expand your skills.

⏱️

Slow & Steady

A 10-12 hour projectβ€”great for savoring the process over several sessions.

🏑

Cozy Accent

A warm touch for your space that transforms ordinary corners into inviting nooks filled with handmade charm.

About This Garden Path Throw Knitting Pattern

The Garden Path Throw is a beautifully designed knitted blanket that showcases an elegant lace pattern with decorative bobbles throughout. This pattern uses seed stitch borders combined with a charming diamond eyelet design that creates a lightweight yet warm throw perfect for any room in your home. The finished piece measures 46x46 inches and features lovely fringe details that add a feminine touch to the overall design.

Garden Path Throw Knitting Pattern crochet pattern - detailed view of completed project

Knitted in superwash merino wool, this throw is both practical and luxurious. The open lace work creates beautiful drape while the bobble details add delightful texture and visual interest throughout the piece.

Why You'll Love This Garden Path Throw Knitting Pattern

I absolutely love this pattern because it strikes the perfect balance between simplicity and sophistication. The stitch pattern is surprisingly easy to memorize, which means you can work on it while relaxing without constantly referring to the chart. I find the combination of lace and bobbles creates such beautiful texture and dimension, and watching the diamond pattern emerge as you knit is incredibly satisfying. The fringe finishing technique adds that special handmade touch that makes this throw feel extra special, and knowing it's made from soft superwash merino means it's as practical as it is beautiful.

Garden Path Throw Knitting Pattern step 1 - construction progress Garden Path Throw Knitting Pattern step 2 - assembly progress Garden Path Throw Knitting Pattern step 3 - details and accessories Garden Path Throw Knitting Pattern step 4 - final assembly and finishing

Switch Things Up

I love experimenting with this Garden Path pattern by changing up the colors to match different seasons and dΓ©cor styles. Instead of the classic natural shade, I've created versions in soft pastels for spring, rich jewel tones for autumn, and even a sophisticated charcoal gray for a modern look. You could also try using a variegated or gradient yarn to add subtle color shifts throughout the diamond pattern.

For a completely different aesthetic, I recommend working this pattern in cotton yarn for a lighter, more breathable summer throw. The lace pattern looks absolutely stunning in crisp white cotton and becomes perfect for warmer weather. If you want to make it more luxurious, consider using a cashmere blend yarn for the ultimate cozy experience.

I've also experimented with the fringe by trying different lengths and even adding beads to the ends for extra sparkle. Some knitters prefer to skip the fringe entirely and add a simple crochet border instead, which gives the throw a more tailored appearance. Another fun variation is to work the bobbles in a contrasting color for added visual interest throughout the piece.

Common Mistakes & How to Fix Them

βœ— Forgetting to work bobbles on the correct side - always check if you're on a right side or wrong side row before making bobbles to ensure they appear correctly on the finished throw βœ— Pulling the cast-on or bind-off too tightly - this pattern specifically requires loose cast-on and bind-off to maintain proper drape and prevent the edges from puckering inward βœ— Losing track of pattern repeats - use stitch markers to separate the six pattern repeats across each row to avoid counting errors and ensure your lace diamonds align properly βœ— Not blocking properly after completion - blocking is essential for this lace pattern to open up the eyelet diamonds and ensure all bobbles face the right direction

Garden Path Throw Knitting Pattern

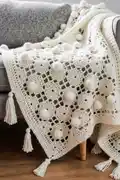
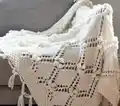
Create a stunning Garden Path Throw that combines elegance with comfort in this beautiful lace knitting project. This lightweight yet warm accessory features staggered eyelet-diamonds separated by charming bobbles worked on both sides, creating a delicate open lace pattern perfect for your home. The design includes a feminine fringe detail on top and bottom edges, and the simple, easy-to-memorize stitch pattern makes this 46x46 inch throw an enjoyable project that results in a timeless piece you'll treasure for years.

Intermediate 25-30 Hours

Materials Needed for Garden Path Throw Knitting Pattern

β€” Main Fabric

  • 01
    Knit Picks Bare Swish Bulky yarn in Natural color (100% Superwash Merino Wool, 137 yards per 100g skein)
  • 02
    9 hanks of bulky weight superwash merino wool yarn totaling approximately 1233 yards

β€” Tools Required

  • 01
    US 11 (8mm) circular needle, 40 inches or longer
  • 02
    Yarn needle for weaving in ends
  • 03
    Size I (5.5mm) crochet hook for attaching fringe
  • 04
    Stitch markers (optional but recommended)
  • 05
    12 inch blocking mat or picture frame for wrapping fringe strands
  • 06
    Scissors for cutting fringe
  • 07
    Blocking materials for finishing

Progress Tracker

0% Complete

β€” Cast On :

Initial Cast On :

Loosely CO 127 sts

β€” Seed Stitch Border :

Rows 1-11 :

Work Seed Stitch for 11 rows. Seed Stitch pattern: (K1, P1) to last st, K1

β€” Main Pattern Section :

Rows 12-155 :

Work Rows 1-24 of the chart or written instructions six times

Row 1 (RS) :

(K1, P1) x 3, K4, (K2tog, YO) x 2, K1, *K2, (YO, SSK) x 2, K5, (K2tog, YO) x 2, K1; rep from * a total of 6 times, K2, (YO, SSK) x 2, K4, (P1, K1) x 3

Rows 2, 4, 6, 8 (WS) :

(K1, P1) x 3, K1, P to last 7 sts, (K1, P1) x 3, K1

Row 3 :

(K1, P1) x 3, K3, (K2tog, YO) x 2, K2, *K3, (YO, SSK) x 2, K3, (K2tog, YO) x 2, K2; rep from * a total of 6 times, K3, (YO, SSK) x 2, K3, (P1, K1) x 3

Row 5 :

(K1, P1) x 3, K2, (K2tog, YO) x 2, K3, *K4, (YO, SSK) x 2, K1, (K2tog, YO) x 2, K3; rep from * a total of 6 times, K4, (YO, SSK) x 2, K2, (P1, K1) x 3

Row 7 :

(K1, P1) x 3, K1, (K2tog, YO) x 2, K4, *K5, YO, SSK, YO, CDD, YO, K2tog, YO, K4; rep from * a total of 6 times, K5, (YO, SSK) x 2, (K1, P1) x 3, K1

Row 9 :

(K1, P1) x 3, K1, (YO, SSK) x 2, K4, *K5, K2tog, YO, K1, MB, K1, YO, SSK, K4; rep from * a total of 6 times, K5, (K2tog, YO) x 2, (K1, P1) x 3, K1

Row 10 :

(K1, P1) x 3, K1, P9, *P6, MB, P1, MB, P7; rep from * a total of 6 times, P8, (K1, P1) x 3, K1

Row 11 :

(K1, P1) x 3, K2, (YO, SSK) x 2, K3, *K4, (K2tog, YO) x 2, MB, (YO, SSK) x 2, K3; rep from * a total of 6 times, K4, (K2tog, YO) x 2, K2, (P1, K1) x 3

Rows 12, 14, 16, 18, 20 :

Repeat Row 2

Row 13 :

(K1, P1) x 3, K3, (YO, SSK) x 2, K2, *K3, (K2tog, YO) x 2, K3, (YO, SSK) x 2, K2; rep from * a total of 6 times, K3, (K2tog, YO) x 2, K3, (P1, K1) x 3

Row 15 :

(K1, P1) x 3, K4, (YO, SSK) x 2, K1, *K2, (K2tog, YO) x 2, K5, (YO, SSK) x 2, K1; rep from * a total of 6 times, K2, (K2tog, YO) x 2, K4, (P1, K1) x 3

Row 17 :

(K1, P1) x 3, K5, (YO, SSK) x 2, *K1, (K2tog, YO) x 2, K7, (YO, SSK) x 2; rep from * a total of 6 times, K1, (K2tog, YO) x 2, K5, (P1, K1) x 3

Row 19 :

(K1, P1) x 3, K6, YO, SSK, YO, *CDD, YO, K2tog, YO, K9, YO, SSK, YO; rep from * a total of 6 times, CDD, YO, K2tog, YO, K6, (P1, K1) x 3

Row 21 :

(K1, P1) x 3, K6, K2tog, YO, K1, *MB, K1, YO, SSK, K9, K2tog, YO, K1; rep from * a total of 6 times, MB, K1, YO, SSK, K6, (P1, K1) x 3

Row 22 :

(K1, P1) x 3, K1, P7, MB, P1, *MB, P13, MB, P1; rep from * a total of 6 times, MB, P7, (K1, P1) x 3, K1

Row 23 :

(K1, P1) x 3, K5, (K2tog, YO) x 2, *MB, (YO, SSK) x 2, K7, (K2tog, YO) x 2; rep from * a total of 6 times, MB, (YO, SSK) x 2, K5, (P1, K1) x 3

Row 24 :

Repeat Row 2

β€” Partial Pattern Repeat :

Rows 156-172 :

Work Rows 1-17 of the chart or written instructions once

β€” Final Seed Stitch Border :

Rows 173-183 :

Work Seed Stitch for 11 rows, finishing with a WS row

Final Row (RS) :

BO K-wise, loosely

β€” Bobble Instructions :

Make Bobble on RS Row :

(K1, YO, K1, YO, K1) in the same st, drop all sts from LH needle, turn, K5, turn, K5, pass second st on RH needle over first st 4 times. 1 st left on RH needle. Place this st P-wise back onto LH needle and knit it

Make Bobble on WS Row :

(P1, YO, P1, YO, P1) in the same st, drop all sts from LH needle, turn, P5, turn, P5, pass second st on RH needle over first st 4 times. 1 st left on RH needle. Place this st P-wise back onto LH needle and purl it

Centered Double Decrease (CDD) :

Sl 2 sts K-wise, K next st, pass 2 slipped sts over K st. 2 sts decreased

Assembly Instructions

  • Weave in all yarn ends securely using a yarn needle, taking care to follow the pattern lines to keep ends invisible.
  • Wash the throw gently according to yarn care instructions to prepare it for blocking.
  • Block the throw to finished measurements of 46x46 inches, pinning out all lace diamonds to open up the pattern.
  • While blocking, twist and shape all bobbles so they appear prominently on the right side of the throw.
  • Allow the throw to dry completely before removing blocking pins.
  • Prepare fringe by wrapping yarn loosely around a 12 inch blocking mat or picture frame 64 times, then cut to create strands.
  • Attach fringe groups using crochet hook method, placing 16 groups along bottom edge and 16 along top edge, with corner groups at cast-on and bind-off edge stitches.

Important Notes

  • πŸ’‘Cast on and bind off very loosely to ensure proper drape and prevent edge puckering in the finished throw
  • πŸ’‘Use stitch markers to separate the six pattern repeats across each row to make counting easier and avoid mistakes
  • πŸ’‘Read right side chart rows from right to left and wrong side rows from left to right when following the chart
  • πŸ’‘Pay attention to bobble instructions as they differ for right side and wrong side rows
  • πŸ’‘Block the throw thoroughly to open up the lace pattern and shape bobbles correctly on the right side
  • πŸ’‘Do not wrap fringe yarn too tightly around the form or your fringe strands will be too short
  • πŸ’‘The seed stitch borders on sides should be worked consistently to maintain even edges throughout the project

The Garden Path Throw is a timeless knitting pattern that combines classic lace techniques with charming bobble details to create a beautiful home accessory. This pattern is perfect for knitters ready to expand their lace skills while creating something truly special. The lightweight yet warm design makes it ideal for year-round use, and the elegant eyelet diamonds create a sophisticated look that complements any décor. With clear instructions and an easy-to-memorize pattern, you'll enjoy every stitch of this rewarding project. Happy knitting! 🧢✨

You ask,

we answer.

FAQs

Can I use a different yarn weight for this pattern?

While the pattern calls for bulky weight yarn, you can adapt it to other weights by adjusting your needle size and recalculating yardage. Keep in mind that using a different weight will significantly change the finished size and drape of the throw. Always work a gauge swatch first.

How do I keep my bobbles from appearing on the wrong side?

The pattern provides specific instructions for making bobbles on both right side and wrong side rows. While blocking, twist and shape each bobble to ensure they all face the right side. Proper blocking is essential for achieving the correct bobble appearance.

Do I need to follow the chart or can I use written instructions?

The pattern includes both charted and written instructions, so you can choose whichever method you prefer. Many knitters find the written instructions easier to memorize after working through the pattern a few times.

How much fringe do I need to prepare?

You'll need 128 strands total, each 24 inches long. The pattern instructs you to wrap yarn around a 12 inch form 64 times, twice, then cut the strands. Make a few extra strands to ensure you have enough for all 32 fringe groups.

Can I make this throw larger or smaller?

Yes, you can adjust the size by adding or removing pattern repeats. Each pattern repeat is 19 stitches wide. Remember to maintain the seed stitch borders on each side and adjust your yarn quantity accordingly.

What's the best way to block this lace throw?

Pin the throw out to the finished measurements on blocking mats, making sure to open up all the eyelet diamonds evenly. Use plenty of pins to maintain the lace structure, and don't forget to shape the bobbles so they face the right side. Allow it to dry completely before unpinning.