🧢 Beautiful ✨ Detailed πŸ’ Adorable

Rose Turtle Amigurumi Pattern

Rose Turtle Amigurumi Pattern
4.9β˜… Rating
4-5 Hours Time Needed
2.5K Made This
βœ‚οΈ

Intermediate Level

Ideal for those with basic knitting experience, featuring slightly more advanced stitches and techniques to expand your skills.

⏱️

Weekend Treat

Takes 5-7 hours, making it an enjoyable project to finish over a couple of days.

🐒

Charming Critter

Delightful animal designs with sweet details that capture the essence of your favorite woodland and farmyard friends.

About This Rose Turtle Amigurumi Pattern

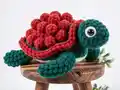
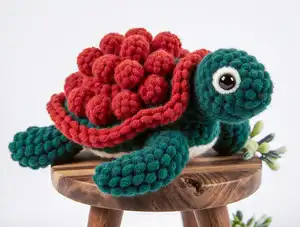
This enchanting Rose Turtle pattern brings together two beloved elements of nature into one charming amigurumi creation. The distinctive shell features a stunning rose design with layered petals worked in the front loops, creating beautiful dimensional texture that mimics real flower petals. Using bulky yarn and a larger hook, this project works up relatively quickly while still offering enough detail to keep intermediate crocheters engaged and excited throughout the process.

Rose Turtle Amigurumi Pattern crochet pattern - detailed view of completed project

The pattern includes clear instructions for creating all components including the rose shell with its spiral petal technique, four legs of different sizes for realistic proportions, and finishing details that bring your turtle to life with personality and charm.

Why You'll Love This Rose Turtle Amigurumi Pattern

I absolutely love how this pattern combines two of my favorite things into one adorable creation. The rose shell technique is surprisingly simple yet creates such a stunning three-dimensional effect that always impresses. Working with chunky yarn means this beauty comes together faster than traditional amigurumi, but the end result looks intricate and detailed. The way the petals naturally spiral around the shell reminds me of real roses in my garden, and watching that texture emerge as you work is incredibly satisfying. Plus, turtles have always been symbols of patience and wisdom, making this a meaningful handmade gift that carries special sentiment.

Rose Turtle Amigurumi Pattern step 1 - construction progress Rose Turtle Amigurumi Pattern step 2 - assembly progress Rose Turtle Amigurumi Pattern step 3 - details and accessories Rose Turtle Amigurumi Pattern step 4 - final assembly and finishing

Switch Things Up

I love experimenting with color combinations to make each rose turtle truly unique and personal. While the original pattern uses red for the rose and emerald green for the body, I've discovered that soft pinks with sage green create a vintage romantic feel, perfect for spring decor. Purple roses with forest green bodies give an enchanted garden vibe that's absolutely magical.

For a modern twist, I sometimes work the rose in ombre yarn that shifts from deep burgundy to soft coral, creating a sunset-inspired shell that's breathtaking. You could also try variegated yarn for the rose petals to get a multi-colored bloom effect without having to change colors manually.

Another fun variation is adding small french knots or embroidered details on the shell between petals using metallic thread for a touch of sparkle. I've also experimented with making tiny roses using the same petal technique and attaching them as a baby turtle on mama's back for an adorable family scene.

If you want to make your turtle more interactive for children, consider using crinkle material inside the shell or adding a small rattle insert during stuffing. The chunky yarn makes this pattern perfect for beginners to practice working with bulkier materials before moving to more complex projects.

Common Mistakes & How to Fix Them

βœ— Missing stitches when working the rose petals in front loops only can create gaps in the flower design βœ— Not using stitch markers with fluffy bulky yarn makes it difficult to track rounds and count stitches accurately βœ— Attaching legs at the wrong angle causes the turtle to lean or sit unevenly instead of balanced βœ— Stuffing the shell too firmly before attaching legs prevents proper shaping and makes assembly difficult later

Rose Turtle Amigurumi Pattern

Create an adorable rose turtle that combines the sweetness of a flower with the charm of a gentle turtle companion. This unique amigurumi pattern features a beautiful red rose shell with delicate petals worked in continuous spirals, paired with a lovely emerald green body. Perfect for adding a touch of nature-inspired cuteness to your crochet collection, this turtle makes a wonderful gift or decorative piece that brings together floral beauty and animal charm in one delightful project.

Intermediate 4-5 Hours

Materials Needed for Rose Turtle Amigurumi Pattern

β€” Main Fabric

  • 01
    Premier Parfait Chunky (Size 6) yarn in Emerald and White colors
  • 02
    Yarn Bee Velvety Smooth (Size 5) yarn in Red color
  • 03
    Bulky weight yarn (Size 5-6) in green, red, and white

β€” Tools Required

  • 01
    Crochet hook size 4.5mm
  • 02
    Safety eyes 14mm
  • 03
    Tapestry needle
  • 04
    Scissors
  • 05
    Poly-Fil stuffing
  • 06
    Stitch markers (recommended for chunky yarn)

Progress Tracker

0% Complete

β€” Front Legs :

Info :

Using Emerald, Make 2

R1 :

8 SC in MR

R2 :

Inc (16)

R3 :

SC, Inc (24)

R4 :

3 SC, Inc (30)

Info :

Fold your circle in half to make a half circle. Working around the half circle and through both sides, SC through both stitches. Continue until you reach the end of the half circle. FO, there is no need to leave a tail for sewing

β€” Back Legs :

Info :

Using Emerald, Make 2

R1 :

8 SC in MR

R2 :

Inc (16)

R3 :

SC, Inc (24)

Info :

Working around the half circle and through both sides, SC through both stitches. Continue until you reach the end of the half circle. FO, there is no need to leave a tail for sewing

β€” Tail :

Info :

Using Emerald

R1 :

6 SC in MR

R2-4 :

SC (6)

Info :

SS, FO, there is no need to leave a tail for sewing, you will SC the tail piece into a round of the body

β€” Head :

Info :

Using Emerald

R1 :

8 SC in MR

R2 :

Inc (16)

R3 :

SC, Inc (24)

R4 :

3 SC, Inc (30)

R5-7 :

SC (30)

R8 :

3 SC, Dec (24)

R9 :

SC, Dec (16)

Info :

SS, leave a long tail for sewing (8-9 inches). Add eyes and stuff the head. Add eyes at around rows 5-6 and about 9-10 stitches apart

β€” Shell/Body :

Info :

Using Red. The top of the shell is all worked in the BLO (back loops only) of the previous round. The petals are formed in the front unworked loops once the top of the shell is completed

R1 :

8 SC in MR

R2 :

Working in BLO: Inc (16)

R3 :

Working in BLO: SC, Inc (24)

R4 :

Working in BLO: (SC, Inc, SC) x 8 (32)

R5 :

Working in BLO: 3 SC, Inc (40)

R6 :

Working in BLO: (5 SC, Inc, 2 SC) x 5 (45)

Info :

Color change to green

R7 :

Working in BLO: SC (45)

Info :

Drop your working yarn, the rest of the body will be finished after completing the petals

β€” Petals :

Info :

To make the petals, you will be working in a continuous spiral on top of the shell in the unworked front loops of each round. Grab your red yarn and attach it with a SC in the very first unworked front loop of row 2

Pattern :

Working into the remaining front loops repeat the following pattern until you reach the last front loop: HDC, DC, TC, DC, HDC, SS

Info :

FO, weave in the ends. The remaining steps of the body will be worked normally through both loops. Pick up where you left off with your green yarn

R8 :

3 SC, Dec (36)

R9 :

Grab your legs and tail, this is the row you will SC your pieces into. You place your pieces in front of the stitches of the body, pushing your hook through the leg/tail first then through the body stitch. 4 SC, Grab the first big leg attach using 3 SC, 5 SC, Grab the first small leg attach using 2 SC, 3 SC, Grab your tail and using 3 SC attach the tail, 3 SC, Grab the second small leg attach using 2 SC, 5 SC, Grab the second big leg attach using 3 SC, 3 SC (36)

R10 :

SC, Dec (24)

Info :

Stuff the body to your desired firmness

R11 :

SC, Dec (16)

Info :

Add any additional stuffing

R12 :

Dec (8)

Info :

SS, cut yarn leaving a short tail to sew the hole closed. Weave the yarn tail back and forth into the stitches around then pull tight to close. Tie to secure and weave the rest of the yarn tail into the body

Assembly Instructions

  • Sew the head onto the body in the middle of the front two legs, positioning it half way over the rose and half over the bottom portion to help cover color changes
  • For eye detail using white yarn, embroider a line up the side of each safety eye by inserting needle at middle bottom and bringing it up to top middle
  • Ensure all legs are securely attached during Round 9 with proper curve orientation - big legs curve on outside, small legs curve on outside
  • Weave in all yarn ends thoroughly throughout the body and shell to prevent unraveling

Important Notes

  • πŸ’‘Use stitch markers to help find stitches and rows when working with fluffy chunky yarn until you can feel for them
  • πŸ’‘The rose petals are very forgiving - if you miss or double up a loop it will not affect the overall flower appearance significantly
  • πŸ’‘Place safety eyes at rows 5-6 and about 9-10 stitches apart before stuffing the head completely
  • πŸ’‘Premier Parfait Chunky and Yarn Bee Velvety Smooth work well together despite different labeled weights
  • πŸ’‘When attaching legs in Round 9, ensure pieces are positioned in front of body stitches with hook going through leg/tail first
  • πŸ’‘Leave 8-9 inches of yarn tail when finishing the head for easier sewing to body

This delightful Rose Turtle pattern combines the beauty of nature's flowers with an adorable turtle design that will capture hearts. The unique rose shell technique creates stunning dimensional petals while the chunky yarn makes this project work up faster than traditional amigurumi. Whether you're making it as a gift for a nature lover or adding to your own collection, this charming turtle with its blooming shell brings joy and creativity together in every stitch. The pattern's clear instructions and forgiving petal technique make it an enjoyable project that yields impressive results. 🌹🐒 Happy crocheting! 🧢✨

You ask,

we answer.

FAQs

Can I use regular worsted weight yarn instead of bulky yarn?

Yes, you can use worsted weight yarn with a smaller hook (2.5-3mm), but your finished turtle will be much smaller (approximately 3-4 inches) and will take longer to complete.

How do I prevent losing stitches when working with fluffy chunky yarn?

Use stitch markers liberally, especially marking the first stitch of each round and the front loops in the shell section. With practice, you'll learn to feel for the stitches through the fluff.

What if my rose petals don't look perfect or I miss some front loops?

The beauty of this pattern is that no two roses are identical in nature, so your turtle's unique petal arrangement adds character. Just end on whatever stitch you have when you complete the round.

Can I make the legs poseable or adjustable?

The legs are flat and sewn into the body during Round 9, so they're not poseable. However, you could stuff them lightly before folding if you want slightly more dimensional legs.

What's the best way to attach the head securely?

Position the head overlapping both the rose shell and the green body bottom, then use the long tail to sew through both layers multiple times in a circular pattern for maximum security.