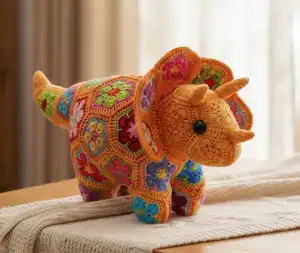
Create your own adorable Plod, a charming triceratops made entirely from colorful African Flower motifs! This unique pattern combines the beauty of granny square techniques with 3D amigurumi construction to bring a prehistoric friend to life. Perfect for using up your sock yarn stash, Plod measures approximately 30cm from tail to nose and features intricate hexagons, pentagons, octagons, and more joined together with the join-as-you-go method. With detailed instructions for sculpting eye sockets and creating a magnificent neck frill, this pattern will challenge your crochet skills while delivering an absolutely stunning finished piece that's sure to become a treasured companion.
Progress Tracker
0% Complete
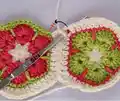
— African Flower Hexagon Motif :
Round 1 :
Ch5 and join with slip stitch to form a ring. Ch3 (counts as first dc), 1 dc in ring, ch1. Then make *2 dc in ring, ch1*. Repeat from * to * 4 times more, slip stitch join to third chain of beginning ch3 of the round. Cut yarn and pull through. (6 sets of 2dc's separated by chain stitches)
Round 2 :
Join next color in the ch1 space (just to the right of the previous round's ch3 beginning) and ch3 (counts as first dc). Make a dc in that same chain space then ch1. Make 2 dc (still in the same chain space). Move on to the next chain space of the previous round, and make the following: 2 dc, ch1, 2dc in that chain space. Repeat this in each of the next 4 chain spaces. Join with slip stitch to third chain of beginning ch3 of the round. (6 clusters of [2dc,ch,2dc])
Round 3 :
Continue with the same color. Slip stitch into the chain space in the middle of the first cluster of the previous round. Ch3 (counts as first dc). Make 6 dc in same chain space (total of 7 dc's). Make 7 dc's into the chain space of the next cluster. Repeat 4 more times, so that each cluster has 7 dc's in its chain space. Join with slip stitch to the third chain of the beginning ch3 of the round. Cut yarn and pull through. (6 sets of 7 dc's)
Round 4 :
Join new color in the slip stitch of previous round's end, and ch1 (counts as a sc). Make one sc into each of the dc's of the cluster (this makes 7 sc including the ch1). Make one long dc (between clusters) that extends down into round 2 of the flower, so that it separates the round 2 clusters. *Sc into each of the 7 dc stitches of the next cluster. Make one long dc (between clusters) that extends down into round 2 of the flower, so that it separates the round 2 clusters.* Repeat from * to * four more times. Slip stitch to the beginning of the round ch1 stitch. Cut yarn and pull through. (42 sc and 6 long dc)
Round 5 :
Join next color to the slip stitch at the end of the previous round. Ch3 (counts as first dc). Make one dc into each of the next 2 sc's, then (dc, ch1, dc) into the next sc (this forms the apex of the flower petal). Then make one dc into each of the next three sc. Make one dc into the previous round's long dc stitch. *Make one dc into each of the next petal's first three sc stitches, then (dc, ch1, dc) into the next sc (this forms the apex of the petal), then make one dc into each of the next three sc. Make one dc into the previous round's long dc stitch.* Repeat from * to * four more times. Slip stitch to the third chain of the ch3 of the beginning of the round. Cut yarn and pull through. (You should have nine dc stitches between each petal apex, separated by a chain stitch, so 54 dc in all)
— African Flower Pentagon Motif :
Round 1 :
Ch5 and join with slip stitch to form a ring. Ch3 (counts as first dc), 1 dc in ring, ch1. Then make *2 dc in ring, ch1*. Repeat from * to * 3 times more, slip stitch join to third chain of beginning ch3 of the round. Cut yarn and pull through, leaving a tail. (5 sets of 2dc's separated by chain stitches)
Round 2 :
Join next color in the ch1 space (just to the right of the previous round's ch3 beginning) and ch3 (counts as first dc). Make a dc in that same chain space then ch1. Make 2 dc (still in the same chain space). Move on to the next chain space of the previous round, and make the following: 2 dc, ch1, 2dc in that chain space. Repeat this in each of the next 3 chain spaces. Join with slip stitch to third chain of beginning ch3 of the round. (5 clusters of [2dc,ch,2dc])
Round 3 :
Continue with the same color. Slip stitch into the chain space in the middle of the first cluster of the previous round. Ch3 (counts as first dc). Make 6 dc in same chain space (total of 7 dc's). Make 7 dc's into the chain space of the next cluster. Repeat 3 more times, so that each cluster has 7 dc's in its chain space. Join with slip stitch to the third chain of the beginning ch3. Cut yarn and pull through, leaving a tail. (5 sets of 7 dc's)
Round 4 :
Join new color in the slip stitch of previous round's end, and ch1 (counts as a sc). Make one sc into each of the dc's of the cluster (this makes 7 sc including the ch1). Make one long dc (between clusters) that extends down into round 2 of the flower, so that it separates the round 2 clusters. *Sc into each of the 7 dc stitches of the next cluster. Make one long dc (between clusters) that extends down into round 2 of the flower, so that it separates the round 2 clusters.* Repeat from * to * three more times. Slip stitch to the beginning of the round ch1 stitch. Cut yarn and pull through, leaving a tail. (35 sc and 5 long dc)
Round 5 :
Join next color to the slip stitch at the end of the previous round. Ch3 (counts as first dc). Make one dc into each of the next 2 sc's, then (dc, ch1, dc) into the next sc (this forms the apex of the flower petal). Then make one dc into each of the next three sc. Make one dc into the previous round's long dc stitch. *Make one dc into each of the next petal's first three sc stitches, then (dc, ch1, dc) into the next sc (this forms the apex of the petal), then make one dc into each of the next three sc. Make one dc into the previous round's long dc stitch.* Repeat from * to * three more times. Slip stitch to the third chain of the ch3 of the beginning of the round. Cut yarn and pull through, leaving a tail. (You should have nine dc stitches between each petal apex, separated by a chain stitch, so 45 dc in all)
— African Flower Heptagon Motif :
Round 1 :
Ch5 and join with slip stitch to form a ring. Ch3 (counts as first dc), 1 dc in ring, ch1. Then make *2 dc in ring, ch1*. Repeat from * to * 5 times more, slip stitch join to third chain of beginning ch3 of the round. Cut yarn and pull through, leaving a tail. (7 sets of 2dc's separated by chain stitches)
Round 2 :
Join next color in the ch1 space (just to the right of the previous round's ch3 beginning) and ch3 (counts as first dc). Make a dc in that same chain space then ch1. Make 2 dc (still in the same chain space). Move on to the next chain space of the previous round, and make the following: 2 dc, ch1, 2dc in that chain space. Repeat this in each of the next 5 chain spaces. Join with a slip stitch to third chain of beginning ch3 of the round. (7 clusters of [2dc,ch,2dc])
Round 3 :
Continue with the same color. Slip stitch into the chain space in the middle of the first cluster of the previous round. Ch3 (counts as first dc). Make 6 dc in same chain space (total of 7 dc's). Make 7 dc's into the chain space of the next cluster. Repeat 5 more times, so that each cluster has 7 dc's in its chain space. Join with slip stitch to the third chain of the beginning ch3 of the round. Cut yarn and pull through, leaving a tail. (7 sets of 7 dc's)
Round 4 :
Join new color in the slip stitch of previous round's end, and ch1 (counts as a sc). Make one sc into each of the dc's of the cluster (this makes 7 sc including the ch1). Make one long dc (between clusters) that extends down into round 2 of the flower, so that it separates the round 2 clusters. *Sc into each of the 7 dc stitches of the next cluster. Make one long dc (between clusters) that extends down into round 2 of the flower, so that it separates the round 2 clusters.* Repeat from * to * five more times. Slip stitch to the beginning of the round ch1 stitch. Cut yarn and pull through, leaving a tail. (49 sc and 7 long dc)
Round 5 :
Join next color to the slip stitch at the end of the previous round. Ch3 (counts as first dc). Make one dc into each of the next 2 sc's, then (dc, ch1, dc) into the next sc (this forms the apex of the flower petal). Then make one dc into each of the next three sc. Make one dc into the previous round's long dc stitch. *Make one dc into each of the next petal's first three sc stitches, then (dc, ch1, dc) into the next sc (this forms the apex of the petal), then make one dc into each of the next three sc. Make one dc into the previous round's long dc stitch.* Repeat from * to * five more times. Slip stitch to the third chain of the ch3 of the beginning of the round. Cut yarn and pull through, leaving a tail. (You should have nine dc stitches between each petal apex, separated by a chain stitch, so 63 dc in all)
— African Flower Octagon Motif :
Round 1 :
Ch5 and join with slip stitch to form a ring. Ch3 (counts as first dc), 1 dc in ring, ch1. Then make *2 dc in ring, ch1*. Repeat from * to * 6 times more, slip stitch join to third chain of beginning ch3 of the round. Cut yarn and pull through, leaving a tail. (8 sets of 2dc's separated by chain stitches)
Round 2 :
Join next color in the ch1 space (just to the right of the previous round's ch3 beginning) and ch3 (counts as first dc). Make a dc in that same chain space then ch1. Make 2 dc (still in the same chain space). Move on to the next chain space of the previous round, and make the following: 2 dc, ch1, 2dc in that chain space. Repeat this in each of the next 6 chain spaces. Join with slip stitch to third chain of beginning ch3 of the round. (8 clusters of [2dc,ch,2dc])
Round 3 :
Continue with the same color. Slip stitch into the chain space in the middle of the first cluster of the previous round. Ch3 (counts as first dc). Make 6 dc in same chain space (total of 7 dc's). Make 7 dc's into the chain space of the next cluster. Repeat 6 more times, so that each cluster has 7 dc's in its chain space. Join with slip stitch to the third chain of the beginning ch3 of the round. Cut yarn and pull through, leaving a tail. (8 sets of 7 dc's)
Round 4 :
Join new color in the slip stitch of previous round's end, and ch1 (counts as a sc). Make one sc into each of the dc's of the cluster (this makes 7 sc including the ch1). Make one long dc (between clusters) that extends down into round 2 of the flower, so that it separates the round 2 clusters. *Sc into each of the 7 dc stitches of the next cluster. Make one long dc (between clusters) that extends down into round 2 of the flower, so that it separates the round 2 clusters.* Repeat from * to * six more times. Slip stitch to the beginning of the round ch1 stitch. Cut yarn and pull through, leaving a tail. (56 sc and 8 long dc)
Round 5 :
Join next color to the slip stitch at the end of the previous round. Ch3 (counts as first dc). Make one dc into each of the next 2 sc's, then (dc, ch1, dc) into the next sc (this forms the apex of the flower petal). Then make one dc into each of the next three sc. Make one dc into the previous round's long dc stitch. *Make one dc into each of the next petal's first three sc stitches, then (dc, ch1, dc) into the next sc (this forms the apex of the petal), then make one dc into each of the next three sc. Make one dc into the previous round's long dc stitch.* Repeat from * to * six more times. Slip stitch to the third chain of the ch3 of the beginning of the round. Cut yarn and pull through, leaving a tail. (You should have nine dc stitches between each petal apex, separated by a chain stitch, so 72 dc's in all)
— African Flower Square Motif :
Info :
The square has only 4 rounds instead of 5. If using JAYG method, make the square only up to round 3 before starting JAYG, which creates Round 4 (the final round)
Round 1 :
Ch5 and join with a slip stitch to make a ring. Ch3 (counts as first dc), then make 1dc into the ring, ch1. Make *4 dc into ring, ch1*. Repeat from * to * twice more. Make 2 dc into ring and join with a slip stitch to the third chain of the ch3 of the beginning of the round. (4 sets of 4dc's separated by chain stitches)
Round 2 :
If you choose, you can join a new color yarn. Ch3 into a chain space of Round 1. If you choose not to change colors, first slip stitch into the next along chain space, then Ch3 (counts as first dc). Make 7 dc into this same chain space. Make 8dc's into each of the three remaining chain spaces of Round 1. Join with a slip stitch to the third chain of the Ch3 beginning of Round 1. (4 clusters of 8 dc's)
Round 3 :
Join a new color if you wish. Ch1 into the slip stitch of the previous round. Sc into each of the seven dc's of this cluster. Sc into each of the 8 dc's of the next cluster. Repeat for the remaining two clusters. Join with a slip stitch to the ch1 at the beginning of the round. (4 sets of 8 sc's)
Round 4 :
Join a new color yarn to the slip stitch of round 3. Ch3 (counts as first dc). Make a dc into each of the next four sc stitches. Ch1, then *make a dc into the same sc space as the previous dc. Make a dc into each of the next eight sc's from Round 3. Ch1*. Repeat from * to * two times more. Make a dc into the same sc space as the previous dc. Make a dc into each of the next three sc stitches of Round 3. Join with a slip stitch to the third chain of the ch3 at the beginning of the round. (4 sets of 9 dc's separated by 4 chain stitches, ie four 9dc repeats)
— Making the Feet and Belly :
Step 1 :
Complete a pentagon up to round 5. Take a second pentagon that has been made up to Round 4 and join it to the completed pentagon along THREE SIDES. The two pentagons form a pocket when opened up. Make three more feet in the same way for a total of four feet
Step 2 :
Pop open each of the feet so that you can only see half of each pentagon. Place the four opened-up feet in position
Step 3 :
Join the belly octagon. The first TWO SIDES of the belly octagon are joined to the top INNER pentagons
Step 4 :
Crochet TWO UN-JOINED SIDES on the octagon
Step 5 :
Join the octagon on TWO SIDES to the feet again. The first side is joined to the lower left inner pentagon and the second side is joined to the lower right inner pentagon
Step 6 :
Complete the remainder of the octagon's Round 5 without joining. Plod now has a tummy
— Joining a Full Row of Hexagons to the Body Base :
Info :
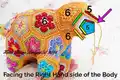
You will need 8 hexagons for this part. Open up each foot and place on your work table. You will be facing the wrong side of the belly octagon. The octagon still has FOUR FREE SIDES (two free sides at the left-hand side of the body and two free sides on at the right-hand side of the body)
Step 1 :
Join first hexagon along TWO SIDES to the body. The first side is joined to the left-hand front leg pentagon and the second side is joined to one free side of the belly octagon
Step 2 :
Join a hexagon to the body along THREE SIDES. The first side is joined to the previously-joined hexagon, then join it to the belly octagon and then finally to the left-hand hind leg pentagon
Step 3 :
Turn the work so that you are facing the bum end of the body. Join a hexagon on three sides to the body. The first side is joined to the hexagon you joined in the previous step, the second and third sides are joined to the left hind leg
Step 4 :
Join a hexagon along three sides, starting at the indicated point. The first side is joined to the hexagon you added in the previous step. The second and third sides are joined to the right hind leg
Step 5 :
Turn the work so that you are facing the Right-Hand Side of the body. Join a hexagon to the work along three sides. The first side is joined to the hexagon you added previously. Note that the third side is joined to the belly octagon
Step 6 :
Join another hexagon along three sides. The second side is joined to the belly octagon
Step 7 :
Turn the work so that you are now facing the front of the body. Join a hexagon along three sides. The first side is joined to the hexagon you added in the previous step. The 2nd and 3rd sides are joined to the right front leg pentagons
Step 8 :
Join a hexagon along four sides. The first side is joined to the hexagon you added in the previous step. The second and third sides are joined to the left front leg pentagons, and the fourth side is joined to the hexagon at the left-hand side of the body
— Making Plod's Tail :
Step 1 :
Turn the work so that you are facing the bum end. Join a hexagon to the V-shaped area between the two bum hexagons along two sides
Step 2 :
Join a pentagon along one side of the pentagon you added in the previous step
Step 3 :
Join a pentagon along one side
Step 4 :
Crochet the remainder of round 5 without joining
Step 5 :
Join a pentagon to the tail end along two sides
Step 6 :
Join a pentagon to the tail along one side (to the previously added pentagon)
Step 7 :
Continue to crochet ONE un-joined side. The next joined side is to the hexagon at the right-hand side of the bum
Step 8 :
Turn the work so that you are facing the left hand side of the body. Continue to join the pentagon to the tail end along a further three sides
— Making the Rest of the Body :
Step 1 :
Join a hexagon to the work along three sides on the right-hand side of the body
Step 2 :
Join a pentagon to the work along three sides
Step 3 :
Join a hexagon to the work along three sides
Step 4 :
Turn the work to face the left hand side of the body. Join a hexagon to the body along three sides
Step 5 :
Join a pentagon along three sides
Step 6 :
Join a pentagon along three sides. The left side of the body is done
— Making the Top of the Body :
Step 1 :
Place the work so that you are facing the top of the body with the tail at the top. Join a hexagon to the back along four sides
Step 2 :
Join another hexagon along four sides
Step 3 :
Join an adjacent hexagon along five sides
Step 4 :
Join a heptagon along four sides. There are three free sides remaining on the heptagon
— Stuffing :
Info :
Start with small tufts of stuffing, and stuff the tail and hind legs first. Make sure that the legs are equally stuffed, shape and firmness being considered. Add small tufts of stuffing to the body, being careful to distribute the stuffing evenly between the left and right hand sides of the body. When you have reached the middle of the body, stuff the front legs. Continue to stuff the rest of the body, always using small bits of stuffing and not big handfuls. Make sure to leave enough room for you to still be able to crochet the head motifs to the body
— Making the Head :
Step 1 :
Face the front of the body. Join a hexagon to the V-shaped area between the two front legs along two sides. The first side is joined to the right front leg and the second side is joined to the left front leg
Step 2 :
Join a hexagon to the Right-hand side of the head along three sides, starting the first joining side to the heptagon
Step 3 :
Join a hexagon to the Left-hand side of the head along three sides, starting the first joining side to the one-color hexagon you joined in the first step of making the head
Step 4 :
Still facing the front of the body but looking slightly from above, join a square to the head along three sides
Step 5 :
Join a pentagon to the top of the head along three sides. The second side is joined to the square
Step 6 :
Face the Right-hand side of the head. Join a pentagon to the head along three sides
Step 7 :
Face the Left-hand side of the body. Join the final pentagon along ALL SIDES. When you have two sides left over to still join, carefully stuff the remainder of the head and neck, making sure the stuffing is even and symmetrically placed. Complete the joining
— Completing the Tail :
Info :
There is a little opening left at the tip of the tail. This was purposely left until last so that you could still place a little stuffing into the tail end. Stuff the tail so that you have a nice, pleasing shape. Note there are two sides remaining at this end
Step 1 :
Join a square motif to the tail tip along the two remaining sides. Start by joining the square to the first side (which is at the left-hand side of the body). Turn the work so that you are facing the right hand side of the body and tail end. Continue to join the square along the second side
Step 2 :
Complete the square, not joining any further. There will be a short opening between the two un-joined sides of the completed square. Stuff the tip of the tail and then sew the opening closed using spare yarn and a tapestry needle
— Making and Attaching the Neck Frill :
Info :
The neck frill is made up of ten pentagons. The front side of the neck frill has five pentagons and the back side also has five pentagons. Each row of five pentagons are joined along one side to each other. You can either complete all ten pentagons up to round 5 and sew five of them together or use the JAYG method (in which case you'll complete one pentagon and then join the remaining four, one at a time, along one side)
Step 1 :
Complete the two rows of the neck frill (5 pentagons each). Place them together, wrong side facing. Starting at one end, crochet them together using a dc, making sure that you slip your crochet hook under all four loops of the two stitches you are crocheting together (2 loops per stitch from each side). Continue to join all around
Step 2 :
Sew the frill to the neck area along the bottom edge. Using a curved sewing needle will make things easier. You will only sew the frill to the body along the bottom edge of the frill
— Sculpting the Eye Sockets and Attaching the Eyes :
Step 1 :
Take a length of yarn around a meter long (around a yard) and fold in half so that the two ends are placed together. Thread these two ends into the eye of a long tapestry needle or doll making needle
Step 2 :
Insert the needle at the left eye area and push the needle all the way through the head, exiting at the right eye area. Pull the yarn through the head, leaving a small loop at the left eye
Step 3 :
Re-insert the needle into the right eye area just next to where your needle exited, and push across the head back to the left eye area, again exiting slightly adjacent to where you initially inserted the needle, putting the needle through the yarn loop
Step 4 :
Pull up the yarn gently and you will see the eye sockets indent. Don't pull too hard or the eyes will be placed too close together
Step 5 :
Thread the needle through the wire loop of the glass eye. Re-insert the needle into the centre of the left eye motif and push through the head to the right eye centre. Before you pull the yarn all the way through, use pointed nose pliers to pinch the wire loop narrower (this allows it to be pulled into the head more easily). Give a gentle tug on the yarn to sink the eye into the head
Step 6 :
Repeat the process for the right eye. Thread the needle and yarn through the right eye wire loop, re-insert the needle into the same hole that the needle exited from, and again, pinch the wire loop narrower, and push the needle all the way to the left eye, exiting under the left eye, just to the side of where the wire loop sits. Give a gentle tug on the yarn and see the right eye sink into the head. Make a triple stitch under the left eye to anchor the yarn and snip. The eyes are done
— Making and Attaching the Horns :
Large Horn (make 2) :
Making sure to leave a long tail, Ch12. Join in the round with a slip stitch into the first ch. You will be working in a spiral from now on, NOT in rounds. Make a sc into each of the next 24 sts. *Sc into each of the next two stitches, then make a sc decrease. Repeat two more times from * (three decreases in total). Crochet a sc into each stitch until you have worked in a spiral for a total of 50 sts. **Make a sc into each of the next two sts, then crochet a sc decrease. Repeat from ** two more times. Sc into each of the next 12 sts. Crochet two sc decreases. Cut the yarn and pull through the last stitch. Use a tapestry needle to draw the tail through the remaining stitches and pull tight to close the hole. Lightly stuff the horn using polyester stuffing
Small Horn (make 1) :
Making sure to leave a long tail, Ch12. Join in the round with a slip stitch into the first ch. You will be working in a spiral from now on, NOT in rounds. Make a sc into each of the next 24 sts. *Sc into each of the next two stitches, then make a sc decrease. Repeat two more times from * (three decreases in total). Crochet a sc into each stitch until you have worked in a spiral for a total of 20 sts. **Make a sc into each of the next two sts, then crochet a sc decrease. Repeat from ** two more times. Sc into each of the next 12 sts. Cut the yarn and pull through the last stitch. Use a tapestry needle to draw the tail through the remaining stitches and pull tight to close the hole. Lightly stuff the horn using polyester stuffing
Attaching Horns :
Thread the tail end of yarn through a tapestry needle and sew the horns to the head around the base of each, making sure they are firmly attached. Place two larger horns on the top part of the head and one smaller horn on the lower part of the head
This stunning Plod the Triceratops pattern showcases the incredible beauty of modular African Flower crochet at its finest! Designed for adventurous crocheters ready to tackle an impressive 3D project, this pattern transforms 50 individual colorful motifs into a charming prehistoric companion. The detailed photo tutorials and comprehensive instructions guide you through every join, from constructing sturdy feet to sculpting realistic eye sockets. Whether you're a dedicated granny square enthusiast or looking to expand your amigurumi skills with an innovative technique, Plod offers the perfect blend of challenge and reward. The result is a truly heirloom-quality piece that will be treasured for generations! 🦖🧶✨