🧶 Beautiful ✨ Detailed 💝 Adorable

Feather Locklear the Chick Amigurumi Pattern

Feather Locklear the Chick Amigurumi Pattern
4.6★ Rating
3-4 Hours Time Needed
2.7K Made This
✂️

Intermediate Level

Ideal for those with basic knitting experience, featuring slightly more advanced stitches and techniques to expand your skills.

⏱️

Bite-Sized Project

Complete in under 2 hours—quick, fun, and perfect for a little creative escape.

🐥

Charming Critter

Delightful animal designs with sweet details that capture the essence of your favorite woodland and farmyard friends.

About This Feather Locklear the Chick Amigurumi Pattern

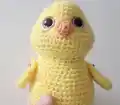
Feather Locklear the Chick is an endearing amigurumi pattern that combines simple crochet techniques with a unique sunken eye design to create a character bursting with personality. Standing at 6 inches tall when made with worsted weight yarn, this little chick features a rounded body, stubby wings, and adorable webbed feet. The pattern includes a special technique for creating expressive sunken eyes that give your chick a truly distinctive look, along with optional embellishments like hair tufts and blushed cheeks to add even more charm.

Feather Locklear the Chick Amigurumi Pattern crochet pattern - detailed view of completed project

The versatility of this pattern shines through with options to create standard, fluffy, or chenille versions by simply changing your yarn type and hook size. Each variation offers a different texture and appearance while maintaining the same lovable character that makes Feather Locklear so special.

Why You'll Love This Feather Locklear the Chick Amigurumi Pattern

I absolutely love this pattern because it teaches you the sunken eye technique, which is a game-changer for creating expressive amigurumi characters. The instant personality that comes from those sweet, slightly sad eyes makes every chick you create feel unique and full of life. I also appreciate how beginner-friendly the construction is while still offering that special detail that makes it feel like an advanced project. The size is perfect for quick gifting, and the optional variations mean you can make a whole flock of chicks with different textures and looks. Plus, there's something incredibly satisfying about watching this little character come to life as you stuff and assemble it!

Feather Locklear the Chick Amigurumi Pattern step 1 - construction progress Feather Locklear the Chick Amigurumi Pattern step 2 - assembly progress Feather Locklear the Chick Amigurumi Pattern step 3 - details and accessories Feather Locklear the Chick Amigurumi Pattern step 4 - final assembly and finishing

Switch Things Up

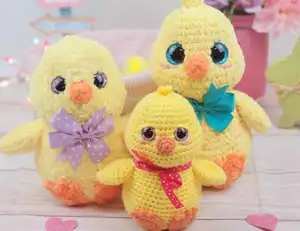
I love experimenting with different yarn textures to give Feather Locklear unique personalities! One of my favorite variations is using a variegated yellow yarn that creates subtle color shifts throughout the body—it adds depth without requiring color changes. I've also tried making seasonal versions by swapping the yellow for pastel pink, baby blue, or lavender for a whole rainbow flock of chicks.

For a more realistic look, I sometimes add a slight gradient by starting with a deeper golden yellow at the bottom and transitioning to a lighter yellow toward the head. You can achieve this by alternating between two shades of yellow every few rounds. I've also experimented with the beak and feet colors—trying coral, bright red, or even a dusky rose for a different vibe.

The optional hair tufts are a fun place to play around too! Instead of making just two small tufts, try creating three or four for a spikier, more personality-filled look. You could even use a contrasting color like white or orange for a punk-rock chick aesthetic. I've made versions with embroidered closed eyes for a sleeping chick, and others with felt eyelashes for a more feminine touch.

For texture lovers, mixing standard yarn for the body with fluffy yarn just for the tail creates an interesting contrast that highlights the tail as a feature. I've also sewn tiny ribbon bows around the neck or added miniature crocheted flowers behind one ear for extra charm. The beauty of this pattern is its versatility—each small change creates a completely different character while keeping the same lovable base design!

Common Mistakes & How to Fix Them

✗ Placing eyes too far apart or too close together can throw off the chick's proportions—always count the 9 holes between them carefully before securing 
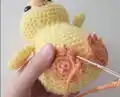
✗ Over-stuffing the head before creating sunken eyes makes it difficult to achieve the desired look—remove most stuffing, create the eye effect, then re-stuff ✗ Skipping stitch markers when working in continuous rounds leads to losing your place and uneven shaping throughout the body and head ✗ Not stuffing the body firmly enough as you work causes the chick to be floppy and lose its rounded shape—stuff gradually and firmly ✗ Forgetting to leave long tails for sewing pieces together means struggling with assembly or having visible knots where parts connect to the body

Feather Locklear the Chick Amigurumi Pattern

Create your own adorable Feather Locklear the Chick with this charming amigurumi pattern! This delightful 6-inch yellow chick features expressive sunken eyes, tiny wings, and sweet orange feet that give it incredible personality. Perfect for Easter gifts, spring decorations, or as a cuddly companion for children and adults alike. The pattern includes detailed instructions for creating the signature sunken eye technique that brings this little chick to life, plus optional hair tufts and rosy cheeks for extra cuteness. With variations for fluffy and chenille versions, you can customize your chick to match your style and yarn preferences.

Intermediate 3-4 Hours

Materials Needed for Feather Locklear the Chick Amigurumi Pattern

— Main Fabric

  • 01
    Worsted Weight #4 yarn, approximately 50g of yellow (Color A) for main body
  • 02
    Worsted Weight #4 yarn, approximately 20g of orange (Color B) for beak and feet
  • 03
    Red Heart With Love Daffodil for standard yellow version
  • 04
    I Love This Yarn Carrot for standard orange accents
  • 05
    Little Bunny Yellow yarn for fluffy chick variation
  • 06
    Parfait Mango for fluffy and chenille variations
  • 07
    Parfait Yellow for chenille variation
  • 08
    Flecks Yarn Loops and Thread Sunshine for chenille variation (double stranded with Parfait Yellow)

— Tools Required

  • 01
    Crochet hook size D (3.25mm) for standard version
  • 02
    Crochet hook size F for fluffy and chenille variations
  • 03
    18mm safety eyes for standard version
  • 04
    23mm safety eyes for fluffy chick variation
  • 05
    28mm safety eyes for chenille chick variation
  • 06
    Scissors
  • 07
    Yarn needle for sewing
  • 08
    Stitch markers
  • 09
    Fiberfill stuffing (Polyfil recommended)
  • 10
    Pins for assembly
  • 11
    White yarn for eye highlights (optional)
  • 12
    Pink yarn or embroidery thread for cheeks (optional)

Progress Tracker

0% Complete

— Head and Body :

Info :

Crocheted from top of head to bottom with Color A (Yellow)

Round 1 :

Make 12 sc into a magic ring (12)

Round 2 :

Increase in each st around (24)

Round 3 :

(3 sc, inc) x 6 (30)

Round 4 :

sc in each st around (30)

Round 5 :

(4 sc, inc) x 6 (36)

Round 6-8 :

sc in each st around (36)

Info :

Mark the 6th and 7th inc with a stitch marker on round 9 for placement of eyes

Round 9 :

inc x 6, 6 sc, inc x 6, 18 sc (48)

Round 10-12 :

sc in each st around (48)

Round 13 :

dec x 6, 6 sc, dec x 6, 18 sc (36)

Round 14 :

sc in each st around (36)

Round 15 :

(dec, 4 sc) x 6 (30)

Info :

Place eyes between rounds 8 and 9, leaving 9 holes between them. With eyes facing you, left eye will be placed before the stitch marker between rounds 8 and 9. Right eye will be placed after the stitch marker. If you want the sunken eye look, do not place the backs of the eyes on until round 29.

Round 16 :

(dec, 3 sc) x 6 (24)

Round 17 :

sc in each st around (24)

Info :

Now for the eyes. Stuff the head well. Cut a long piece of yarn and remove the eyes. Place the needle in the hole where the first eye was and insert the needle into a hole next to the eye hole. Go back and forth between each eye hole repeating the process from the first eye. Pull slightly on the yarn after going through each hole. Do this about 3 times on each side until you reach the look you want.

Info :

To place the backs of the eyes you will need to remove most of the stuffing to place the washers on the eyes, then re-stuff it.

Round 18 :

(inc, 3 sc) x 6 (30)

Round 19 :

(inc, 4 sc) x 6 (36)

Round 20 :

sc in each st around (36)

Info :

Stuff the body as you work

Round 21 :

(inc, 11 sc) x 3 (39)

Round 22 :

sc in each st around (39)

Round 23 :

(inc, 12 sc) x 3 (42)

Round 24 :

sc in each st around (42)

Round 25 :

(6 sc, inc) x 6 (48)

Round 26 :

(7 sc, inc) x 6 (54)

Round 27-29 :

sc in each st around (54)

Round 30 :

(7 sc, dec) x 6 (48)

Round 31 :

(6 sc, dec) x 6 (42)

Round 32 :

(5 sc, dec) x 6 (36)

Round 33 :

(4 sc, dec) x 6 (30)

Round 34 :

(3 sc, dec) x 6 (24)

Round 35 :

(2 sc, dec) x 6 (18)

Round 36 :

(sc, dec) x 6 (12)

Round 37 :

dec x 6 (6)

Info :

F/O and sew the hole closed

— Beak :

Info :

With Color B (Orange)

Round 1 :

Make 6 sc into a magic ring (6)

Round 2 :

(sc, inc) x 3 (9)

Info :

F/O and leave a long tail for sewing

— Wings :

Info :

Make 2 pieces with Color A (Yellow)

Round 1 :

Make 6 sc into a magic ring (6)

Round 2 :

(sc, inc) x 3 (9)

Round 3 :

(2 sc, inc) x 3 (12)

Round 4 :

sc in each st around (12)

Info :

Do not stuff the wings

Round 5 :

(sc, inc) x 6 (18)

Round 6 :

sc in each st around (18)

Round 7 :

(sc, dec) x 6 (12)

Round 8 :

(2 sc, dec) x 3 (9)

Round 9 :

(sc, dec) x 3 (6)

Info :

Fold the wings in half and sc the opening closed. F/O and leave a long tail for sewing

— Tail :

Info :

With Color A (Yellow)

Round 1 :

Make 6 sc into a magic ring (6)

Round 2 :

(sc, inc) x 3 (9)

Round 3 :

Inc x 3, 6 sc (12)

Info :

F/O and leave a long tail for sewing

— Feet :

Info :

Make 2 pieces with Color B (Orange)

Round 1 :

Make 6 sc into a magic ring (6)

Round 2 :

Increase in each st around (12)

Round 3 :

(sc, inc) x 6 (18)

Round 4 :

(ch 3, sl st in 2nd ch from hook, sl st in next ch, sl st in next 2 sts on circle) x 3

Info :

F/O and leave a long tail for sewing

— Hair on Head (Optional) :

Info :

With Color A (Yellow)

Info :

Attach yarn in the magic ring with a sl st

Instructions :

(Ch 4, sl st in 2nd ch from hook and across) x 2

Info :

F/O and weave in the tail end

Assembly Instructions

  • Take a long strand of white yarn and thread your needle. Insert the needle into a hole between the eyes, bring the needle to the lower corner of the eye, wrap around the outside of the eye, and insert into a hole on top of the eye. Pull slightly to create a highlight. Repeat for the second eye.
  • Optional: Take a long strand of yellow yarn and create eyelids by bringing the needle up to a corner on the eye, wrapping the needle in front of the eye to create an eyelid shape. Repeat on the second eye and weave in the tail end.
  • Optional: Cut a strand of pink yarn or embroidery thread and embroider two small cheeks on the face below and to the sides of the eyes.
  • Pin the beak onto the front of the face in between the eyes at the appropriate height. The beak is not stuffed. Sew securely in place.
  • Pin the wings onto the sides of the body approximately between rounds 18 and 19. Sew the wings securely onto the body.
  • Pin the feet onto the front bottom portion of the body, positioning them to give the chick a stable standing base. Sew the feet securely onto the body.
  • Pin the tail onto the back of the body at the appropriate height to balance the front features. Sew the tail securely onto the body.

Important Notes

  • 💡Do not join rounds unless stated in the pattern—work in a continuous spiral and use a stitch marker to mark the beginning of each round
  • 💡All stitches are worked in both loops unless the pattern specifically states to work in BLO (back loops only) or FLO (front loops only)
  • 💡The sunken eye technique requires removing most of the head stuffing temporarily—be patient with this process as it creates the distinctive character expression
  • 💡How you stuff matters significantly—the type of stuffing you use and how firmly you pack it will affect the final appearance of your chick
  • 💡You can use different hook sizes and yarn weights to create chicks of various sizes, but you may need to adjust eye placement and eye sizes accordingly
  • 💡Pin all pieces in place before sewing to ensure proper positioning and to visualize the final appearance before making permanent attachments
  • 💡If making the fluffy or chenille variations, follow the alternative yarn and hook size specifications provided in the helpful tips section for best results

This delightful Feather Locklear the Chick pattern combines beginner-friendly construction with an intermediate-level eye technique that brings instant personality to your creation. The sunken eye method transforms a simple amigurumi into a character bursting with emotion and charm. Whether you choose the classic version, the fluffy variation, or the chenille style, you'll love watching this adorable chick come to life in your hands. Perfect for Easter baskets, springtime decorations, or as a cuddly companion for bird lovers of all ages. The compact 6-inch size makes it ideal for quick gifts and stash-busting projects! 🐥✨ Happy crocheting! 🧶💛

You ask,

we answer.

FAQs

What makes the sunken eye technique special and is it difficult to learn?

The sunken eye technique creates a distinctive, expressive look by pulling the area around the eyes inward slightly, giving the chick a sweet, slightly wistful expression. While it requires patience and practice, the pattern includes detailed instructions and references a video tutorial. The key is to work slowly, pull gently on the yarn, and repeat the process several times until you achieve the desired depth. It's easier than it looks once you get the hang of it!

Can I make this chick larger or smaller by changing my yarn and hook?

Absolutely! The pattern is designed for worsted weight yarn with a 3.25mm hook, creating a 6-inch chick. You can use bulkier yarn with larger hooks for a bigger chick, or lighter weight yarn with smaller hooks for a miniature version. Just remember that changing sizes may require adjusting the placement and size of the safety eyes to maintain proper proportions. The helpful tips section provides guidance on alternative versions.

Do I need to stuff the wings, tail, and beak?

No, the pattern specifically states not to stuff the wings, and the designer also mentions not stuffing the beak. The tail is left to your preference but typically would have minimal stuffing if any. Leaving these parts unstuffed helps them maintain their natural shape and gives the chick better proportions, with the wings lying flat against the body and the beak staying relatively flat on the face.

What if I want to skip the sunken eye technique?

You can absolutely skip this technique if you prefer! Simply place the safety eyes between rounds 8 and 9 with 9 holes between them, secure the backs immediately, and continue with the pattern. Your chick will still be adorable but will have a more traditional amigurumi appearance with the eyes sitting flush with the face rather than sunken. This also makes the pattern faster and more beginner-friendly.

What's the difference between the fluffy and chenille variations?

The fluffy variation uses Little Bunny yarn, which creates a soft, fuzzy texture that makes the chick look like a real baby chick with downy feathers. The chenille variation uses double-stranded Parfait Yellow with Loops and Thread Sunshine yarn, creating a plush, velvety texture. Both variations use an F hook and larger safety eyes (23mm for fluffy, 28mm for chenille) to accommodate the bulkier yarn. Each offers a unique tactile and visual experience while following the same basic pattern structure.