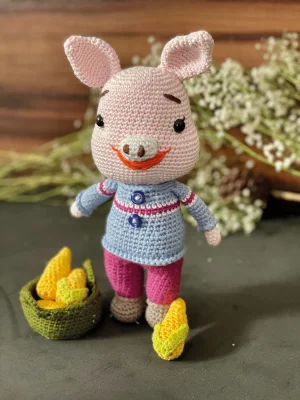
Meet Pinky, the most stylish little pig in the garden! This pattern is a joy to work up, especially with those tiny corn accessories and her sweet striped sweater. You'll love seeing her personality come to life as you stitch each piece. She's got so much character in that little snout, and the harvest basket is the perfect finishing touch for a farmhouse-themed shelf or a thoughtful handmade gift.
Progress Tracker
0% Complete
— 1. Head :
Round 1 :
Start with a magic ring and work 8 sc into it. (8)
Round 2 :
Work 1 inc in every stitch around. (16)
Round 3 :
Repeat [1 sc, 1 inc] 8 times. (24)
Round 4 :
Repeat [2 sc, 1 inc] 8 times. (32)
Round 5 :
Repeat [3 sc, 1 inc] 8 times. (40)
Round 6 :
Repeat [4 sc, 1 inc] 7 times, then sc in the remaining stitches. (48)
Round 7 :
Repeat [7 sc, 1 inc] 6 times. (54)
Round 8-17 :
Work 1 sc in every stitch around. (54)
Round 18 :
14 sc, 6 inc, 14 sc, 6 inc, 13 sc. (66)
Round 19-27 :
Work 1 sc in every stitch around. (66)
Round 28 :
Repeat [11 sc, 1 dec] 5 times, then sc in the last stitch. (61)
Round 29 :
Repeat [10 sc, 1 dec] 5 times, then sc in the last stitch. (56)
Round 30 :
Repeat [9 sc, 1 dec] 5 times, then sc in the last stitch. (51)
Round 31 :
Repeat [8 sc, 1 dec] 5 times, then sc in the last stitch. (46)
Round 32 :
Repeat [4 sc, 1 dec] 8 times. (38)
Round 33 :
Repeat [5 sc, 1 dec] 5 times. (32)
Info :
Begin stuffing the head firmly. Place safety eyes between Rounds 15 and 16 with 14 stitches between them.
Round 34-35 :
Work 1 sc in every stitch around. (32)
Info :
Fasten off, leaving a long tail for sewing.
— 2. Legs :
Round 1 :
Using the secondary color, work 8 sc into a magic ring. (8)
Round 2 :
Work 1 inc in every stitch. (16)
Round 3 :
sc, inc, sc, inc, 4 sc, inc, inc, 4 sc, inc, sc. (22)
Round 4-6 :
Work 1 sc in every stitch around. (22)
Round 7 :
7 sc, 4 dec, 7 sc. (18)
Round 8 :
5 sc, 4 dec, 5 sc. Switch to the sweater color for the final 5 stitches. (14)
Round 9 :
Work in blo only: 14 sc around. (14)
Round 10 :
3 sc, inc, 6 sc, inc, 3 sc. (16)
Info :
Start stuffing the leg as you go.
Round 11 :
Work 1 sc in every stitch around. (16)
Round 12 :
Repeat [7 sc, 1 inc] 2 times. (18)
Round 13-14 :
Work 1 sc in every stitch around. (18)
Round 15 :
4 sc, inc, 8 sc, inc, 4 sc. (20)
Round 16-17 :
Work 1 sc in every stitch around. (20)
Round 18 :
For the first leg: 14 sc, then stop. For the second leg: 20 sc. (20)
Round 19 :
On the second leg only: 6 sc, then stop. (6)
Info :
Note: The original source does not provide the specific rounds for the torso/sweater body. Use the leg joining technique and build up the torso to match the head size (32 stitches at the neck) before attaching. For the leg detail, work into the unused flo of Round 8.
— 3. Arms :
Round 1 :
Using the main color, work 6 sc into a magic ring. (6)
Round 2-4 :
Repeat [2 sc, 1 inc] around. (10)
Round 5-7 :
Work 1 sc in every stitch around. (10)
Round 8 :
Repeat [5 sc, 1 inc] around. (12)
Round 9 :
Work in blo only: 12 sc around. (12)
Round 10-15 :
Work 1 sc in every stitch around. (12)
Colour Change :
Switch to color D for Round 16. Switch to color C for Round 17. Switch to color D for Round 18. Switch back to color A for Rounds 19-20.
Round 16-20 :
Work 1 sc in every stitch around using the specified colors. (12)
Finish :
Flatten the top of the arm and work 6 sc through both layers to close. Do not stuff. Fasten off with a long tail.
— 4. Tail :
Round 1 :
Work 6 sc into a magic ring. (6)
Round 2 :
Work 1 sc in every stitch around. (6)
Round 3 :
Work 2 inc around. (8)
Round 4 :
Work 1 sc in every stitch around. (8)
Round 5 :
Repeat [2 sc, inc] 2 times. (12)
Round 6 :
Work 1 sc in every stitch around. (12)
Round 7 :
Repeat [3 sc, inc] 3 times. (15)
Round 8 :
Work 1 sc in every stitch around. (15)
Round 9 :
Repeat [3 sc, inc] 3 times. (18)
Round 10 :
Work 1 sc in every stitch around. (18)
Round 11 :
Repeat [3 sc, dec] 3 times. (15)
Round 12 :
Repeat [3 sc, dec] 3 times. (12)
Round 13-14 :
Work 1 sc in every stitch around. (12)
Finish :
Stuff lightly, flatten the end, and work 6 sc through both layers to close. Fasten off.
— 5. Nose :
Round 1 :
ch 5. Starting in the 2nd ch from hook, work 2 sc in the first ch, 3 sc across, then 2 sc in the last ch. Rotate and work 1 sc in the unworked loops of the ch. (7)
Round 2 :
sc in first st, 2 inc, 4 sc, inc, 4 sc, 2 inc, sc in last st. (12)
Round 3-4 :
Repeat [3 sc, inc] around. (16)
Finish :
Fasten off, leaving a tail for sewing. Work 6 sc through the center ring to finish the snout shape if needed.
— 6. Ears :
Round 1 :
Work 6 sc into a magic ring. (6)
Round 2 :
Repeat [inc, 2 sc] 3 times. (9)
Round 3 :
Work 1 sc in every stitch around. (9)
Round 4 :
Repeat [inc, 2 sc] 3 times. (12)
Round 5 :
Repeat [inc, 1 sc] 6 times. (18)
Round 6 :
Repeat [2 sc, inc] 6 times. (24)
Round 7 :
Repeat [3 sc, inc] 6 times. (30)
Round 8-11 :
Work 1 sc in every stitch around. (30)
Round 12 :
Repeat [3 sc, dec] 6 times. (24)
Round 13 :
Repeat [2 sc, dec] 6 times. (18)
Round 14 :
Repeat [2 sc, dec] 6 times. (12)
Round 15 :
Work 1 sc in every stitch around. (12)
Round 16 :
Repeat [5 sc, dec] 2 times. (10)
Round 17 :
Work 1 sc in every stitch around. (10)
Finish :
Fasten off and leave a long tail for sewing.
— 7. Basket :
Round 1-5 :
Follow the same instructions as Rounds 1 through 5 of the Head. (40)
Round 6 :
Repeat [4 sc, inc] 8 times. (48)
Round 7-11 :
Work 1 sc in every stitch around. (48)
Round 12 :
ch 9, skip 4 st, sc in next 19 st, ch 9, skip 4 st, sc in next 19 st. (48)
Round 13 :
Work 9 hdc over the ch-9 space, skip 1 sc, 2 hdc into 1 sc, repeat around. (48)
— 8. Corn & Leaves :
Round 1 :
Work 12 sc into a magic ring. (12)
Round 2 :
Work 1 hdc in every stitch around. (12)
Round 3-7 :
Work 1 hdc in every stitch around. (12)
Round 8 :
hdc dec, hdc in remaining stitches. (11)
Round 9 :
hdc dec, hdc in remaining stitches. (10)
Round 10 :
hdc dec, hdc in remaining stitches. (9)
Round 11 :
Work 1 hdc in every stitch around. (9)
Round 12-14 :
hdc dec in every round until closed. (6)
Leaves :
ch 10, work 1 hdc in each ch. Repeat to create multiple leaves.
I hope you enjoy making Pinky as much as I did! She’s such a cheerful little character to have around, and those tiny corn cobs are just the sweetest detail. Whether she’s sitting on your desk or being hugged by a little one, she’s sure to bring a smile to everyone’s face. Don’t forget to share your finished photos with the community—I love seeing the different color combinations you choose for her sweater! Happy crocheting, and may your stitches always be even! 🧶 🐷 ✨