๐Ÿงถ Beautiful โœจ Detailed ๐Ÿ’ Adorable

Pillow Bunny Amigurumi Pattern

Pillow Bunny Amigurumi Pattern
4.0โ˜… Rating
6-8 Hours Time Needed
1.6K Made This
โœ‚๏ธ

Intermediate Level

Ideal for those with basic knitting experience, featuring slightly more advanced stitches and techniques to expand your skills.

โฑ๏ธ

Weekend Treat

Takes 5-7 hours, making it an enjoyable project to finish over a couple of days.

๐Ÿงธ

Cute Companion

An adorable friend to cherish, handcrafted with love to bring comfort and joy for years to come.

About This Pillow Bunny Amigurumi Pattern

This Pillow Bunny pattern combines functionality with cuteness, creating a dual-purpose item that serves as both a comfortable cushion and an adorable decorative piece. The pattern uses plush yarn worked in spiral rounds to create the main pillow body, with separately crocheted features including a white nose with pink embroidery, safety eyes with embroidered eyelids, long tapered ears, and small arms and legs. The construction is straightforward, making it accessible for intermediate crocheters while still offering plenty of charming details to keep the project interesting.

Pillow Bunny Amigurumi Pattern crochet pattern - detailed view of completed project

The finished bunny pillow can be customized in any color combination you choose, though the classic yellow and white color scheme gives it a cheerful, sunny appearance. The pattern includes clear instructions for shaping, assembly, and adding all the sweet facial features that bring this bunny to life.

Why You'll Love This Pillow Bunny Amigurumi Pattern

I absolutely love this pattern because it creates something that's both practical and utterly adorable! There's something so satisfying about making a project that can actually be used daily as a cozy pillow while also serving as room decor. The plush yarn works up quickly and feels incredibly soft, making the crafting process enjoyable from start to finish. I especially love how the long ears give the bunny so much personality, and the embroidered details add that handmade charm that makes each piece unique. It's also a fantastic gift that works for any age - kids love it as a cuddly companion, while adults appreciate it as a charming home accent.

Pillow Bunny Amigurumi Pattern step 1 - construction progress Pillow Bunny Amigurumi Pattern step 2 - assembly progress Pillow Bunny Amigurumi Pattern step 3 - details and accessories Pillow Bunny Amigurumi Pattern step 4 - final assembly and finishing

Switch Things Up

I love experimenting with color combinations for this bunny pillow! While the pattern suggests yellow and white, I've made versions in soft pastels like lavender and cream for a dreamy nursery vibe, or bold combinations like coral and mint for a modern look. You could even create seasonal versions - think warm browns and oranges for autumn, or cool blues and whites for winter.

If you want to add more personality, consider crocheting a little flower or bow to attach between the ears, or even adding some blush to the cheeks with fabric paint or embroidery. I've also experimented with making the ears even longer for a more dramatic, floppy effect that looks adorable.

For a truly unique touch, you could embroider the bunny's name on the back of the pillow or add decorative stitching patterns to the ears using contrasting yarn colors. Some makers even add small pom-poms for the tail instead of crocheting one, which gives it an extra fluffy, playful appearance. The possibilities are endless, and each variation makes your bunny pillow one-of-a-kind!

Common Mistakes & How to Fix Them

โœ— Not maintaining consistent tension throughout the spiral rounds can result in an uneven pillow shape that doesn't sit flat or looks lumpy when stuffed โœ— Attaching the ears too close to the center of the pillow top rather than near the edges makes them appear too small and loses the characteristic floppy bunny ear look โœ— Overstuffing the pillow makes it too firm and uncomfortable to use as an actual cushion while understuffing makes it look deflated and sad โœ— Placing the facial features without pinning them first often results in asymmetrical positioning that's difficult to fix once sewn permanently in place

Pillow Bunny Amigurumi Pattern

Create an adorable oversized bunny pillow that's perfect for snuggling, decorating, or gifting! This charming crochet pattern features a sweet bunny face with embroidered details, long floppy ears, and cute little paws and feet. Made with soft plush yarn, this pillow bunny measures approximately 34cm tall and 42cm wide, making it the perfect companion for bedrooms, nurseries, or cozy reading nooks. The pattern includes optional features like a fluffy tail and is designed to be both decorative and functional as a comfortable cushion.

Intermediate 6-8 Hours

Materials Needed for Pillow Bunny Amigurumi Pattern

โ€” Main Fabric

  • 01
    Himalaya Dolphin Baby plush yarn in yellow (3 skeins)
  • 02
    Himalaya Dolphin Baby or YarnArt Dolce plush yarn in white (less than half a skein)
  • 03
    Himalaya Dolphin Baby plush yarn in pink (small amount for nose)
  • 04
    Himalaya Dolphin Baby plush yarn in black (small amount for eyelids)
  • 05
    Black semi-cotton or acrylic yarn for eyebrows (such as YarnArt Jeans)
  • 06
    Holofiber or polyester stuffing

โ€” Tools Required

  • 01
    Crochet hook 3.5mm (or 4mm)
  • 02
    Needle with large eye for sewing
  • 03
    Safety eyes 22-24mm
  • 04
    Transparent glue
  • 05
    Scissors
  • 06
    Stitch markers (recommended)

Progress Tracker

0% Complete

โ€” Pillow :

Info :

Crochet with yellow yarn in spiral

Row 1 :

90 ch

Row 2 :

connect with the first loop crocheting 1 sc (it will be the first sc of the second row) and crochet 89 sc {90}

Rows 3-40 :

90 sc (38 rows) {90}

Info :

In the end of the last row crochet 10-11 sc more to the edge of the pillow. Tighten the thread, leave the long end for sewing. Sew the top of the pillow using a needle.

โ€” Nose :

Info :

Crochet with white yarn

Row 1 :

4 ch

Row 2 :

from the second loop from the hook: 2 sc, 3 sc in one loop. On the other side of the chain: 2 sc, 3 sc in one loop {10}

Row 3 :

2 sc, inc, inc, inc, 2 sc, inc, inc, inc {16}

Row 4 :

(3 sc, inc) - repeat 4 times {20}

Row 5 :

(4 sc, inc) - repeat 4 times {24}

Row 6 :

(4 sc, inc) - repeat 5 times {30}

Row 7 :

(5 sc, inc) - repeat 5 times {35}

Row 8 :

35 sc

Infos :

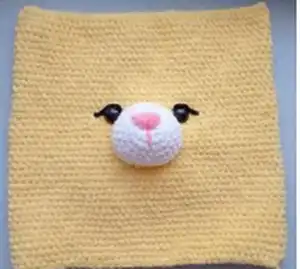
Tighten the loop, leave the long thread for sewing. Embroider the nose with pink plush (or semi-cotton) thread. Tie a knot and hide the thread inside. Fill the detail and sew on it between rows 16 and 26, counting from the bottom of the pillow. Secure the thread, hide it inside the pillow.

โ€” Eyes and Eyelids :

Infos :

Insert the safety eyes (or sew on them if you have buttons) between rows 24 and 25. The distance between the eyes is 9 sc. Embroider the eyelids with black plush yarn. Secure the thread inside the pillow. Optional: you can glue the eyelids to the pillow.

โ€” Ears (2 details) :

Info :

Crochet with yellow yarn

Row 1 :

6 sc in magic ring {6}

Row 2 :

(inc) - repeat 6 times {12}

Row 3 :

(5 sc, inc) - repeat 2 times {14}

Row 4 :

(6 sc, inc) - repeat 2 times {16}

Row 5 :

(7 sc, inc) - repeat 2 times {18}

Row 6 :

(8 sc, inc) - repeat 3 times {20}

Row 7 :

inc, 8 sc, inc, inc, 8 sc, inc {24}

Row 8 :

inc, 9 sc, inc, inc, 10 sc, inc, inc {29}

Row 9 :

12 sc, inc, inc, 15 sc {31}

Rows 10-15 :

31 sc (6 rows)

Row 16 :

14 sc, dec, 13 sc, dec {29}

Row 17 :

29 sc

Row 18 :

13 sc, dec, 12 sc, dec {27}

Rows 19-20 :

27 sc (2 rows)

Row 21 :

12 sc, dec, 11 sc, dec {25}

Row 22 :

25 sc

Row 23 :

1 sc, dec, 11 sc, dec, 9 sc {23}

Row 24 :

23 sc

Row 25 :

1 sc, dec, 10 sc, dec, 8 sc {21}

Row 26 :

21 sc

Row 27 :

2 sc, dec, 8 sc, dec, 7 sc {19}

Rows 28-38 :

19 sc (11 rows)

Info :

Tighten the thread, leave the long thread for sewing

โ€” Arms (2 details) :

Info :

Crochet with white yarn

Row 1 :

6 sc in magic ring {6}

Row 2 :

(inc) - repeat 6 times {12}

Rows 3-9 :

12 sc (7 rows) {12}

Infos :

Do not fill the arms. Sew two halves, crocheting 6 sc. Leave the long thread for sewing.

โ€” Legs (2 details) :

Info :

Crochet with white yarn

Row 1 :

6 sc in magic ring {6}

Row 2 :

(inc) - repeat 6 times {12}

Row 3 :

(1 sc, inc) - repeat 6 times {18}

Row 4 :

(2 sc, inc) - repeat 6 times {24}

Row 5 :

(11 sc, inc) - repeat 2 times {26}

Row 6 :

26 sc

Row 7 :

(11 sc, dec) - repeat 2 times {24}

Row 8 :

24 sc

Infos :

Fill the leg a little, not tightly. Sew two halves crocheting 12 sc. Leave the long thread for sewing.

โ€” Tail (Optional) :

Row 1 :

6 sc in magic ring {6}

Row 2 :

(inc) - repeat 6 times {12}

Row 3 :

(1 sc, inc) - repeat 6 times {18}

Row 4 :

(2 sc, inc) - repeat 6 times {24}

Row 5 :

(3 sc, inc) - repeat 6 times {30}

Row 6 :

30 sc

Row 7 :

(3 sc, dec) - repeat 6 times {24}

Infos :

Leave the long thread for sewing. Fill the tail and sew on it to the pillow from behind. Secure the thread, hide it inside.

Assembly Instructions

  • Fill the pillow evenly and slowly, paying special attention to filling the corners well to maintain a nice rectangular shape
  • Sew the bottom of the pillow closed using a needle and matching yarn, ensuring secure stitching throughout
  • Sew the ears to the top of the pillow, counting 3-4 sc from the edge of the pillow on each side for proper positioning
  • Attach the arms slightly diagonally between rows 14 and 17, with approximately 18-19 sc distance between them
  • Sew the legs to the bottom of the pillow, counting 2-3 sc from the edge of the pillow for each leg
  • Embroider the eyebrows using black semi-cotton thread above the eyes for added expression
  • If desired, attach the optional tail to the back center of the pillow for extra bunny cuteness

Important Notes

  • ๐Ÿ’กThe final size of your pillow will vary depending on your yarn choice, hook size, and personal tension
  • ๐Ÿ’กUse stitch markers to keep track of rounds and maintain even spiral crocheting throughout the main pillow body
  • ๐Ÿ’กWhen embroidering facial features, secure threads firmly inside the pillow to prevent them from coming loose with use
  • ๐Ÿ’กPin all pieces in place before sewing to ensure symmetrical and balanced positioning of all features
  • ๐Ÿ’กIf making this for young children, ensure safety eyes are very securely attached or embroider eyes instead
  • ๐Ÿ’กPlush yarn can be challenging to see stitches in, so work in good lighting and take your time counting

This delightful Pillow Bunny pattern brings together comfort and cuteness in one huggable creation! Perfect for gifting or keeping for yourself, this oversized bunny pillow adds a touch of handmade charm to any space while remaining wonderfully functional. The combination of plush yarn and simple construction techniques makes it an enjoyable project that yields impressive results. Whether displayed on a bed, couch, or favorite reading chair, this sweet bunny friend is sure to bring smiles. ๐Ÿงถ Happy crocheting! ๐Ÿฐโœจ

You ask,

we answer.

FAQs

Can I use different yarn than the recommended Himalaya Dolphin Baby or YarnArt Dolce?

Yes, you can use any plush or velvet yarn, but keep in mind that different yarn weights and textures will affect the final size and look of your pillow. You may need to adjust your hook size accordingly to achieve a fabric that's neither too loose nor too tight.

How do I keep track of my rounds when crocheting in spiral?

Use a stitch marker or piece of contrasting yarn to mark the first stitch of each round. Move the marker up as you complete each round to help you keep count and maintain even rows throughout the pillow construction.

Can I make the pillow smaller or larger?

Absolutely! To make it smaller, start with fewer chains (like 60-70 instead of 90) and work fewer rows. For a larger pillow, increase your starting chain to 110-120 and add more rows. Just remember to adjust the positioning of facial features proportionally.

Is it safe to use safety eyes if making this for a baby or toddler?

For babies and young toddlers, it's safer to embroider the eyes using black yarn instead of using safety eyes, as they could potentially be pulled off and pose a choking hazard. Safety eyes are best for decorative items or for older children.

How much stuffing will I need for this pillow?

You'll need approximately 400-500 grams of polyester fiberfill or holofiber stuffing, depending on how firm you want your pillow. It's better to have extra stuffing on hand to ensure you can fill all corners evenly and achieve a plump, comfortable pillow.