🧶 Beautiful ✨ Detailed 💝 Adorable

Magic Potion Bottle Crochet Pattern

Magic Potion Bottle Crochet Pattern
4.1★ Rating
3-4 Hours Time Needed
2.3K Made This
✂️

Intermediate Level

Ideal for those with basic knitting experience, featuring slightly more advanced stitches and techniques to expand your skills.

⏱️

Bite-Sized Project

Complete in under 2 hours—quick, fun, and perfect for a little creative escape.

Stylish Touch

An elegant detail to elevate any look, combining traditional techniques with contemporary design sensibilities.

About This Magic Potion Bottle Crochet Pattern

This magical potion bottle pattern brings whimsical charm to your crochet projects with its detailed construction and decorative elements. The pattern guides you through creating a realistic-looking bottle complete with a textured cork stopper and flowing decorative tendrils that add an enchanting finishing touch. Working with the beautiful Canada Jade and Boulder Opal colorways creates stunning visual appeal that captures the mystical essence of a fantasy potion.

Magic Potion Bottle Crochet Pattern crochet pattern - detailed view of completed project

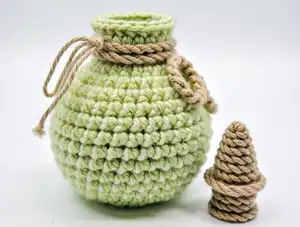
The rolled-down bottle neck and back-loop-only techniques create authentic texture and dimension, while the decorative chain work adds elegant movement to your finished piece.

Why You'll Love This Magic Potion Bottle Crochet Pattern

I absolutely love how this pattern transforms simple yarn into something truly magical and decorative! The combination of basic stitches creates such an impressive three-dimensional effect that looks far more complex than it actually is. I find the process of working the cork stopper particularly satisfying, especially when you pull it closed to create that authentic bottle-stopper shape. The hanging tendrils add such a whimsical touch that makes the finished piece feel like it came straight from a wizard's shelf. It's quick enough to complete in an afternoon but detailed enough to feel like a genuine accomplishment.

Magic Potion Bottle Crochet Pattern step 1 - construction progress Magic Potion Bottle Crochet Pattern step 2 - assembly progress Magic Potion Bottle Crochet Pattern step 3 - details and accessories Magic Potion Bottle Crochet Pattern step 4 - final assembly and finishing

Switch Things Up

I love experimenting with color combinations for this magical potion bottle! Instead of the jade green, try creating a mysterious purple potion using deep violet yarn, or a healing potion in bright red. You could even work with ombre or gradient yarns to create a color-shifting magical effect that looks like the potion is swirling inside.

For the decorative tendrils, I sometimes add small beads to the chain loops to create a more luxurious, jeweled appearance. You can also vary the length of the chain loops to create a more wild, organic look, or keep them uniform for a neater aesthetic.

If you want to make your bottle more functional, consider adding a small loop at the top of the cork to turn it into an ornament or keychain. I've also created sets of mini potion bottles in different colors by working fewer increase rounds and shorter straight sections.

Try adding embroidered details like stars, moons, or mystical symbols on the bottle body using a contrasting yarn color. You could also create a label by crocheting a small rectangle and sewing it onto the bottle front, then embroidering the name of your potion on it.

Common Mistakes & How to Fix Them

✗ Not stuffing the cork properly can result in a loose fit; test-fit frequently as you stuff to ensure snug placement in bottle opening ✗ Forgetting to work in front loops only on Row 31 of the bottle will prevent the proper rolled-neck effect from forming correctly ✗ Skipping the back loop only rounds on the cork (Rows 7-8 and 10-11) eliminates the decorative ribbed texture that makes it realistic ✗ Pulling the cork closure tail too tightly can distort the shape; gently adjust tension to maintain the flat bottom appearance

Magic Potion Bottle Crochet Pattern

Transform your yarn stash into an enchanting magic potion bottle with this delightful crochet pattern! Perfect for fantasy lovers, this charming 6-inch tall decorative piece features a beautiful jade-colored bottle with an intricate cork stopper and elegant hanging tendrils. Whether you're creating mystical home décor or a unique gift for a fellow crafting enthusiast, this pattern combines simple techniques with creative details to bring a touch of magic to your crochet collection.

Intermediate 3-4 Hours

Materials Needed for Magic Potion Bottle Crochet Pattern

— Main Fabric

  • 01
    Sheepjes Stonewashed XL in Canada Jade color for bottle
  • 02
    Sheepjes Stonewashed XL in Boulder Opal color for cork and decoration
  • 03
    Medium weight or worsted weight yarn as alternative

— Tools Required

  • 01
    3.5mm crochet hook
  • 02
    Yarn scissors
  • 03
    Polyfill stuffing for cork
  • 04
    Tapestry needle
  • 05
    Stitch markers

Progress Tracker

0% Complete

— Bottle :

Info :

Work in Canada Jade color

Row 1 :

6 sc in a magic circle (6)

Row 2 :

Inc in all 6 st (12)

Row 3 :

(inc in next st, sc in next st) repeat 6 times (18)

Row 4 :

(inc in the next st, sc in the next 2 st) repeat 6 times (24)

Row 5 :

(sc in the next 2 st, inc in the next st, sc in the next st) repeat 6 times (30)

Row 6 :

(inc in the next st, sc in the next 4 st) repeat 6 times (36)

Row 7 :

(sc in the next 3 st, inc in the next st, sc in the next 2 st) repeat 6 times (42)

Row 8 :

(inc in the next st, sc in the next 6 st) repeat 6 times (48)

Rows 9-19 :

sc in all 48 st (48)

Row 20 :

(dec in the next st, sc in the next 6 st) repeat 6 times (42)

Row 21 :

(sc in the next 3 st, dec in the next st, sc in the next 2 st) repeat 6 times (36)

Row 22 :

(dec in the next st, sc in the next 4 st) repeat 6 times (30)

Row 23 :

(sc in the next st, dec in the next st, sc in the next 2 st) repeat 6 times (24)

Row 24 :

(sc in the next 6 st, dec in the next st) repeat 3 times (21)

Rows 25-30 :

sc in all 21 st (21)

Row 31 :

sc in the FLO of all 21 st (21)

Rows 32-34 :

sc in all 21 st (21)

Info :

Fasten off and weave in end, roll down top of bottle

— Cork :

Info :

Work in Boulder Opal color

Row 1 :

6 sc in a magic circle (6)

Row 2 :

Inc in all 6 st (12)

Rows 3-4 :

sc in all 12 st (12)

Row 5 :

(sc in the next 4 st, inc in the next st) repeat 2 times, sc in the last 2 st (14)

Row 6 :

sc in all 14 st (14)

Rows 7-8 :

sc in the BLO in all 14 st (14)

Row 9 :

sc in all 14 st (14)

Info :

Stuff as you go along, try the cork in the bottle and stuff more or less for a good fit

Rows 10-11 :

sc in the BLO in all 14 st (14)

Row 12 :

dec in all 14 st (7)

Infos :

Fasten off leaving long tail and using a tapestry needle weave in and out through each front loop and pull to close. Pull the tail up through the center of the bottom through the top and pull to get the flat appearance at the bottom of stopper. Fasten off at top to hold shape and hide inside.

— Cork Decoration :

Info :

Make a slip knot and put your crochet hook in the loops closest to the top that we did the back loop sc in and ch1 to anchor. Sc around in each st and slip st into the st we ch1 into and fasten off.

— Decoration Tendrils :

Info :

Work in Boulder Opal color. Leave a long starting tail if you want to use it to tie into a bow

Row 1 :

ch 26 starting in the second chain from the hook HDC in all 25 st, ch1 and turn (25)

Row 2 :

sl st in the first st and in the same st ch 10, sl st back along in all 9 st and sl st into the next 4 st repeat until end, 5 times total

Info :

Pull yarn through last sl st and using a needle thread it through to match the other side and either sew ends together around bottle neck or tie them in a bow

Assembly Instructions

  • Finish the bottle by rolling down the top edge at Row 31 where you worked in front loops only to create the bottle rim
  • Stuff the cork firmly as you work, testing the fit in the bottle opening frequently to ensure a snug placement
  • Close the bottom of the cork by weaving through the front loops with your tapestry needle and pulling tight
  • Pull the tail through the center from bottom to top to create the flat stopper appearance, then secure inside
  • Add the decorative band around the cork by working single crochet in the back loop only ridges near the top
  • Create the hanging tendrils by working the chain loops along the foundation row, spacing them evenly
  • Attach the decorative tendrils around the bottle neck by either sewing the ends together or tying them in a bow

Important Notes

  • 💡Use stitch markers to keep track of which row you're on, especially during the shaping sections of the bottle
  • 💡The FLO row on the bottle (Row 31) is crucial for creating the rolled edge effect, don't skip it
  • 💡Test-fit your cork into the bottle opening as you stuff to ensure it's not too loose or too tight
  • 💡The back loop only rows on the cork create decorative ridges that add realistic texture to the stopper
  • 💡Keep your tension consistent throughout the bottle to maintain an even, smooth shape
  • 💡Don't overstuff the cork as this can distort its shape and make it difficult to fit properly

This enchanting Magic Potion Bottle pattern was designed to bring a touch of fantasy and whimsy to your crochet collection! The pattern combines simple increase and decrease techniques with creative finishing details to create a decorative piece that looks straight out of a wizard's laboratory. The rolled bottle neck and textured cork add authentic dimension, while the flowing tendrils provide an elegant finishing touch. Perfect for home décor, fantasy-themed gifts, or as a unique addition to your handmade collection. 🧶✨🔮

You ask,

we answer.

FAQs

Can I use different yarn weights for this pattern?

Yes, you can use any medium or worsted weight yarn, but your finished bottle size will vary depending on your yarn choice and tension. Adjust your hook size accordingly to maintain good stitch definition.

What does 'roll down top of bottle' mean in the instructions?

After working Row 31 in front loops only, this creates a natural fold line. Simply fold the top few rows down on the outside of the bottle to create a rolled rim effect, similar to rolling down a sock.

How tight should the cork fit in the bottle?

The cork should fit snugly but not be forced. Test-fit it as you stuff in Row 9, and adjust the amount of stuffing until you achieve a secure fit that can be removed and replaced easily.

Can I make the bottle larger or smaller?

Absolutely! To make it larger, add more increase rounds at the beginning and work more straight rounds in the middle. For smaller, reduce the number of increase rounds. Just ensure you maintain the same shaping proportions.

What's the purpose of the back loop only rows on the cork?

The BLO rows create horizontal ridges on the cork that add texture and make it look more realistic, similar to the grooves you'd see on an actual bottle stopper.