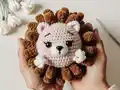
Create your own adorable Herbie Hedgehog with this charming amigurumi crochet pattern! This delightful hedgehog features a soft beige body, fluffy brown spikes, and the sweetest little face that will melt your heart. Perfect for snuggling or displaying, Herbie measures approximately 6 inches and makes a wonderful gift for nature lovers and animal enthusiasts. With detailed step-by-step instructions and helpful visual guides, you'll bring this precious woodland creature to life stitch by stitch.
Progress Tracker
0% Complete
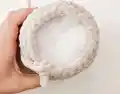
— HEAD/BODY :
Info :
Use 5.5mm hook with bulky yarn in Colour A
Round 3 :
[sc, inc] x8 (24)
Round 5 :
[sc 2, inc] x8 (32)
Round 6-15 :
sc 32 (10 rounds) (32)
Round 16 :
[sc 2, dec] x8 (24)
Infos :
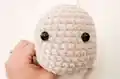
Stuff with fiber fill after row 17 and continue to stuff every row until complete. Place eyes between rounds 9 and 10 with 4-5 stitches in between.
Round 18 :
[sc, dec] x8 (16)
Info :
Slst to next stitch. Weave through outside loops of 8 remaining stitches and pull tight to close. Then tie off and weave in ends
— SHAPING THE FACE :
Info :
Using darning needle and Colour D Yarn, insert into the top inner corner of one eye
Info :
Push the darning needle over from the top of eye one to the top of eye two. You should now have one strand of yarn hanging from both eyes
Info :
Take the darning needle and now insert one strand into the bottom inner eye
Info :
Push the needle through the body to the back of the head
Info :
Repeat steps 3 and 4 for the other eye. Then tie the two strands together once you have pulled the eyes to their desired shape. Weave in ends
— NOSE :
Info :
Use 5.5mm hook with medium yarn in Colour A. Place safety nose on the top of round 1
Round 2 :
[sc, inc] x2 (6)
Round 3 :
[sc 2, inc] x2 (8)
Info :
Slst and tie off. Leave 12 inch strand of yarn to sew
Infos :
Using fabric pins, place nose on round 9-12 centered between the eyes. Sew on using a darning needle. Once sewn halfway on, place a small amount of fiber fill if required. If no safety nose you can also embroider a nose in the same place
— EYEBROWS :
Info :
Using darning needle and Colour C Yarn, insert the needle into the top of round 9, one stitch over from the top of the eye
Info :
Then insert the needle 2 rounds up and about 1-2 stitches over so it's in line with the top centre of the eye
Info :
Push the needle over and repeat for the other eye
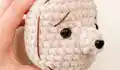
— SPIKE FRAMING :
Info :
Using a darning needle and any colour medium yarn, insert the needle into the bottom of round 3 centered between the eyes
Info :
Continue around the head marking the area that the spikes will start. You want to be about 2-3 stitches from the corner of the eyebrows, 5 stitches from the nose. On the bottom it should be on the bottom of round 16
— SPIKES :
Info :
Use 3.5mm hook with bulky yarn in Colour B. Make a slip knot on your smaller 3.5mm hook
Info :
Using the spike framing as a reference, insert the needle in the top center point that we placed on the bottom of round 3. Make a slst
Info :
Chain 4. Skip the first chain and place one slst in each of the remaining 3 chains
Info :
Then on the head, skip one stitch and place a slst into the next stitch over
Info :
Repeat steps 3 and 4 all the way around the head in a spiral until the entire head is covered
Info :
Once the first spiral is done, work the second and subsequent spirals the same way as close to the first as possible to avoid gapping between rows. You also want to try and offset the spikes so it looks more full. Remove spike framing when done
— EARS (Make 2) :
Info :
Use 5.5mm hook with bulky yarn in Colour A
Info :
Slst and tie off. Leave 12 inch strand of yarn to sew on
Infos :
Pinch ear in half and using a darning needle, sew one end together. Using fabric pins, attach ears to round 4 and 5 of the head, directly against the spikes. Using a darning needle, sew the ears on
— LEGS (Make 2) :
Info :
Use 5.5mm hook with bulky yarn in Colour A
Row 1 :
Slip knot, ch 5 (5)
Row 2 :
Skip first chain, sc in the remaining 4 ch and then 4sc in bottom 4 ch (8)
Info :
Slst and tie off. Leave 12 inch strand of yarn to sew on
Infos :
Using fabric pins, attach the feet to the bottom of the head directly against the spikes with 2-3 stitches in between. Using a darning needle, sew on both feet. If you want to sew down the feet more, insert the needle 2 rows above where you sewed the foot on. Then push the needle down one stitch over. This will secure the foot in place. Tie off and weave in ends
— ARMS (Make 2) :
Info :
Use 5.5mm hook with bulky yarn in Colour A
Row 1 :
Slip knot, ch 4 (4)
Row 2 :
Skip first chain, sc in the top 3 chs and then 3 sc in bottom 3 ch (6)
Info :
Slst and tie off. Leave 12 inch strand of yarn to sew on
Infos :
Using fabric pins, attach arms to round 11 and 12 right against the spines. Using a darning needle, sew on arms. Tie off and weave in ends
This adorable Herbie Hedgehog pattern was designed to capture the charm of woodland creatures in a huggable amigurumi form! The unique spike construction technique creates a realistic yet soft texture that makes Herbie perfect for both play and display. With detailed face-shaping instructions and helpful visual guides throughout, you'll create a hedgehog full of personality and charm. Whether you're making Herbie as a gift for an animal lover or adding him to your own collection, this pattern delivers satisfying results that showcase your crochet skills beautifully. �hedgehog🧶 Happy crocheting! 🧵✨