🧢 Beautiful ✨ Detailed πŸ’ Adorable

Pigs in a Blanket Amigurumi Pattern

Pigs in a Blanket Amigurumi Pattern
4.3β˜… Rating
8-10 Hours Time Needed
2.1K Made This
βœ‚οΈ

Advanced Level

Designed for experienced knitters, these patterns involve intricate designs and complex techniques to challenge and inspire.

⏱️

All-Day Adventure

Requires 8-10 hours, ideal for a full day of immersive knitting.

🎁

Sweet Surprise

A delightful, gift-ready creation perfect for birthdays and special occasions that will be treasured for years.

About This Pigs in a Blanket Amigurumi Pattern

Pigs in a Blanket Amigurumi Pattern crochet pattern - detailed view of completed project

The interactive design allows the pig to slide in and out of the pastry, making this more than just a static decorationβ€”it's a toy that invites playful interaction and brings smiles every time someone discovers the hidden pig inside!

Why You'll Love This Pigs in a Blanket Amigurumi Pattern

I'm completely obsessed with this pattern because it's just so clever and unexpected! The moment people realize the pig can actually come out of the pastry, their faces light up with pure delightβ€”it never gets old! I love working the pastry portion with all those BLO and FLO rounds that create those gorgeous ridges and folds that look just like real puff pastry. The embroidered sleepy eyes give the pig such a sweet, peaceful expression that makes you want to just cuddle it forever. Adding those tiny French knot sesame seeds is so meditative and satisfying, and they really take the realism to the next level. The curly tail made from increases is adorable, and those big floppy ears with the two-toned construction add so much character. It's the perfect combination of whimsy and skill-building, and the finished piece always becomes a conversation starter!

Pigs in a Blanket Amigurumi Pattern step 1 - construction progress Pigs in a Blanket Amigurumi Pattern step 2 - assembly progress Pigs in a Blanket Amigurumi Pattern step 3 - details and accessories Pigs in a Blanket Amigurumi Pattern step 4 - final assembly and finishing

Switch Things Up

I absolutely love customizing this pattern to create different variations that keep things exciting! Try making the pig in different shades of pink, or go wild with fantasy colors like purple or blue for a magical twist. You could even add tiny spots or stripes to the pig's body for a unique look that makes each one special.

The pastry offers great opportunities for variation tooβ€”experiment with different shades of brown for lighter or darker baked effects, or try adding more or fewer sesame seeds for different textures. I've even tried using yellow yarn mixed with the white to create a buttery, egg-washed appearance on parts of the pastry!

For extra personality, consider embroidering rosy cheeks on the pig's face or adding tiny nostrils to the snout. You could also make the tail extra curly by adding more increases, or create different ear shapes for variety. Some crafters even add a tiny bow between the ears for an extra cute factor! The possibilities are endless, and each variation brings its own unique charm to this already adorable pattern!

Common Mistakes & How to Fix Them

βœ— Not maintaining consistent tension on the pastry BLO and FLO rounds, which creates uneven folds and ridges that don't look uniform βœ— Forgetting to stuff the pastry firmly while slip stitching pieces together, resulting in a flat appearance instead of a puffy pastry look βœ— Embroidering the pig's eyes too early before assembly, making it difficult to position them symmetrically once all parts are attached βœ— Skipping the step to stretch the pastry opening with hands, leaving it too tight to comfortably insert and remove the pig

Pigs in a Blanket Amigurumi Pattern

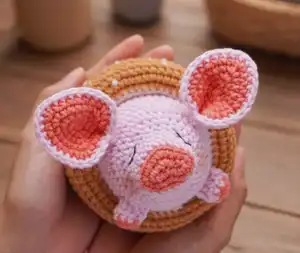
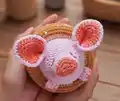
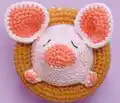
Wrap up cuteness with this charming pig-in-pastry amigurumi pattern that brings the classic appetizer to adorable life! This pattern features a sweet pink pig with embroidered sleepy eyes nestled inside a golden-brown pastry wrap complete with sesame seed details. The pig can be removed from the pastry for interactive play, making it both a decorative piece and an engaging toy. Perfect for food lovers and anyone who appreciates clever amigurumi designs with a playful twist!

Advanced 8-10 Hours

Materials Needed for Pigs in a Blanket Amigurumi Pattern

β€” Main Fabric

  • 01
    Baby pink Jeans Bamboo 109 (50g, 160m)
  • 02
    Pink Gazzal Baby Cotton 3435 (50g, 165m)
  • 03
    White YarnArt Jeans 03 (50g, 160m)
  • 04
    Brown Etrofil Jeans 59 (50g, 160m)

β€” Tools Required

  • 01
    Crochet hook size 2.5mm
  • 02
    Tapestry needles
  • 03
    Brown thread
  • 04
    Pins
  • 05
    Stitch markers
  • 06
    Scissors
  • 07
    Polyester fiberfill

Progress Tracker

0% Complete

β€” Pig's Body (yarn B) :

Round 1 :

ch 6, start on the 2nd ch from the hook, [(sc 3) on the next st, sc 1] 2x, (sc 3) on the next st, sc 4 (15)

Round 2 :

sc 1, [(sc 3) on the next st, sc 3] 2x, (sc 3) on the next st, sc 5, break yarn B, change to yarn A (21)

Round 3 :

(blo) sc 21 (21)

Round 4-5 :

sc 21 (2 rnds) (21)

Round 6 :

[sc 6, inc] 3x (24)

Round 7 :

[sc 1, inc, sc 1] 6x, sc 6 (30)

Round 8 :

[sc 3, inc] 6x, sc 6 (36)

Round 9 :

[sc 2, inc, sc 2] 6x, sc 6 (42)

Round 10 :

[sc 5, inc] 6x, sc 6 (48)

Round 11-25 :

sc 48 (15 rnds) (48)

Round 26 :

[sc 6, dec] 6x (42)

Round 27 :

[sc 5, dec] 6x (36)

Round 28 :

[sc 4, dec] 6x (30)

Round 29 :

[sc 3, dec] 6x, stuff firmly (24)

Round 30 :

[sc 2, dec] 6x (18)

Round 31 :

[sc 1, dec] 6x (12)

Round 32 :

dec 6 (6)

Info :

Break the yarn, weave in the last 6 sts, stuff firmly

β€” Legs (yarn B, X4) :

Round 1 :

sc 8 into a magic loop, break yarn B, change to yarn A (8)

Round 2-4 :

sc 8 (3 rnds) (8)

Info :

Break the yarn, sew 2 edges together

β€” Ears (yarn B-X2, Yarn A-X2) :

Info :

We will make 2 pieces of yarn B first

Round 1 :

sc 6 into a magic loop (6)

Round 2 :

[sc 1, (sc 3) on the next st] 3x (12)

Round 3 :

sc 2, (sc 3) on the next st, [sc 3, (sc 3) on the next st] 2x, sc 1 (18)

Round 4 :

sc 3, (sc 3) on the next st, [sc 5, (sc 3) on the next st] 2x, sc 2 (24)

Round 5 :

sc 4, (sc 3) on the next st, [sc 7, (sc 3) on the next st] 2x, sc 3 (30)

Infos :

Break the yarn for 2 pieces of yarn B, make other 2 pieces with yarn A but do not break the yarn. Hold 2 pieces (right side on the front), crochet sc across the edges. Fold the ear in half, sc 2 across the edges, leave a long rest to sew later.

β€” Tail (yarn B) :

Round 1 :

ch 16, start on the 2nd ch from the hook, inc 15 (30)

Info :

Break the yarn with a long rest to sew later

β€” Pastry (yarn C) :

Round 1 :

ch 54, slst on the 1st ch to make a ring, sc 54 (54)

Round 2-3 :

sc 54 (2 rnds) (54)

Round 4 :

(flo) sc 54 (54)

Round 5-6 :

sc 54 (2 rnds) (54)

Round 7 :

(flo) sc 54 (54)

Round 8-9 :

sc 54 (2 rnds), break yarn C, change to yarn D (54)

Round 10 :

(blo) [sc 4, inc, sc 4] 6x (60)

Round 11 :

[sc 9, inc] 6x (66)

Round 12-14 :

sc 66 (3 rnds) (66)

Round 15 :

[sc 9, dec] 6x (60)

Round 16 :

[sc 4, dec, sc 4] 6x (54)

Round 17 :

slst 54 on the blo of rnd 7 (stuff firmly as long as crocheting) (54)

Round 18 :

(flo) [sc 4, inc, sc 4] 6x (60)

Round 19 :

[sc 9, inc] 6x (66)

Round 20-22 :

sc 66 (3 rnds) (66)

Round 23 :

[sc 9, dec] 6x (60)

Round 24 :

[sc 4, dec, sc 4] 6x (54)

Round 25 :

slst 54 on the blo of rnd 4 (stuff firmly as long as crocheting) (54)

Round 26-32 :

Repeat rnd 18-24 (7 rnds) (54)

Infos :

Break the yarn, leave a really long rest to sew 2 edges together, stuff firmly as long as sewing. Stretch the completed pastry with your hands to make the hole bigger. Use french-knot technique to create the sesames.

Assembly Instructions

  • Sew the two-toned ears onto the top of the pig's head, ensuring the darker pink interior faces forward for proper color display
  • Embroider sleepy eyes using black thread with a gentle curved line to create a peaceful, content expression on the pig's face
  • Attach all four legs to the bottom of the pig's body, spacing them evenly so the pig can sit or stand properly
  • Sew the curly tail made from increases to the back center of the pig's body for that signature piggy look
  • Stretch the pastry opening with your hands to make it large enough to easily insert and remove the pig
  • Add French knot sesame seeds randomly across the brown pastry surface using brown thread for realistic detail
  • Place the completed pig inside the pastry wrap, adjusting positioning so it sits comfortably and can be removed easily

Important Notes

  • πŸ’‘Pay close attention to BLO and FLO instructions as they create the distinctive ridges and layers in the pastry wrap
  • πŸ’‘Stuff the pastry sections firmly while crocheting to maintain the puffy, layered appearance of real puff pastry
  • πŸ’‘Use stitch markers to track which round you're working on, especially during the repetitive pastry construction sections
  • πŸ’‘Practice French knots on scrap yarn before adding sesame seeds to ensure they look uniform and neat
  • πŸ’‘The pig's snout is created in the first two rounds with the darker pink yarn, so maintain good tension for proper shaping
  • πŸ’‘Stretch the pastry opening adequately after completion to prevent tearing when inserting and removing the pig repeatedly

This adorable Pigs in a Blanket pattern brings playful charm to a beloved comfort food classic! The combination of the sweet sleeping pig and the incredibly realistic layered pastry makes this a showstopper piece that delights everyone who sees it. The interactive element of being able to remove and replace the pig adds extra fun and makes it perfect for both display and play. Whether you're a food amigurumi enthusiast or just love creative crochet projects, this pattern delivers satisfaction in every stitch! Happy crocheting! 🧢🐷✨

You ask,

we answer.

FAQs

Can I make the pig's eyes open instead of sleepy?

Absolutely! Instead of embroidering curved sleepy eyes, you can use safety eyes or embroider open eyes with highlights. This will give your pig a more awake, alert expression while maintaining its adorable charm.

How do I get the pastry folds to look even and realistic?

The key is maintaining consistent tension throughout and paying careful attention to the BLO and FLO rounds. Stuff firmly as you go, and don't be afraid to manipulate the folds with your fingers to enhance the layered appearance.

What if my French knot sesame seeds look messy?

Practice makes perfect! Try practicing on a scrap piece first. Keep your knots small and consistent in size, and space them randomly across the surface. If they still don't look right, you could use tiny yellow seed beads sewn on instead.

Can I make multiple pigs to fit in one pastry?

While charming, the pastry is sized for one pig. However, you could make mini versions of the pig (using thinner yarn and smaller hook) to create a pig family, though you'd need to adjust the pastry size accordingly.

Is this pattern safe for young children?

Since there are no small parts like safety eyes and everything is embroidered, this can be safe for children. However, always supervise young children with handmade toys and ensure all parts are very securely attached.