🧢 Beautiful ✨ Detailed πŸ’ Adorable

Crochet Summer Sun Hat Pattern

Crochet Summer Sun Hat Pattern
4.3β˜… Rating
6-8 Hours Time Needed
3.4K Made This
βœ‚οΈ

Beginner Friendly Level

Perfect for those just starting their sewing journey, with clear instructions and simple techniques

⏱️

Weekend Treat

Takes 5-7 hours, making it an enjoyable project to finish over a couple of days.

🌸

Spring Bloom

Light and fresh designs for warmer days, capturing the renewal and brightness of the season.

About This Crochet Summer Sun Hat Pattern

Crochet Summer Sun Hat Pattern crochet pattern - detailed view of completed project

Made with lightweight paper raffia yarn and a simple 3mm hook, this hat works up surprisingly quickly using basic single crochet stitches throughout most of the pattern. The decorative cluster stitch finish on the brim adds visual interest without overwhelming complexity, making it accessible for confident beginners.

Why You'll Love This Crochet Summer Sun Hat Pattern

I absolutely love this pattern because it perfectly balances simplicity with stunning results that look way more complicated than they actually are. The fact that it uses paper raffia yarn means the finished hat has that authentic summery texture and natural breathability that keeps you cool even on the hottest days. What really excites me is how the spiral construction eliminates those annoying seams and visible round joinsβ€”your hat looks professionally made from every angle. I appreciate the three size options because finding the right hat fit can be tricky, and this pattern takes all the guesswork out of the equation. The cluster stitch border at the brim is my favorite partβ€”it creates this gorgeous scalloped edge that adds so much elegance and movement to the finished piece. I love that most of the pattern uses straightforward single crochet, so you can work on it while chatting with friends or watching your favorite show, then surprise yourself with how quickly it comes together. The wide brim provides excellent sun protection, making this a practical accessory I'll actually wear constantly throughout summer. Every time I make this hat, I feel like I'm creating a custom piece that rivals anything you'd find in boutique shops, but with the satisfaction of knowing I made it with my own hands.

Crochet Summer Sun Hat Pattern step 1 - construction progress Crochet Summer Sun Hat Pattern step 2 - assembly progress Crochet Summer Sun Hat Pattern step 3 - details and accessories Crochet Summer Sun Hat Pattern step 4 - final assembly and finishing

Switch Things Up

I love experimenting with this summer hat pattern to create different looks for various occasions and personal styles. One of my favorite variations is working the entire hat in a natural undyed raffia, then adding a colorful fabric ribbon or grosgrain band around the base of the crown where it meets the brim for a pop of color and vintage charm.

Sometimes I create an ombre effect by gradually transitioning between two or three coordinating colors of paper raffia as I work from the crown down to the brim, creating a beautiful sunset or ocean-inspired gradient. For a more bohemian vibe, I've tried working the cluster stitch edging in a contrasting color, which really makes that decorative border stand out and adds extra visual interest.

When I want something more playful, I attach small crocheted flowers, leaves, or butterflies to one side of the hat band using the same yarn, creating a garden-party-ready accessory that's perfect for weddings or tea parties. I've also experimented with skipping the cluster stitch border entirely and instead working several rounds of shell stitches or puff stitches for a different textured edge that's equally beautiful.

For those who prefer minimalist style, I sometimes extend the straight bucket section by a few rounds before starting the brim increases, creating a taller crown that has a slightly different silhouette and provides even more sun protection. Another fun modification is working the brim with fewer increase rounds to create a smaller, more subtle brim that's perfect for casual everyday wear rather than maximum sun coverage.

Common Mistakes & How to Fix Them

βœ— Forgetting to place stitch marker at the beginning of each spiral round, causing confusion and misalignment in stitch counts βœ— Not maintaining consistent tension throughout the hat, resulting in a wavy or puckered brim that won't lay flat properly βœ— Miscounting increases in the crown section, leading to a hat top that's either too small and tight or too large and floppy βœ— Working cluster stitches too tightly in the brim edging round, which prevents the beautiful scalloped effect from forming properly

Crochet Summer Sun Hat Pattern

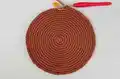
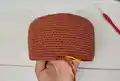
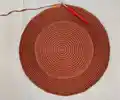
Beat the heat in style with this beautifully crafted summer sun hat pattern made from lightweight paper raffia yarn. This versatile design comes in three women's sizes to ensure the perfect fit for everyone, featuring a classic bucket-style crown that transitions into a gorgeous wide brim with decorative cluster stitch edging. Perfect for beach days, garden parties, or any sunny outdoor adventure, this hat combines practicality with elegant handmade charm. The spiral construction method makes it easy to follow, while the detailed sizing options ensure professional results every time.

Beginner Friendly 6-8 Hours

Materials Needed for Crochet Summer Sun Hat Pattern

β€” Main Fabric

  • 01
    230-260 yards of 100% paper raffia yarn (amount varies by size: Small 230 yards, Medium 245 yards, Large 260 yards)

β€” Tools Required

  • 01
    3mm crochet hook
  • 02
    Scissors
  • 03
    Yarn needle for weaving in ends
  • 04
    Stitch marker to track rounds

Progress Tracker

0% Complete

β€” Notes :

Info :

Work in spiral, place stitch marker into first stitch in each round. All sizes start the same for hat top. Gauge unblocked: 18 sc x 18 rounds = 4 inches

β€” Hat Top :

Round 1 :

Make a magic ring, 8 sc into the ring sp. Total of 8(8, 8) sc

Round 2 :

2 sc into each st around. Total of 16(16, 16) sc

Round 3 :

*1 sc into next st, 2 sc into next st* REP from *TO* around. Total of 24(24, 24) sc

Round 4 :

*1 sc into each of next 2 st, 2 sc into next st* REP from *TO* around. Total of 32(32, 32) sc

Round 5 :

*1 sc into each of next 3 st, 2 sc into next st* REP from *TO* around. Total of 40(40, 40) sc

Round 6 :

*1 sc into each of next 4 st, 2 sc into next st* REP from *TO* around. Total of 48(48, 48) sc

Round 7 :

1 sc into each st around. Total of 48(48, 48) sc

Round 8 :

1 sc into each of next 2 st, 2 sc into next st, *1 sc into each of next 5 st, 2 sc into next st* REP from *TO* until you have 3 st left, 1 sc into each of next 3 st. Total of 56(56, 56) sc

Round 9 :

*1 sc into each of next 6 st, 2 sc into next st* REP from *TO* around. Total of 64(64, 64) sc

Round 10 :

1 sc into each of next 3 st, 2 sc into next st, *1 sc into each of next 7 st, 2 sc into next st* REP from *TO* until you have 4 st left, 1 sc into each of next 4 st. Total of 72(72, 72) sc

Round 11 :

1 sc into each st around. Total of 72(72, 72) sc

Round 12 :

*1 sc into each of next 8 st, 2 sc into next st* REP from *TO* around. Total of 80(80, 80) sc

Round 13 :

1 sc into each of next 4 st, 2 sc into next st, *1 sc into each of next 9 st, 2 sc into next st* REP from *TO* until you have 5 st left, 1 sc into each of next 5 st. Total of 88(88, 88) sc

Round 14 :

1 sc into each st around. Total of 88(88, 88) sc

Round 15 (Size S only) :

1 sc into each st around. Total of 88 sc

Round 15 (Sizes M and L only) :

*1 sc into each of next 10 st, 2 sc into next st* REP from *TO* around. Total of (96, 96) sc

Round 16 (Size M only) :

1 sc into each st around. Total of 96 sc

Round 16 (Size L only) :

1 sc into each of next 5 st, 2 sc into next st, *1 sc into each of next 11 st, 2 sc into next st* REP from *TO* until you have 6 st left, 1 sc into each of next 6 st. Total of 104 sc

Round 17 (Size L only) :

1 sc into each st around. Total of 104 sc

β€” Hat Bucket :

Round 16(17, 18) :

1 sc into each st around. Total of 88(96, 104) sc

Round 17(18, 19) - Round 34(35, 36) :

REP Round 16(17, 18)

β€” Sun Hat Brim :

Round 35(36, 37) :

*1 sc into each of next 10(11, 12) st, 2 sc into next st* REP from *TO* around. Total of 96(104, 112) sc

Round 36(37, 38) :

1 sc into each of next 5(5, 5) st, 2 sc into next st, *1 sc into each of next 11(12, 13) st, 2 sc into next st* REP from *TO* until you have 6(7, 8) st left, 1 sc into each of next 6(7, 8) st. Total of 104(112, 120) sc

Round 37(38, 39) :

*1 sc into each of next 12(13, 14) st, 2 sc into next st* REP from *TO* around. Total of 112(120, 128) sc

Round 38(39, 40) :

1 sc into each of next 6(6, 6) st, 2 sc into next st, *1 sc into each of next 13(14, 15) st, 2 sc into next st* REP from *TO* until you have 7(8, 9) st left, 1 sc into each of next 7(8, 9) st. Total of 120(128, 136) sc

Round 39(40, 41) :

1 sc into each st around. Total of 120(128, 136) sc

Round 40(41, 42) :

*1 sc into each of next 14(15, 16) st, 2 sc into next st* REP from *TO* around. Total of 128(136, 144) sc

Round 41(42, 43) :

1 sc into each of next 7(7, 7) st, 2 sc into next st, *1 sc into each of next 15(16, 17) st, 2 sc into next st* REP from *TO* until you have 8(9, 10) st left, 1 sc into each of next 8(9, 10) st. Total of 136(144, 152) sc

Round 42(43, 44) :

1 sc into each st around. Total of 136(144, 152) sc

Round 43(44, 45) :

*1 sc into each of next 16(17, 18) st, 2 sc into next st* REP from *TO* around. Total of 144(152, 160) sc

Round 44(45, 46) :

1 sc into each of next 8(8, 8) st, 2 sc into next st, *1 sc into each of next 17(18, 19) st, 2 sc into next st* REP from *TO* until you have 9(10, 11) st left, 1 sc into each of next 9(10, 11) st. Total of 152(160, 168) sc

Round 45(46, 47) :

1 sc into each st around. Total of 152(160, 168) sc

Round 46(47, 48) :

*1 sc into each of next 18(19, 20) st, 2 sc into next st* REP from *TO* around. Total of 160(168, 176) sc

Round 47(48, 49) :

1 sc into each of next 9(9, 9) st, 2 sc into next st, *1 sc into each of next 19(20, 21) st, 2 sc into next st* REP from *TO* until you have 10(11, 12) st left, 1 sc into each of next 10(11, 12) st. Total of 168(176, 184) sc

Round 48(49, 50) :

1 sc into each st around. Total of 168(176, 184) sc

Round 49(50, 51) :

sl st into first st, beg cl into the same st, ch 3(3, 3), sk 3(3, 3) st, *1 cl into next st, ch 3(3, 3), sk 3(3, 3) st* REP from *TO* around, sl st into the top of the beg cl. Total of 42(44, 46) cl st

Round 50(51, 52) :

5 sc into each ch sp around. Total of 210(220, 230) sc

Round 51(52, 53) :

1 sc into each st around. Total of 210(220, 230) sc

Round 52(53, 54) :

1 sc into each st around. Total of 210(220, 230) sc. Cut the yarn and weave all the ends

Assembly Instructions

  • After completing the final round, cut your yarn leaving a 6-inch tail for weaving in
  • Thread the yarn tail through your yarn needle and weave it securely through several stitches on the wrong side of the hat
  • Weave in the starting tail from the magic ring in the same manner, ensuring it's completely secure
  • Gently shape the hat brim by hand, encouraging the cluster stitch edge to curl slightly for that elegant scalloped effect
  • If desired, lightly steam block the hat by holding a steamer several inches away from the brim to help it lay flat and maintain its shape

Important Notes

  • πŸ’‘Paper raffia yarn can be slightly stiff when new, so work with relaxed tension to avoid hand fatigue
  • πŸ’‘Always use a stitch marker in spiral construction to track where each round begins and ends accurately
  • πŸ’‘The hat will feel slightly stiff initially but will soften and become more pliable with wear and handling
  • πŸ’‘Gauge is important for proper fit, so always check your tension matches the pattern specifications before starting
  • πŸ’‘Store your finished hat flat or stuffed with tissue paper to maintain the crown shape between wears
  • πŸ’‘If working in humid conditions, paper raffia may feel softer and more pliable than in dry climates

This Crochet Summer Sun Hat Pattern is your perfect companion for sunny days ahead, combining effortless style with practical sun protection. The three size options ensure everyone can enjoy their custom-fitted hat, while the elegant cluster stitch brim adds that designer touch that makes people ask where you bought it. Made with breathable paper raffia yarn, this hat keeps you cool and comfortable whether you're at the beach, in the garden, or exploring farmer's markets. The spiral construction creates a seamless, professional finish that looks far more complicated than it actually is to make. Get ready to turn heads and stay shaded all summer long! β˜€οΈπŸ§Άβœ¨

You ask,

we answer.

FAQs

Which size should I make for the best fit?

Measure around your head where the hat will sit (usually about 1 inch above your eyebrows). Small fits 20-21 inch heads, Medium fits 21-22 inch heads, and Large fits 22-23.5 inch heads. Choose the size closest to your measurement for a comfortable fit.

Can I use regular yarn instead of paper raffia?

Yes, but the finished hat will have a completely different look and feel. Paper raffia gives the hat structure, breathability, and that authentic summer hat texture. If using cotton or acrylic yarn, you may need to add a wire or interfacing to help the brim hold its shape.

What does working in spiral mean?

Spiral construction means you crochet continuously in rounds without joining or turning at the end of each round. This creates a seamless finish with no visible seam line. Always use a stitch marker to mark the first stitch of each round so you don't lose your place.

How do I make the cluster stitches for the brim edging?

The pattern includes detailed instructions for both regular cluster stitches (cl) and beginning cluster stitches (beg cl). Essentially, you're working multiple yarn overs and pull-throughs in the same stitch, then pulling through all loops at once to create a raised, textured stitch.

Will this hat fit in my beach bag or does it need special storage?

Paper raffia hats are somewhat crushable but resilient. You can fold it gently for travel, and it will reshape with light steaming or wearing. For best results, store it flat or stuff the crown with tissue paper when not in use to maintain its beautiful shape.