🧢 Beautiful ✨ Detailed πŸ’ Adorable

Personalized Post and Bobble Blanket Pattern

Personalized Post and Bobble Blanket Pattern
4.1β˜… Rating
25-30 Hours Time Needed
3.4K Made This
βœ‚οΈ

Advanced Level

Designed for experienced knitters, these patterns involve intricate designs and complex techniques to challenge and inspire.

⏱️

Slow & Steady

A 10-12 hour projectβ€”great for savoring the process over several sessions.

🏑

Cozy Accent

A warm touch for your space that transforms ordinary corners into inviting nooks filled with handmade charm.

About This Personalized Post and Bobble Blanket Pattern

This personalized post and bobble blanket pattern is a true labor of love that combines multiple textured stitch sections into one spectacular design. Each section features different techniques including diamond waffle stitches, intricate cables, stunning chevrons, and raised post stitches that create incredible dimension and visual interest. The centerpiece of this blanket is the customizable name section where you can crochet any name up to eight characters using charming bobble stitches that pop beautifully against the background. With detailed instructions for every section and complete alphabet charts included, you'll be able to create a truly personalized heirloom blanket that celebrates someone special in your life.

Personalized Post and Bobble Blanket Pattern crochet pattern - detailed view of completed project

The finished blanket measures approximately 60cm wide by 87cm long and features beautiful filet border sections that frame each textured area perfectly. The ribbed border finish gives the blanket professional edges that lay flat and square, creating a polished look that showcases your advanced crochet skills beautifully.

Why You'll Love This Personalized Post and Bobble Blanket Pattern

I absolutely love this pattern because it keeps you engaged throughout the entire project with its variety of stitch techniques and textured sections. Each section feels like a mini-project within the larger blanket, so you never get bored working the same stitches repeatedly. The personalization aspect makes this pattern truly special because you're creating something completely unique that can't be bought in stores. I find the bobble stitch name section particularly rewarding to work because watching the letters take shape row by row is incredibly satisfying. The combination of raised posts, cables, and waffle stitches creates such beautiful dimension and texture that you'll want to run your hands across the finished blanket constantly. This is the kind of project that showcases your skills and creates a meaningful heirloom that families will treasure for generations.

Personalized Post and Bobble Blanket Pattern step 1 - construction progress Personalized Post and Bobble Blanket Pattern step 2 - assembly progress Personalized Post and Bobble Blanket Pattern step 3 - details and accessories Personalized Post and Bobble Blanket Pattern step 4 - final assembly and finishing

Switch Things Up

I love how incredibly versatile this personalized blanket pattern can be when you start experimenting with different color combinations and yarn choices. While the pattern shows a classic blue and white combination, imagine creating this in soft pastels for a baby girl, bold primary colors for a playful nursery, or elegant neutrals for a sophisticated gift. You could even match the colors to a specific nursery theme or family's home dΓ©cor to make it extra special.

The textured sections in this pattern work beautifully in solid colors, but I encourage you to get creative with variegated or gradient yarns in some sections while keeping the personalization area in solid colors for clear letter definition. The diamond waffle sections look absolutely stunning in a tonal ombre yarn that shifts through shades gradually.

Consider making multiple smaller versions of this pattern for siblings by adjusting the foundation chain count and scaling down the sections proportionally. You could create a set of matching personalized blankets that coordinate beautifully while each child has their own special name featured prominently.

I also love using this pattern for special occasions beyond baby gifts. Create anniversary blankets with couples' names and wedding dates, commemorate adoptions or foster care placements, celebrate milestone birthdays, or honor graduates with their name and year. The sophisticated texture work makes this appropriate for recipients of all ages.

Don't be afraid to add your own creative touches like working a date below the name, incorporating a small heart or star motif between letters, or adding decorative tassels or pom-poms to the corners. The pattern provides an excellent foundation, but your personal creative additions will make each blanket truly one-of-a-kind and meaningful to the recipient.

Common Mistakes & How to Fix Them

βœ— Losing track of rounds in the diamond waffle section can throw off the entire pattern alignment, so always use stitch markers at the beginning of each row βœ— Not carrying yarn properly through bobble stitches in the personalization section creates loose color changes and messy back sides that show through βœ— Skipping the smaller hook size for bobble rows makes the personalization section wider than the rest of the blanket causing uneven edges and poor drape βœ— Forgetting to count stitches correctly before starting the name section results in off-center personalization that looks unprofessional and cannot be easily fixed βœ— Working bobbles too loosely prevents them from popping out properly and creates a flat appearance instead of the desired three-dimensional texture effect

Personalized Post and Bobble Blanket Pattern

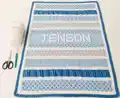
Create a stunning personalized blanket featuring your chosen name in beautiful bobble stitch letters surrounded by intricate texture sections. This gorgeous design combines diamond waffle stitches, cable patterns, chevron details, and plump post stitches to create a truly unique heirloom piece. Perfect for new babies, christenings, birthdays, or special occasions, this customizable blanket measures approximately 60cm wide by 87cm long and showcases advanced crochet techniques beautifully woven together. The pattern includes complete alphabet charts so you can add any name up to eight characters, making each blanket a one-of-a-kind treasure to be cherished for years to come.

Advanced 25-30 Hours

Materials Needed for Personalized Post and Bobble Blanket Pattern

β€” Main Fabric

  • 01
    150g DK weight yarn in light blue (Yarn A)
  • 02
    100g DK weight yarn in white (Yarn B)
  • 03
    100g DK weight yarn in dark blue (Yarn C)
  • 04
    50g DK weight yarn in grey (Yarn D)
  • 05
    Total approximately 350-400g of DK yarn required

β€” Tools Required

  • 01
    4.5mm crochet hook
  • 02
    4mm crochet hook
  • 03
    Tapestry needle
  • 04
    Stitch markers
  • 05
    Scissors
  • 06
    Measuring tape

Progress Tracker

0% Complete

β€” Foundation :

Foundation Row :

Using 4.5mm hook and yarn A, ch 108

β€” Diamond Waffle Section :

Row 1 :

sc in 2nd ch from hook and every st across (107 st's)

Row 2 :

ch 2 (counts as dc), turn, dc next st and every st across

Row 3 :

ch 1, turn, fptr around the 4th sc from last sc row, sc in the next 4 st's (sk the st that the fptr would have gone into), fptr2tog using the same 4th sc from last sc row, sk the next 4 st's from last sc row and place the second half of the fptr2tog around the 5th st, sc in the next 4 st's, *fptr2tog using the same st from last sc row, sk the next 4 st's from last sc row and place the second half of the fptr2tog in the 5th st, sc in next 4 st's; repeat from * to last 2 st's, fptr using same st from last sc row, sc in top of ch 2 from starting ch of previous row

Row 4 :

ch 2 (counts as dc), turn, dc next st and every st across

Row 5 :

ch 1, turn, sc in first 3 st's, fptr2tog using the first fptr post of row before last for the first half and the 2nd AND 3rd post for the second half, sc in next 4 st's, *fptr2tog around both posts from prior peak on row before last for first half and around both posts of next peak for second half, 4 sc's; rep from * to last 4 st's, fptr2tog around both posts from prior peak for first half and around the last post for second half, 3 sc's with the last sc in the top of starting ch 2

Row 6 :

ch 2 (counts as dc), turn, dc next st and every st across

Row 7 :

ch 1, turn, fptr around both posts of the first peak from the row before last, sc in the next 4 st's (sk the st that the fptr would have gone into), *fptr2tog around both posts from prior peak for first half and around both posts of next peak for second half, 4 sc's; rep from * to last 2 st's, fptr around both posts of last peak from row before last, sc in top of ch 2

Row 8 :

ch 2 (counts as dc), turn, dc in next st and every st across

Row 9 :

repeat row 5

Row 10 :

ch 1, turn, sc in first st and every st across

β€” Filet Border Section :

Row 11 :

change to yarn B, ch 1, turn, sc in first st and every st across

Row 12 :

ch 3 (counts as dc and ch 1), turn, sk 1, dc, *ch 1, sk 1, dc; rep from * to end

Row 13 :

ch 1, turn, sc in first st, *sc in 1 ch sp, sc; rep from * to end

β€” Cable Section :

Row 14 :

Change to yarn C, ch 2 (counts as dc), turn, dc in next st and every st across

Row 15 :

ch 2 (counts as dc), turn, make 1 dc in each of the next 2 st's, *fptr around next corresponding dc from last dc row, sk 1, 2 fptr's around following 2 dc's from last dc row, fptr back around skipped dc from last dc row, fptr around next dc from last dc row, 3 dc's (you will have skipped working into the top of 5 st's); rep from * to end

Row 16 :

ch 1, turn, sc in first st and every st across

Row 17 :

ch 2 (counts as dc), turn, make 1 dc in each of the next 2 st's, *fptr around corresponding fptr from last fptr row, sk 1 fptr from last fptr row, 2 fptr's around following 2 fptr's from last fptr row, fptr back around skipped fptr, fptr around next fptr from last fptr row, 3 dc's (you will have skipped 5 sc's from last row); rep from * to end

Row 18 :

rep row 16

Row 19 :

rep row 17

Row 20 :

rep row 16

β€” Filet Border Section :

Row 21-23 :

change to yarn B, rep filet border section (rows 11-13)

β€” Diamond Waffle Section :

Info :

Repeat diamond waffle section as established

β€” Filet Border Section :

Info :

Repeat filet border section as established

β€” Chevron Section :

Row 24 :

Change to yarn A, ch 1, turn, sc in first st and every st across

Row 25 :

ch 2 (counts as dc), turn, 4 dc's, *ch 1, sk 1, 5 dc's; rep from * to end

Row 26 :

ch 1, turn, sc in 1st st and next 4 st's, *ch 1, sk 1, 5 sc's; rep from * to end

Row 27 :

ch 1, turn, yarn over twice, fptc around 3rd dc from last dc row, 3 dc's into 2nd, 3rd and 4th sc of previous row (under the fptc just made), fptc again around 3rd dc BUT don't complete the st (fptcdctog), ch 1, sk 1, yarn over and insert hook into 1st sc of 5 st section, complete dcfptctog, 3 dc's into 2nd, 3rd and 4th sc of previous row, fptcdctog around 3rd dc with the dc in the 5th, *ch 1, sk 1, dcfptctog, 3 dc's into 2nd, 3rd and 4th sc, fptcdctog; rep from * to end

Row 28 :

rep row 26

Row 29 :

rep row 27

Row 30 :

rep row 26

Row 31 :

rep row 27

Row 32 :

ch 1, turn, sc in 1st and next 4 st's, sc in 1 ch sp, 5 sc's, *sc in 1 ch sp, 5 sc's; rep from * to end

β€” Filet Border Section :

Row 33-35 :

Change to yarn B, rep filet border section (rows 11-13)

β€” Plump Posts Section :

Row 36 :

Change to yarn D, ch 1, turn, sc in first st and every st across

Row 37 :

ch 2 (counts as dc), turn, dc in next st and every st across

Row 38 :

ch 1, turn, sc in first st and every st across

Row 39 :

ch 2 (counts as dc), turn, dc in next 2 st's, *dfpdc around the corresponding dc from the last dc row, 3 dc's; rep from * to end

Row 40 :

ch 1, turn, sc in first st and every st across

Row 41 :

ch 2 (counts as dc), turn, *dfpdc around the corresponding dc from the last dc row, 3 dc's; rep from * to last 2 st's, dfpdc around the corresponding dc from the last dc row, dc in last st

Row 42 :

ch 1, turn sc in first st and every st across

Row 43 :

rep row 39

Row 44 :

ch 1, turn, sc in first st and every st across

β€” Filet Border Section :

Row 45-47 :

Change to yarn B, rep filet border section (rows 11-13)

β€” Diamond Waffle Section :

Row 48 :

Change to yarn A, ch 1, turn, sc in first st and every st across

Row 49-53 :

rep rows 1-5 of diamond waffle section

β€” Personalisation Section :

Row 54-57 :

continuing with yarn A, ch 1, turn, sc in first st and every st across

Row 58-70 :

using 4mm hook, yarn A and B, make personalisation rows using bobble stitch for letters

Infos :

Calculate stitches needed: Total 107 sts minus stitches for your name equals remaining stitches. Divide remaining by 2 for sc's before and after name. Most letters are 5 bobbles across (9 sts including spaces) and 7 bobbles high (13 rows including sc rows). Add 3 sc's between each letter. Bobbles worked with wrong side facing. Carry yarn A through bobble stitches and yarn B through sc's for clean color changes.

Row 71-74 :

ch 1, turn, sc in first st and every st across

β€” Diamond Waffle Section :

Row 75-79 :

cont. with yarn A, rep rows 1-5 of diamond waffle section

Row 80 :

ch 1, turn, sc in first st and every st across

β€” Filet Border Section :

Row 81-83 :

Change to yarn B, rep filet border section (rows 11-13)

β€” Plump Posts Section :

Row 84-92 :

Change to yarn D, rep rows 36-44 of plump posts section

β€” Filet Border Section :

Row 93-95 :

Change to yarn B, rep filet border section (rows 11-13)

β€” Chevron Section :

Row 96-104 :

Change to yarn A, rep rows 24-32 of chevron section

β€” Filet Border Section :

Row 105-107 :

Change to yarn B, rep filet border section (rows 11-13)

β€” Cable Section :

Row 108-114 :

Change to yarn C, rep rows 14-20 of cable section

β€” Filet Border Section :

Row 115-117 :

Change to yarn B, rep filet border section (rows 11-13)

β€” Diamond Waffle Section :

Row 118 :

Change to yarn A, ch 1, turn, sc in first st and every st across

Row 119-128 :

rep rows 1-10 of diamond waffle section. Fasten off

β€” Border :

Round 1 :

With right side facing, using 4mm hook, join yarn B anywhere along edge, ch 1, pick up and sc all around the edge. Ensure correct number of sts for flat blanket (approximately 125 sts along each side). Make 1 sc, ch 2, 1 sc in each corner. Sl st to first sc to join

Round 2 :

ch 3 (counts as dc + 1 ch), sk 1, *dc, ch 1, sk 1; rep from * all around. In each corner 2 ch sp make 1 dc, ch 2, 1 dc. Sl st to ch 2 of starting ch 3 to join

Round 3 :

ch 1, sc in same st and every st and 1 ch sp around. In each corner 2 ch sp make 1 sc, 2 ch's, 1 sc. Sl st to first st to join

Round 4 :

change to yarn C, join yarn anywhere around edge, ch 2 (counts as dc), dc in every st around. In each corner 2 ch sp make 1 dc, 2 ch's, 1 dc. Sl st to first dc to join

Round 5 :

ch 2, *fpdc, bpdc; repeat from * all round. In each corner 2 ch sp, make 1 dc, 2 ch's, 1 dc. Always begin with a fpdc after each corner. Sl st to first fpdc to join

Round 6 :

ch 2, *fpdc around each fpdc from previous round, bpdc around each bpdc from previous round; repeat from * all round. In each corner 2 ch sp make 1 dc, 2 ch's, 1 dc. Sl st to first fpdc to join. Fasten off

Finishing :

Sew in all loose ends

Assembly Instructions

  • Complete all rows of the blanket body following the pattern sequence from diamond waffle through personalization to final diamond waffle section
  • Work the border rounds carefully around all edges ensuring you pick up the correct number of stitches along each side to keep the blanket laying flat without ruffling
  • Use the smaller 4mm hook for all border rounds to achieve neat flat edges that frame the blanket professionally
  • Work corner stitches as specified with chain 2 spaces to create square sharp corners that lay flat and maintain the rectangular blanket shape
  • Complete all six rounds of the ribbed border alternating front and back post double crochets to create the textured frame that keeps blanket edges straight
  • Weave in all yarn ends securely on the wrong side of the work using a tapestry needle and working through several stitches in different directions
  • Block the finished blanket gently by laying flat and misting with water to even out stitches and enhance the texture of all sections

Important Notes

  • πŸ’‘Use a smaller 4mm crochet hook specifically for the personalization bobble rows to prevent the section from becoming wider than the rest of the blanket
  • πŸ’‘Keep stitch markers at the beginning of each row especially in the diamond waffle section to avoid losing your place in the complex stitch pattern
  • πŸ’‘Calculate your name stitches carefully before starting the personalization section to ensure the name is perfectly centered on the blanket
  • πŸ’‘Carry yarn colors properly through bobble stitches by keeping unused yarn on the wrong side and switching colors at the correct points for clean changes
  • πŸ’‘Work with the wrong side facing when creating bobble stitches in the personalization section and remember letters are worked from bottom to top
  • πŸ’‘Count stitches regularly throughout the pattern to maintain the consistent 107 stitch count and catch any mistakes before they become major problems
  • πŸ’‘Allow extra time for this project as it involves multiple complex stitch techniques and requires careful attention to detail throughout all sections

This stunning personalized post and bobble blanket pattern combines beautiful textured sections with meaningful customization to create an heirloom treasure that will be cherished for generations. The intricate combination of diamond waffle stitches, cables, chevrons, and raised posts creates incredible visual interest and dimension, while the custom bobble stitch name makes each blanket completely unique. Whether you're welcoming a new baby, celebrating a christening, marking a birthday, or honoring someone special, this blanket becomes a meaningful keepsake that showcases your advanced crochet skills beautifully. The detailed instructions and complete alphabet charts ensure your success in creating this impressive project that combines technical expertise with heartfelt personalization. 🧢 Happy crocheting! 🧡✨

You ask,

we answer.

FAQs

What skill level is required for this blanket pattern?

This is an advanced pattern that requires experience with front post stitches, bobble stitches, color changes, and following complex stitch sequences. It's best suited for crocheters who are comfortable with multiple techniques and can follow detailed instructions carefully.

Can I use different yarn weights for this blanket?

Yes, you can adjust the yarn weight, but you'll need to change your hook size accordingly and work a gauge swatch. Keep in mind that changing yarn weight will affect the finished size of the blanket significantly.

How do I calculate stitches for my chosen name?

Most letters require 9 stitches (5 bobbles plus spaces) with 3 single crochets between each letter. Subtract your total name stitches from 107, then divide the remainder by 2 to determine how many single crochets go before and after your name for perfect centering.

Why do I need two different hook sizes?

The 4.5mm hook is used for the main blanket body, while the smaller 4mm hook is used for the personalization section and border. The smaller hook prevents the bobble rows from stretching wider than the rest of the blanket and keeps edges neat and straight.

How long will it take to complete this blanket?

Expect to spend 25-30 hours on this project depending on your crochet speed and experience level. The multiple textured sections and personalization work require careful attention and cannot be rushed for best results.

Can I make names longer than 8 characters?

The pattern is designed for names up to 8 characters long based on the 107 stitch width. Longer names won't fit properly and may require adjusting the entire blanket width by adding more foundation chains and recalculating all sections.