🧢 Beautiful ✨ Detailed πŸ’ Adorable

Lulu the Mermaid Amigurumi Pattern

Lulu the Mermaid Amigurumi Pattern
4.2β˜… Rating
6-8 Hours Time Needed
1.3K Made This
βœ‚οΈ

Intermediate Level

Ideal for those with basic knitting experience, featuring slightly more advanced stitches and techniques to expand your skills.

⏱️

Weekend Treat

Takes 5-7 hours, making it an enjoyable project to finish over a couple of days.

🧸

Cute Companion

An adorable friend to cherish, handcrafted with love to bring comfort and joy for years to come.

About This Lulu the Mermaid Amigurumi Pattern

This enchanting mermaid pattern brings together classic amigurumi techniques with beautiful decorative elements to create a truly magical companion. Lulu features a carefully crafted design with a curved tail that creates an elegant S-shape, detailed facial features including modeled eyes with embroidered accents, and a charming hair wig with customizable buns and strands. The pattern includes comprehensive instructions for creating wavy hem details on the tail, delicate fin attachments, and an embroidered shell bustier that adds the perfect finishing touch to this underwater beauty.

Lulu the Mermaid Amigurumi Pattern crochet pattern - detailed view of completed project

With four stunning color variations included in the pattern, you can create mermaids with different personalities and styles. Each variation features unique combinations of skin tones, hair colors, and tail designs, making every mermaid special and one-of-a-kind.

Why You'll Love This Lulu the Mermaid Amigurumi Pattern

I absolutely love how this pattern transforms simple yarn into a graceful underwater creature that captures the imagination! The combination of practical construction techniques with artistic details like the modeled eyes and embroidered features makes each mermaid feel truly alive. I'm particularly fond of how the wavy hem adds texture and movement to the tail, and the customizable hair elements allow for endless creative possibilities. The pattern's clear instructions for color changes and assembly make it satisfying to watch your mermaid come together piece by piece. What I appreciate most is the attention to anatomical details that give Lulu her elegant posture and that beautiful S-shaped curve in her tail. It's a project that looks impressive but remains enjoyable to create, with each step revealing more of your mermaid's unique personality.

Lulu the Mermaid Amigurumi Pattern step 1 - construction progress Lulu the Mermaid Amigurumi Pattern step 2 - assembly progress Lulu the Mermaid Amigurumi Pattern step 3 - details and accessories Lulu the Mermaid Amigurumi Pattern step 4 - final assembly and finishing

Switch Things Up

I love experimenting with different color combinations to give each mermaid her own unique personality! Instead of following the four suggested color palettes, try creating a mermaid inspired by your favorite ocean scenesβ€”maybe deep purple and teal for a twilight sea theme, or coral pinks and sunny yellows for a tropical reef vibe.

The hair is where you can really get creative. I've made versions with super long hair strands by adding more chain stitches, and I've even tried making braided hair by creating multiple thin strands and weaving them together before attaching. You could also experiment with different hairstylesβ€”try making a single large bun on top for a elegant updo, or create multiple small buns around the head for a playful bubble style.

For the tail, I love adding extra embellishments like sequins or small beads sewn onto the scales for a shimmery effect, or using metallic thread for the wavy hem to make it sparkle. You could also crochet additional decorative elements like a seashell necklace or a starfish hair clip to really personalize your mermaid.

I've found that changing the facial expression can completely transform the characterβ€”try positioning the eyebrows at different angles or adding a small embroidered smile. Some of my favorite variations include making sleeping mermaids with closed eyes (just embroider curved lines instead of using safety eyes) or creating a whole mermaid family with different sizes by adjusting your hook size and yarn weight.

Common Mistakes & How to Fix Them

βœ— Overstuffing the head or body causes stitches to stretch and creates visible gaps where the filling shows through the work βœ— Forgetting to position safety eyes between rounds sixteen and seventeen with exactly eleven visible stitches between them results in asymmetrical facial features βœ— Not working the color change at the end of the previous stitch leads to messy transitions and visible color bleeding at transition points βœ— Sewing the head without proper alignment to show the S-shaped curve of the tail fin creates an awkward posture for the finished mermaid βœ— Failing to stuff the tail loosely at the bottom and firmer toward the body creates an unnatural shape and poor tail definition βœ— Skipping the eye modeling step results in flat, lifeless eyes instead of the characteristic inward-set appearance that adds depth and expression

Lulu the Mermaid Amigurumi Pattern

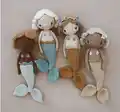
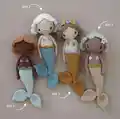
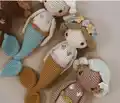
Dive into an enchanting underwater adventure with this delightful mermaid crochet pattern! Create your own charming Lulu, a sweet mermaid doll standing approximately 26 cm tall with beautiful flowing hair, a graceful tail fin, and customizable details. This pattern includes four gorgeous color variations, allowing you to craft a unique mermaid companion with different skin tones, hair colors, and tail designs. Perfect for gifting or as a decorative treasure, each mermaid features intricate details including embroidered eyes, a delicate bustier, wavy hem details, and adorable hair buns that capture the magic of the sea.

Intermediate 6-8 Hours

Materials Needed for Lulu the Mermaid Amigurumi Pattern

β€” Main Fabric

  • 01
    Cotton yarn in skin tone color (25g approximately 115 yards per 50g skein)
  • 02
    Cotton yarn for hair color (15g approximately 115 yards per 50g skein)
  • 03
    Cotton yarn for tail fin color (17g approximately 115 yards per 50g skein)
  • 04
    Cotton yarn for wavy hem in contrasting color
  • 05
    Cotton yarn for flower decoration
  • 06
    Cotton yarn for bustier detail
  • 07
    Babytoly or Ecobebek cotton yarn recommended in various colors
  • 08
    Polyfiber filling for stuffing

β€” Tools Required

  • 01
    Crochet hook size 2.5mm
  • 02
    Safety eyes 8mm (for dolls 2 and 3) or 9mm (for dolls 1 and 4)
  • 03
    Sharp sewing needle for assembly and embroidery
  • 04
    Thin cotton yarn in black or brown for eyebrows
  • 05
    White cotton yarn for eye highlights
  • 06
    Pins for positioning parts
  • 07
    Scissors
  • 08
    Stitch marker (optional)
  • 09
    Thin sewing thread especially in hair color (optional)
  • 10
    Foam curler piece for head stabilization (optional)
  • 11
    Pink blush for cheeks and flower center
  • 12
    Small brush for applying blush

Progress Tracker

0% Complete

β€” Head :

Round 1 :

6 sc into a MR (6)

Round 2 :

inc x 6 (12)

Round 3 :

(1 sc, inc) x 6 (18)

Round 4 :

1 sc, inc, (2 sc, inc) x 5, 1 sc (24)

Round 5 :

(3 sc, inc) x 6 (30)

Round 6 :

2 sc, inc, (4 sc, inc) x 5, 2 sc (36)

Round 7 :

(5 sc, inc) x 6 (42)

Round 8 :

3 sc, inc, (6 sc, inc) x 5, 3 sc (48)

Rounds 9-18 :

48 sc (48) (10 rounds)

Info :

Attach the eyes between rnd 16 & 17, with a distance of 11 visible stitches

Round 19 :

3 sc, dec, (6 sc, dec) x 5, 3 sc (42)

Round 20 :

(5 sc, dec) x 6 (36)

Round 21 :

2 sc, dec, (4 sc, dec) x 5, 2 sc (30)

Round 22 :

(3 sc, dec) x 6 (24)

Round 23 :

1 sc, dec, (2 sc, dec) x 5, 1 sc (18)

Info :

Start to stuff the head with polyfiber

Round 24 :

(1 sc, dec) x 6 (12)

Info :

Finish with 1 sl st, fasten off leaving a long tail for sewing. Continue to stuff the head, especially in the neck area. Fill evenly without bulges for a complete round form

β€” Hair Wig :

Round 1 :

6 sc into a MR (6)

Round 2 :

inc x 6 (12)

Round 3 :

(1 sc, inc) x 6 (18)

Round 4 :

1 sc, inc, (2 sc, inc) x 5, 1 sc (24)

Round 5 :

(3 sc, inc) x 6 (30)

Round 6 :

2 sc, inc, (4 sc, inc) x 5, 2 sc (36)

Round 7 :

(5 sc, inc) x 6 (42)

Round 8 :

3 sc, inc, (6 sc, inc) x 5, 3 sc (48)

Rounds 9-15 :

48 sc (48) (7 rounds)

Round 16 :

3 sc, dec, (6 sc, dec) x 5, 3 sc (42)

Info :

Finish with 1 sl st, fasten off and sew the thread inside of the wig

β€” Hair Strand (make 2) :

Row 1 :

Crochet ch 20, turn the chain. Start into the 3rd chain from hook and crochet dc inc (36)

Info :

Cut the yarn and pull it through the loop

β€” Bun (make 2) :

Round 1 :

6 sc into a MR (6)

Round 2 :

inc x 6 (12)

Round 3 :

(1 sc, inc) x 6 (18)

Round 4 :

1 sc, inc, (2 sc, inc) x 5, 1 sc (24)

Round 5 :

24 sc (24)

Round 6 :

1 sc, dec, (2 sc, dec) x 5, 1 sc (18)

Round 7 :

dec x 9 (9)

Info :

Finish with 1 sl st, fasten off leaving a long thread to sew the bun onto the hair later. Stuff the bun slightly

β€” Ear (make 2 - optional) :

Info :

Crochet 3 sc into a MR. Cut the yarn and pull it through the loop. Pull the initial thread slightly to close the MR

β€” Arm (make 2) :

Round 1 :

6 sc into a MR (6)

Round 2 :

(2 sc, inc) x 2 (8)

Rounds 3-17 :

8 sc (8) (15 rounds)

Info :

Do not stuff the arm. Flatten the arm and crochet both sides together with 3 sc. Cut the yarn, leaving a long thread, and fasten off

β€” Tail & Body :

Info :

Start with tail fin color. Start to fill the tail very early as you go. At the bottom fill it very loose but fill it more tense the wider the tail gets

Round 1 :

6 sc into a MR (6)

Round 2 :

(1 sc, inc) x 3 (9)

Rounds 3-4 :

9 sc (9) (2 rounds)

Round 5 :

(2 sc, inc) x 3 (12)

Round 6 :

dec, 4 sc, inc, 5 sc (12)

Round 7 :

(3 sc, inc) x 3 (15)

Round 8 :

dec, 6 sc, inc, 6 sc (15)

Round 9 :

(4 sc, inc) x 3 (18)

Round 10 :

dec, 7 sc, inc, 8 sc (18)

Round 11 :

(5 sc, inc) x 3 (21)

Round 12 :

dec, 9 sc, inc, 9 sc (21)

Round 13 :

(6 sc, inc) x 3 (24)

Round 14 :

dec, 10 sc, inc, 11 sc (24)

Round 15 :

(7 sc, inc) x 3 (27)

Round 16 :

dec, 12 sc, inc, 12 sc (27)

Round 17 :

(8 sc, inc) x 3 (30)

Round 18 :

dec, 13 sc, inc, 14 sc (30)

Round 19 :

(9 sc, inc) x 3 (33)

Round 20 :

dec, 15 sc, inc, 15 sc (33)

Round 21 :

(10 sc, inc) x 3 (36)

Rounds 22-23 :

dec, 16 sc, inc, 17 sc (36) (2 rounds)

Rounds 24-26 :

36 sc (36) (3 rounds)

Round 27 :

(10 sc, dec) x 3 (33)

Info :

Colour change to skin tone color

Round 28 :

33 sc, into BLO! (33)

Rounds 29-30 :

33 sc (33) (2 rounds)

Round 31 :

(9 sc, dec) x 3 (30)

Rounds 32-33 :

30 sc (30) (2 rounds)

Round 34 :

(8 sc, dec) x 3 (27)

Rounds 35-36 :

27 sc (27) (2 rounds)

Round 37 :

(7 sc, dec) x 3 (24)

Round 38 :

24 sc (24)

Round 39 :

1 sc, dec, (2 sc, dec) x 5, 1 sc (18)

Round 40 :

(1 sc, dec) x 6 (12)

Info :

Finish with 1 sl st, cut the yarn and fasten off. Sew the thread carefully

β€” Fin (make 2) :

Round 1 :

6 sc into a MR (6)

Round 2 :

6 sc (6)

Round 3 :

(1 sc, inc) x 3 (9)

Round 4 :

1 sc, inc, (2 sc, inc) x 2, 1 sc (12)

Round 5 :

(1 sc, inc) x 6 (18)

Round 6 :

1 sc, inc, (2 sc, inc) x 5, 1 sc (24)

Rounds 7-14 :

24 sc (24) (8 rounds)

Round 15 :

dec x 12 (12)

Round 16 :

dec x 6 (6)

Info :

Do not stuff the fin with polyfill

β€” Wavy Hem :

Info :

Make a standing sc into the first front loop of rnd 28 of the tail. Continue as follows: (skip 2 sts, 5 dc into a st, skip 2 sts, 1 sc into a st) x 5 (in the last unit just skip only 1st, so that you achieve 6 waves all around). Crochet 1 sl st into the first sc of the previous round. Cut the yarn, fasten off and sew both threads carefully

β€” Flower in the Hair :

Info :

Start with a MR (leave a long starting yarn tail). (1 sc, ch 2, 1 sc into 2nd chain from hook) x 5. Sl st into the first st. Cut the yarn and fasten off by pulling the tail of yarn until the MR is closed. With pink blush and a brush paint the centre of the flower with a pink dot

β€” Modelling the Eyes :

Info :

Take a sharp sewing needle and a long thread of skin tone color. Pull both ends of the thread through the head very close to the eye and bring them out at the head opening. Take one of the thread ends and repeat the same with the second eye. Pull on both thread ends as tight as possible until the eyes move inwards. Knot both ends very tightly. Stuff both threads into the head. If necessary add some more stuffing with the help of the crochet hook end

β€” White of the Eye :

Info :

Use a long white cotton thread and embroider a small stitch at the outer part of the eye. Repeat on the second eye. Knot the ends at the bottom of the head and stuff the threads into the head

β€” Eyebrows :

Info :

Take a thin sewing or embroidering yarn in black or brown and a thin sharp needle. Embroider the eyebrows 2 rounds above the eye, diagonally over 1.5 stitches (or alternatively embroidered directly over the eye, diagonally over 2.5 stitches)

β€” Nose :

Info :

Cut a long tail from skin tone color. Between rnd 16 and 17 embroider 2 horizontal stripes, running over 2-3 sts. Don't sew the thread but wrap it with the needle tightly around the horizontal stripes. Take a small brush and put some pink blush onto the cheeks
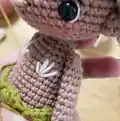
β€” Bustier :

Info :

Embroider the bustier in form of two shells using bustier color. Take a long thread and embroider 4 stitches at chest level (between rnd 7 and 8 from the bottom of the body). The 2 outer ones run diagonally across 3 sts and the 2 in the middle across 2 sts. Between both shells there is a distance of 4 sts

Assembly Instructions

  • Put the hair wig onto the head ensuring it is symmetrical around the head and at the right distance from the eyes. For small children, sew the wig onto the head with some stitches.
  • Place the 2 hair strands symmetrically across the hairline and pin them. Sew each strand beginning at the top downwards, ending approximately at the level of the eyes.
  • Position both buns below the hair strands at the hair line and fix them with pins. Sew them around all 9 stitches from the last round of the bun.
  • Optional: Insert half of a 2-3 cm long piece of foam curler into the opening of the body to stabilize the head, with the other half going inside the head when sewn.
  • Sew the head onto the body making sure it is positioned so you can see the curve of the tail fin like an S-shape.
  • Sew the arms on the right and left of the body between rounds 39 and 40, running diagonally backwards.
  • Sew both fins onto the tail starting from round 4 of the tail downwards. Sew them at different angles for a cute look.

Important Notes

  • πŸ’‘When using different yarns and hook sizes, the outcome may vary and you may need to adjust the size of eyes
  • πŸ’‘Use invisible decrease crochet stitches when decreasing for a neater result and smoother finish
  • πŸ’‘Work colour changes at the end of the previous stitch by not completing the last stitch until you have 2 loops on your hook, then yarn over with the new colour
  • πŸ’‘Fill the head evenly without any bulges and avoid overstuffing which causes stitches to stretch and holes to become visible
  • πŸ’‘For the tail, start filling very early as you go, keeping it very loose at the bottom but firmer as the tail gets wider
  • πŸ’‘Use pins to position all parts before sewing to ensure correct placement and symmetry
  • πŸ’‘If the doll is for a small child, sew the wig onto the head for safety, otherwise it sits tight enough without sewing

This enchanting Lulu the Mermaid pattern combines classic amigurumi techniques with beautiful artistic details to create a truly magical companion that will be treasured for years. With four gorgeous color variations included, you can create unique mermaid dolls with different personalities and styles, each featuring flowing hair, graceful tail fins, and delicate embroidered features. The pattern includes comprehensive instructions for special techniques like eye modeling, wavy hem details, and hair wig construction that bring your mermaid to life. Whether you're creating a gift for someone special or adding to your own collection, this pattern offers both an enjoyable crafting experience and a stunning finished result. πŸ§œβ€β™€οΈπŸ§Άβœ¨

You ask,

we answer.

FAQs

What size will my finished mermaid be?

When using cotton yarn (approximately 115 yards per 50g) with a 2.5mm crochet hook as recommended, your mermaid will be approximately 26 cm (about 10 inches) tall. If you use different yarn weights or hook sizes, the final size may vary.

Can I make the mermaid without the hair wig?

Yes, you can modify the design! Instead of the removable wig, you could crochet the hair directly onto the head or embroider hair details. The wig design allows for easy customization and styling, but feel free to adapt it to your preferences.

Do I need to use the exact yarn brands mentioned in the pattern?

No, the Babytoly and Ecobebek yarns mentioned are recommendations for specific colors. You can use any cotton or acrylic yarn with similar weight (approximately 115 yards per 50g). Just ensure you maintain consistency in yarn weight throughout your project for the best results.

How do I create the S-shaped curve in the tail?

The S-shaped curve is created through the strategic placement of increases and decreases throughout rounds 6-23 of the tail section. This asymmetric shaping creates natural curves. When attaching the head to the body, position it so the curve is visible for that graceful mermaid posture.

Is this pattern suitable for beginners?

This pattern is best suited for intermediate crocheters who are comfortable with basic amigurumi techniques like magic rings, increases, decreases, and color changes. The pattern includes advanced finishing techniques like eye modeling and embroidery that may be challenging for complete beginners.

Can I make this mermaid as a toy for young children?

Yes, but with modifications for safety. Sew the wig securely onto the head, ensure safety eyes are properly attached, and reinforce all sewn parts. Avoid using small decorative elements like separate flowers that could become choking hazards. Always supervise young children with handmade toys.